|
|
||
|
|
|
|
|
|
||
Communications on the Road
|
|
|
|
|
|
Copyright © 2002-2017 John Mayer. All rights reserved. For reuse policy see Reuse Policy In this Section:
Reviews
The discount coupon for any WiFiRanger product is back. Get 5% off your order when using the code WFRMAYER at checkout. The Mobile Internet Handbook, Second Edition (2014) is now available. Take a look HERE for further information. This is the best resource for how to connect to the Internet while Mobile. There is nothing else even close to being as comprehensive on the market today. It is available in all formats - PDF, iBooks, Kindle, and print. Disclosure: I gain nothing financially from this, but I did write a chapter on antennas that is included in the book.
Resources:
I have no affiliation with any of these providers. I recommend them on their merits alone, and my recommendations do change over time. I have done independent testing of some of the products they sell, but I receive no compensation for that.
This section covers ways to acquire and improve cellular and WiFi signals and redistribute them in your RV. The principles cover both voice communications and data communications. The problems are the same:
It may sound simplistic, but solving these issues is really what the myriad of available products do. How far you go in resolving them usually is indicative of the price involved. Simple solutions are usually the cheapest, but don't fully address the issues, while complex solutions cost more but provide better performance. There are three common ways to get Internet when away
from phone lines (physical lines that support DSL, or cable lines). For the very best "primer" on all of the options available to maintain connectivity on the road, take a look at the ebook by Technomadia, The Mobile Internet Handbook. I highly recommend it - it covers all of the options available, in an entertaining and highly understandable fashion. The sections I provide below are best read with an understanding of the basics of communication, which this book provides better than any other source I know of.
We often get asked which cell phone provider to use for best coverage. There is no definitive answer – it really depends on where you travel and how you place your calls. We use the Verizon Shared Data Plan. This has provided us excellent coverage across the nation. Others use AT&T and report equally good coverage. It just depends on where you place your calls from. Fulltiming friends of ours were on our Verizon Family Plan. They also had their own AT&T plan, which they gave up. They found that for their use Verizon gives them better coverage than AT&T in the places they travelled. In my opinion, if you are a current user of Verizon or AT&T, then I would just stick with your current provider and see how it goes. You can always switch later.
Some people use and like ATT. In places where ATT has a strong network they may be a good choice. However, on balance if you are going to have a single provider for both voice and data Verizon is the best choice.
Notice we have not mentioned any of the “smaller” companies. They may give really good service in a specific area – in fact better than Verizon or AT&T – but they do not have the nationwide coverage (in practice) that the big guys have. Personally, I would not recommend them, but if you are already with one of them you have nothing to loose by sticking with them and seeing what happens.
Many of the newer phones do not have external antenna connectors - this is especially true of "smartphones". So you may be "forced" to use a phone without one - there are inductive "patch" antennas available, as well a cradles and wireless amps that help solve this issue - these devices are discussed in the antenna and amplifier sections below.
One technique that some people use to maximize their data connectivity is to have two smartphones with hotspot capabilities. One phone on the ATT network, and one phone on the Verizon network. They then add a cellular modem on the Verizon network. This provides data coverage for either network - either via the modem (primary) or a hotspot from the phone (secondary). The Verizon and Sprint networks share towers and you can roam between them; ATT uses a different technology and has its own towers. Having both available maximizes connectivity. This increases the cost of service, however. Cell Phone Antennas and Amplifiers
An external cellular antenna will help with both data and voice calls if and only if there is a signal of some sort present. The antenna can not "magically" produce a signal for you. But if there is any signal available in the area you are in, the antenna will make a "night and day" difference in voice quality, the ability to sustain a call with out "drops", and the speed of a data connection. In combination with a good amplifier a proper antenna will take you from no signal - and no ability to make or receive calls - to "normal" operation. For any constant traveler I recommend that you get a good antenna and amplifier from the beginning. It is only a matter of time before you encounter an area of marginal signal. If you do not move around a lot, and have a decent signal in your routine locations, then you really would not benefit from an antenna and/or an amplifier so it would be best to save your money for other "toys".
There are a number of antennas for use with cell phones. There is much hype associated with antennas, and many claims for performance not matched with real life results. Antennas are rated in the amount of "gain" (over using no antenna) that they provide. This is typically stated in dBi - as in, 6dBi of gain. You would think this would be a scientific measurement and an antenna with 12dBi of gain would outperform an antenna with 6dBi of gain. But this is not always the case, so real-world experience and testing is important in choosing an antenna.
Most antennas come with 12' or so of cable. That may not be enough for where you want to mount the antenna. But with antennas, the length and quality of the cable is as important as the antenna itself. The shorter the cable run, the better - adding extension cable to the antenna should be avoided if possible. If forced to extend the antenna cable, then only high quality cable should be used. Good cable is relatively expensive - expect to pay for it.
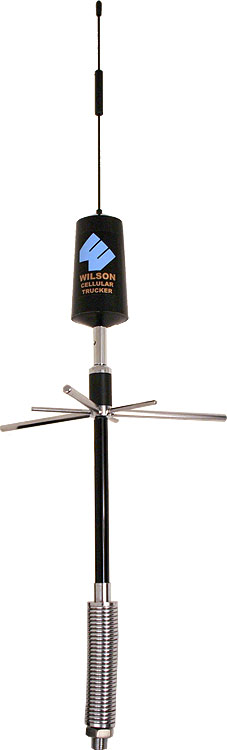
Many RVers use the Wilson Trucker Antenna. There are actually several models of the Wilson Trucker - and all three of the commonly used models perform well. One is designed for use on RVs and has a long threaded shaft extension designed to go directly through the roof of the RV. It can be cut off and mounted on a bracket on the roof if you do not want to penetrate your roof with it. We use this shorter antenna permanently mounted to the side of one of our solar panels. The advantage of using this on the roof is that the antenna is relatively short and will not get caught on tree branches as easily.  
The second model of the Wilson Trucker is designed to be mirror mounted on a truck mirror. The disadvantage of roof mounting this is that it sticks up pretty far and is subject to limb damage. If you choose to use this on the roof, make sure you mount it on the far left of your rig, and use an antenna spring to minimize damage. There is a version of this taller antenna with an integrated spring mount - the antennas perform the same, they are differentiated only by their mounting methods.
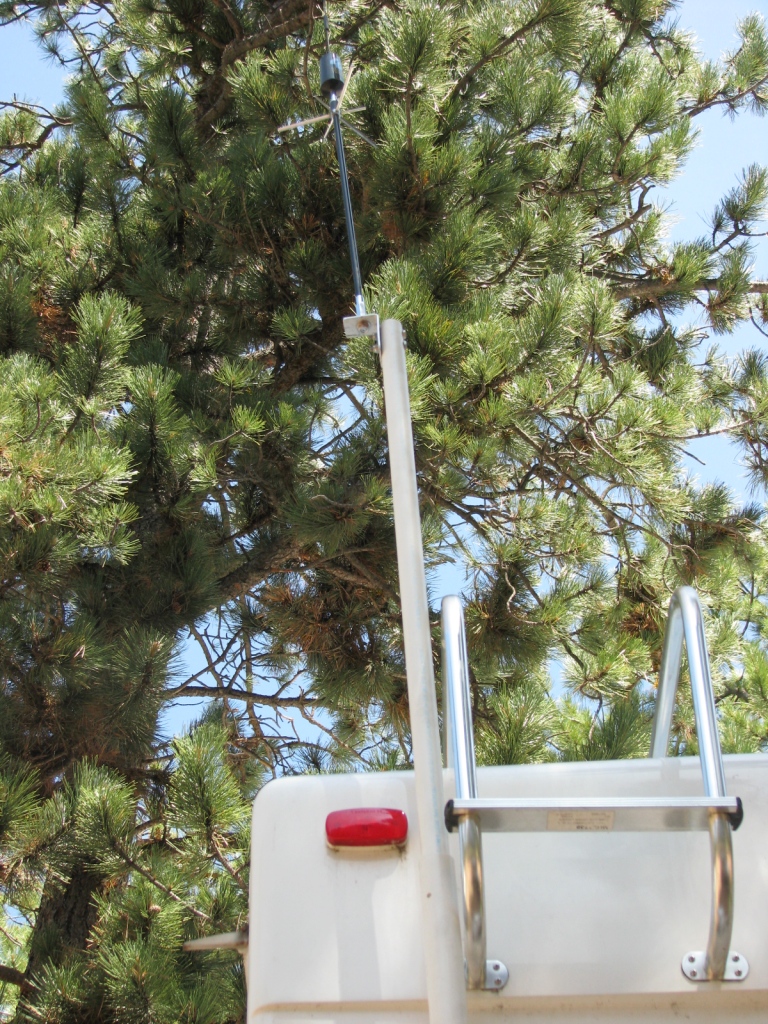
In my opinion, the proper use of this version of the antenna is 1) on a mirror arm, as designed, 2) a permanent mount on the side of the RV with just the top of the antenna projecting above the roof (the radials need to be above the roofline), 3) on a PVC pipe or extension pole that is temporarily attached to the RV slide or ladder with clamps when in camp. Both versions of the
 The The
An excellent alternative to the Wilson antenna is the Super Trucker Antenna, sold by Maximum Signal. This is a high gain 30" antenna enclosed in a fiberglass radome. It comes with the mount and spring for a very reasonable price. I own this antenna and it performs very well. As well or better than the Wilson Trucker in side-by-side comparisons. It would be best mounted on the side of the RV. It does have a built in ground plane so it can be mounted to fiberglass. MaximumSignal also sells a "regular" Trucker antenna. It performs about like the Wilson Trucker, but costs a little less. It also can be mounted on fiberglass.
Here are my suggestions for the “typical” RV setup.
A car antenna should be magnetic mount, and attachable to the amplifier. I prefer the MaximumSignal magnetic mount antenna - it will connect directly to the Cyfre amplifier. It is available as part of the Mobile Kit, which includes the amp, an antenna and all the connectors and chargers needed. This kit is an excellent value and works great. The Cyfre amplifier from Maximum Signal is my first choice for a wired amp (see the Amplifier section, below). The mobile kit supplies everything you need and will give you an excellent magnetic mount antenna for use on your "toad". If you insist on a Wilson amp, then the Wilson amplifier for Verizon and Cingular is the one on the referenced link. You will need the specific adaptors that go on the end of the 6' cable that comes with the amplifier and connects that cable to your phone. They will tell you what you need when you call. Or you can find them on their adaptor area of the website.
You may need
an extension for the amp or the wire from the amp to the phone. Try
to avoid this if possible, since it diminishes the signal.
Antenna Mounting Methods
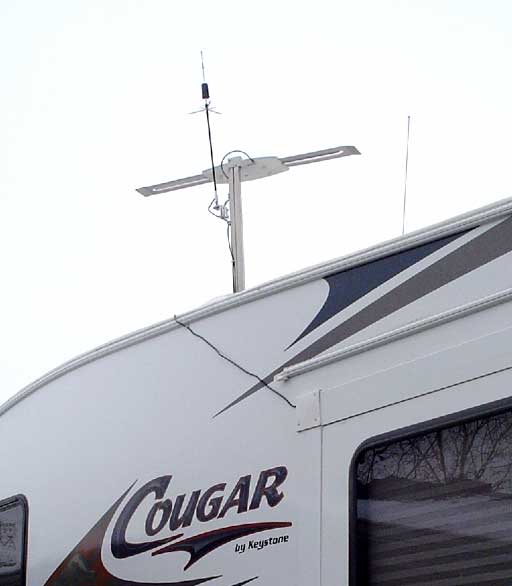
An alternative to using a pole to temporarily mount the antenna is to permanently mount it on the side of your batwing TV antenna. This allows for flat storage on the roof during travel, and for a high elevation when the batwing is raised. This may not meet your needs in a motorhome, since you might want to use the antenna while driving and it will not work well in the horizontal position.
George Miller came up with a nifty mounting method using an exterior door handle riveted to the mast of the batwing. Using the door handle allows the mirror mount that comes with the Wilson to be used, and offsets the antenna radials from the roof to permit flush storage. Your specific batwing may require an adaptation of this technique - but this will give you some ideas. Like the pole-mount method, you can route the antenna cable in through a window or slide for temporary use, but a permanent routing of the cable is probably more convenient with the batwing mount.
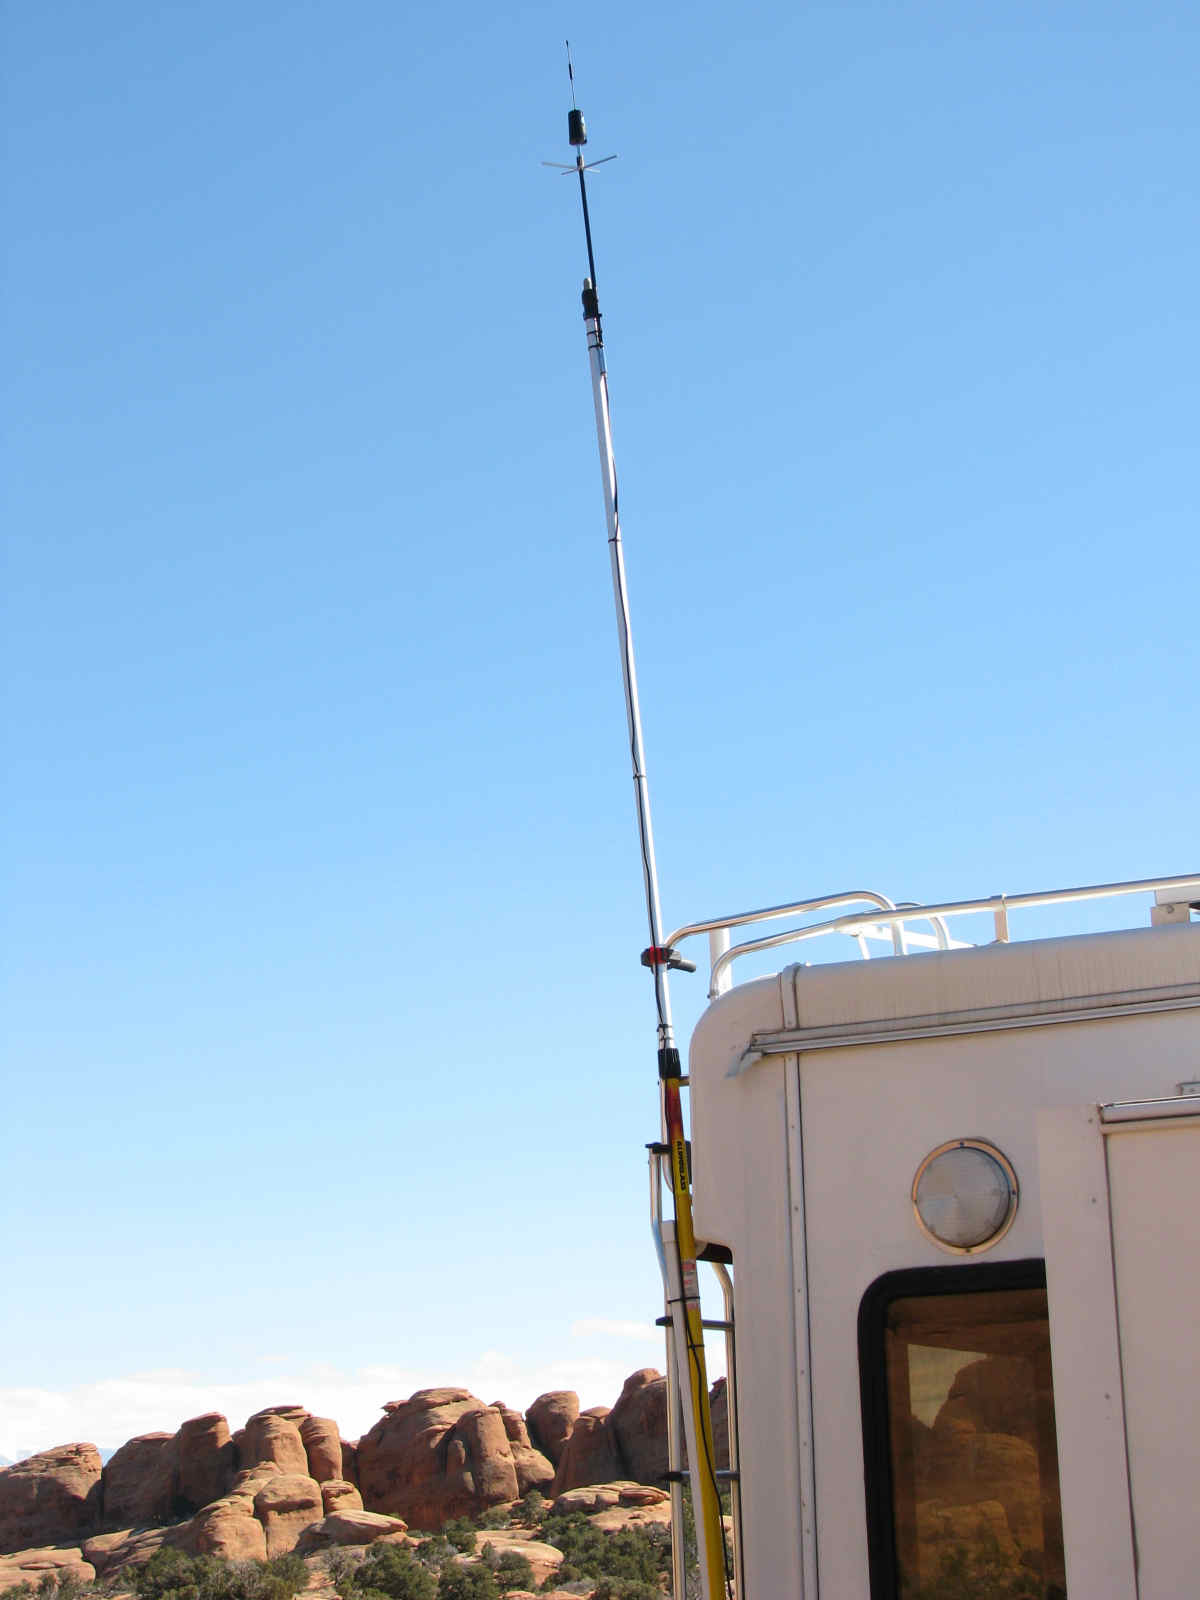
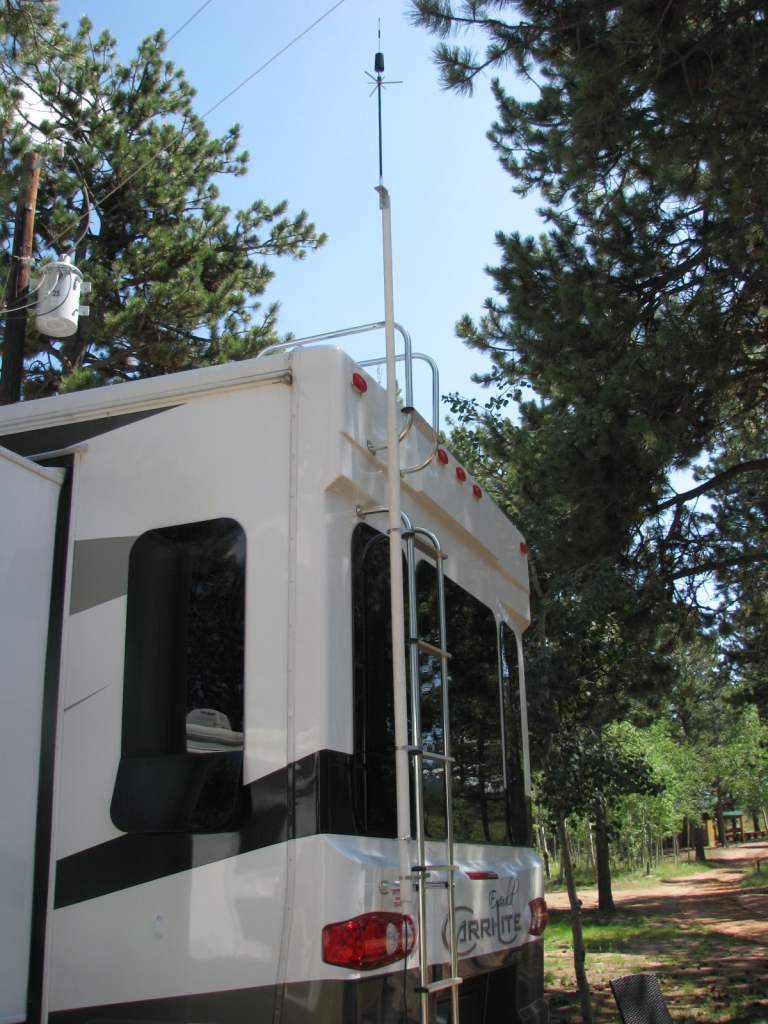
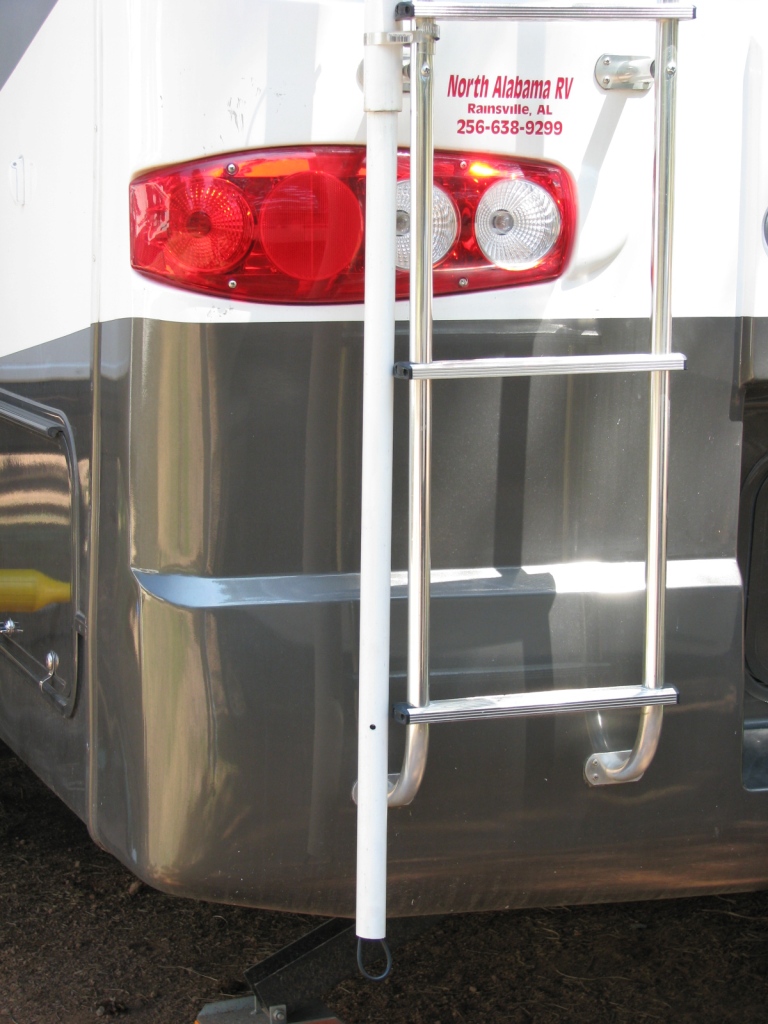
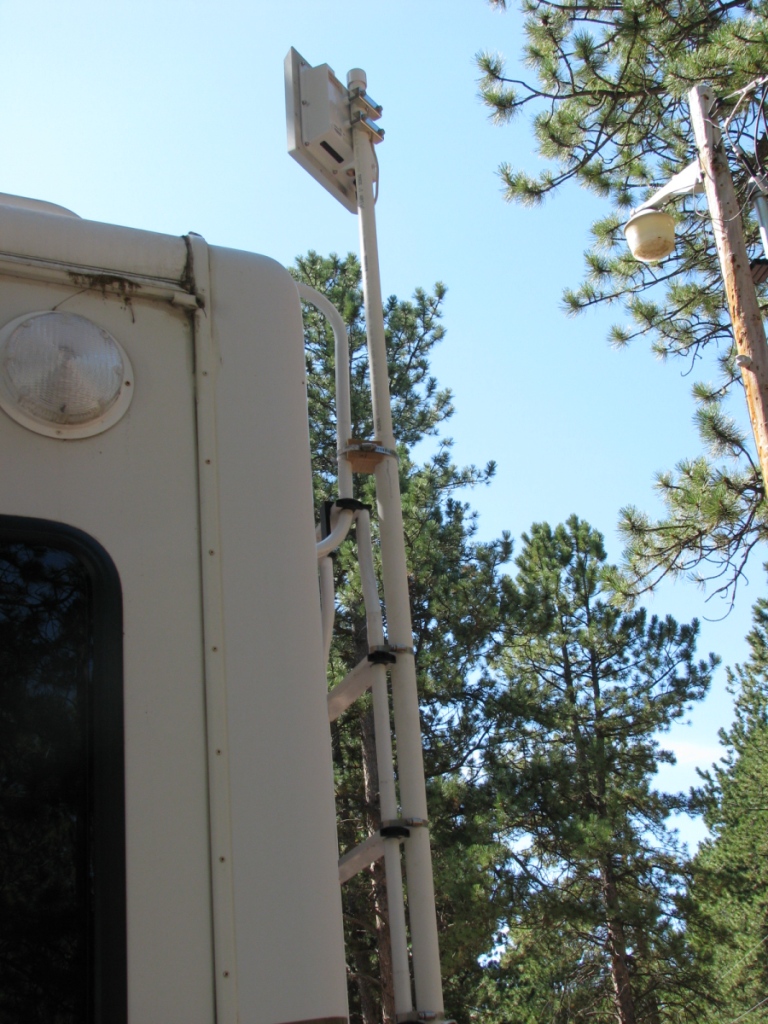
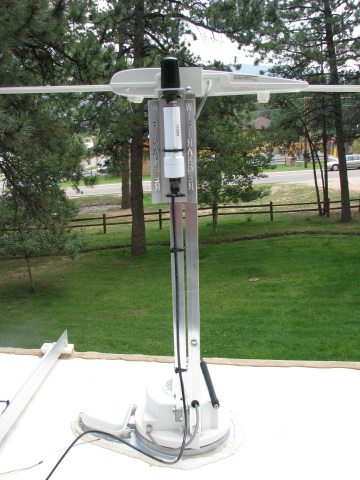
The far picture shows the antenna in it's raised position. Depending on how long the "sleeve" is and the location of the "pin" you can generally get the antenna 4' above the roof and still be able to easily position it from the ground. The second picture shows the antenna retracted for travel. You need to ensure that the inner "pole" (the 1" PVC) is not so long that it could hit in a dip while travelling. A careful look at the picture will show the pin hole location - place it where it works for your combination of sleeve length and mounting height. You can also see the antenna wire exiting from the bottom of the inner pole. For travel, this is just loosely folded over and pushed up inside the pole - friction will keep it in place, but it is a good practice to cap the bottom of the pole with a 1" cap (drill a hole in it to drain water).
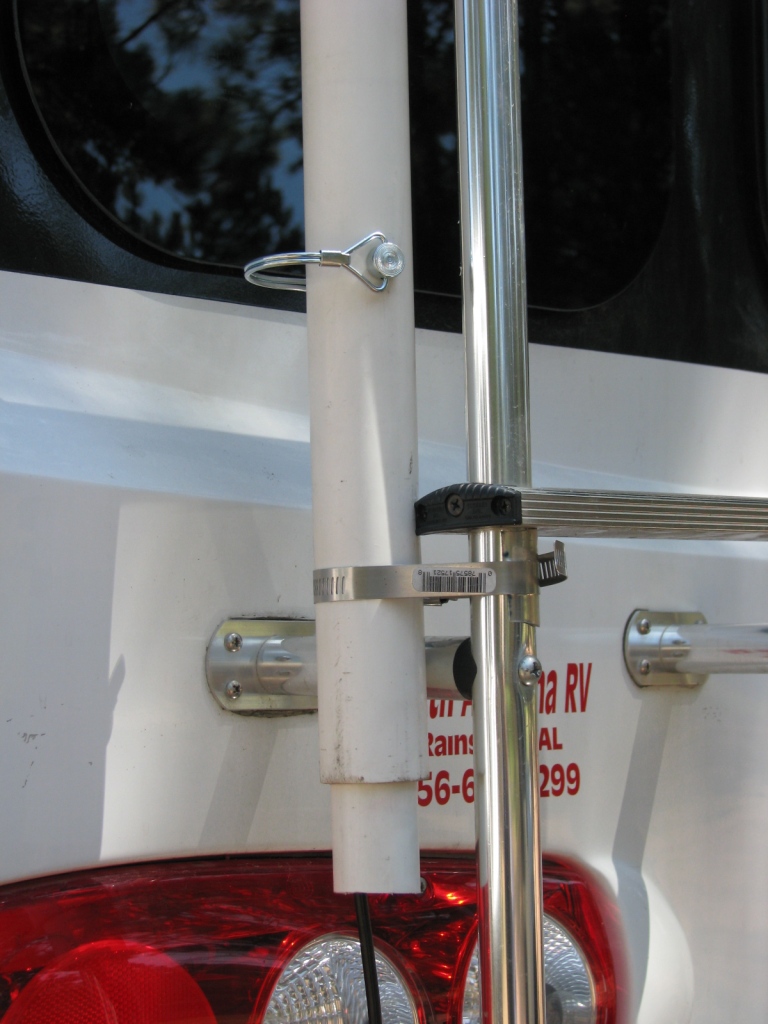
When attaching the outer sleeve to the ladder, make sure you snug up the pipe clamps fairly firmly. Once you put some miles on the rig check them for tightness, or you may find yourself dragging the pole down the road. Generally, this is not a problem. I use clear plastic tubing cut in 1" pieces and "sliced" to wrap the ladder under the clamp. That prevents any damage to the ladder from the clamp. If you look closely you will see the plastic tubing under the clamp in the picture on the left.
The antenna is attached to the top of the pole with a simple bracket fabricated from 1/8"x2" flat aluminum stock. Simply bend it in a "L" shape and drill a 3/8" hole in the top L to bolt the antenna through. Use a stainless nut with lock washer, and coat the treads with red thread lock before tightening. Attach the long part of the "L" to the 1" pole with two 1 3/4" stainless bolts with nylo-lock nuts. The nuts and bolts keep the inner pole from dropping through the sleeve when retracted.
Your 15' extension line from inside attaches to the 12' antenna line when the external antenna is required. Routing locations for the 15' extension are installation dependent, but many people just pop it through the slide seal, or in through a window.
Parts list:
click on pictures to enlarge
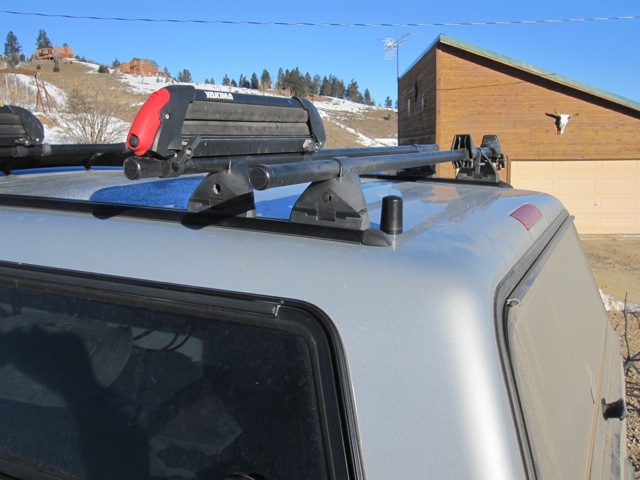
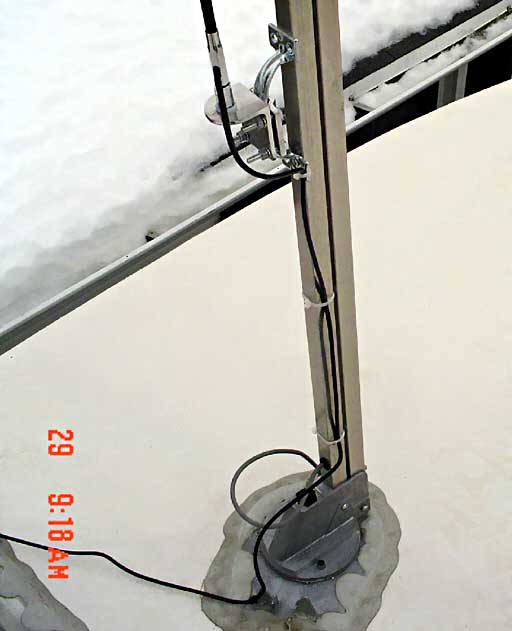
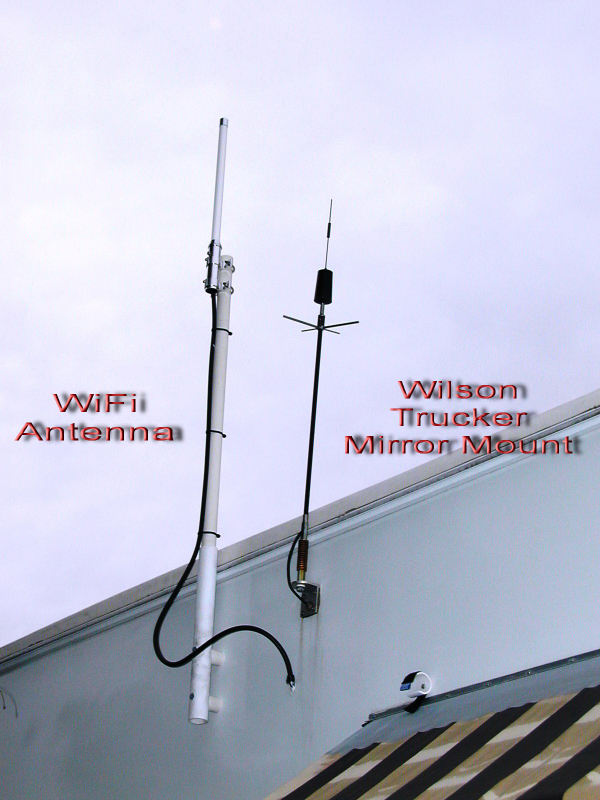
The right antenna is a mirror mount Wilson Trucker, permanently mounted to the left side of the RV. This keeps it relatively safe from tree limbs. There is also a spring on this Wilson (we added it) to offer further impact protection.
Both of these antenna leads enter the RV directly through the wall into a cabinet. The disadvantage of this mounting method is the permanent holes in the side of the rig. But in many cases this is the most logical way to get the leads inside. Particularly in the case of a slide out where the entertainment center and desk is located, this may be the only viable option.
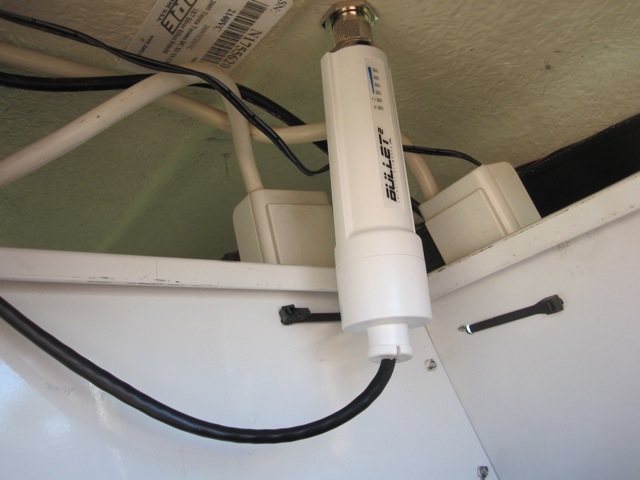
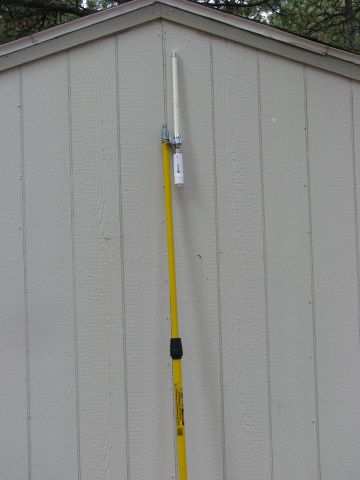
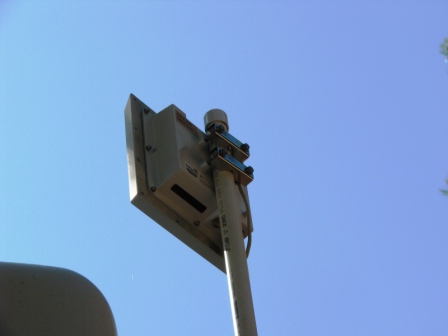
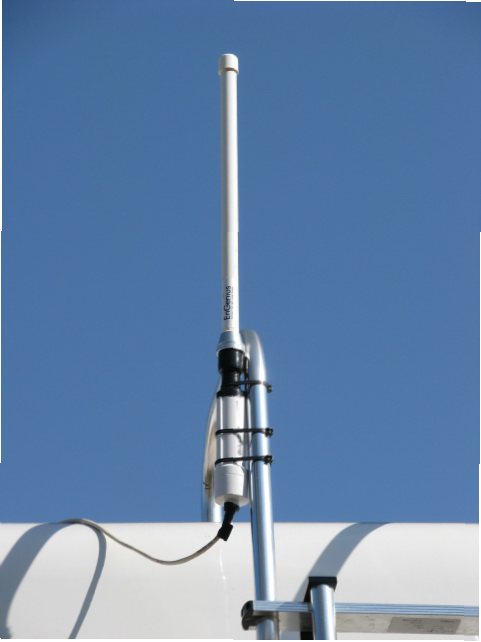
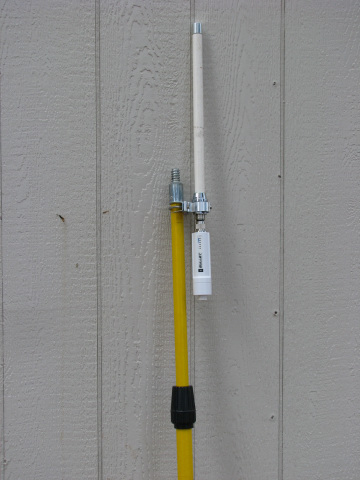
This is a Ubiquity Bullet with 8dbi omni antenna mounted to a painters pole. This makes a great temporary mount - you take it down when you travel. The Bullet makes a very good CPE. See the sections below for additional details on using this for better wifi capture.
Wired
Amplifiers
The amplifiers covered in this section - both wired and wireless -
only work with 3G devices. There are currently no amplifiers
available for the new 4G networks. With Verizon, 3G is on the 800MHz
and 1900MHz bands, and 4G is on the 700MHz band. This situation is
sure to change in the future, so keep your eyes open for 4G amps as
you move to the 4G services.
The type of amp you need depends on your phone provider and what
technology they use. We use Verizon so we use the dual band CDMA
amplifier. The Wilson amps come with a 12-volt car adaptor - if you
want a 120-volt adaptor it is extra. They also come with a 6'
extension cord that you use between your phone and the amplifier. If
you want to be farther from the amp than 6' you need to purchase an
extension cable with the appropriate connectors on it. You also need
the appropriate adaptor for your phone, so make sure you order that
with the amp. If you already use an external antenna, then that
adaptor can be used - you only need one.
The connections go like this: from the phone an adaptor specific to
your phone model connects to
the 6' extension cable. The extension cable plugs into the phone
side of the amp. On the antenna side of the amp you plug in your
external antenna.
The Wilson amps put out 3 watts on the 800MHz band, and 2 watts at
the 1900MHz band.
Wilson is not the only maker of cellular amplifiers.
Maximum Signal sells the
high-quality Cyfre amps for a very reasonable price. They are one of the few
(or only) amplifiers approved for use by the cellular carriers. They are cheaper than the
Wilson, as well. Originally, we used one of these amplifiers for our cell phone,
and relegated our older Wilson amplifier for the aircard. Now we use
a Cyfre with the aircard and use a wireless amp with the other
devices. The Cyfre is an excellent
amp, runs completely cool, is cheaper than a Wilson, and is approved
by the cellular providers. In combination with the Maximum Signal Trucker antenna
(different than the Wilson Trucker) it makes a very good
combination for pulling in maximum signal. In testing in 2009 this amplifier
outperformed the Wilson slightly in my personal testing, and is the
one I would choose first. It does use different connectors than the
Wilson antennas, so if you want to combine it with an existing
Wilson you have to get the appropriate adaptor - which is only a few
dollars. The best thing to do if starting from scratch is to combine
it with a Maximum Signal trucker, if side mounting. If roof mounting
I'd recommend either the short Wilson RV antenna, or the magnetic
mount from Maximum Signal.
Let me be real clear about the 3G wired amplifiers. We have both a Wilson and
a Cyfre, and I have tested both of them with various combinations of
antennas (5 different antennas). While we have had the Wilson for
many years and gotten good use from it (and still do) the Cyfre is a
superior amplifier in my experience. We would buy another Cyfre if
purchasing a replacement for one of our current 3G amplifiers.
At the present time (2014) I recommend waiting until the current
crop of 4G wireless amplifiers hits the market. That is, unless you
NEED to have an amp right now. In that case I'd consider using a
Wilson Sleek as an interim solution.
.
Wireless Amplifiers
Wireless amplifiers allow multiple devices (phones and aircards) to
use the same amplifier without a physical connection to the amp.
They all use two antennas. The "phone" antenna is inside the RV and
is used to communicate with the phone(s), aircard or other
cellular-capable devices (maybe your Kindle). The "tower"
antenna is external to the RV and communicates to the cellular
tower. The "phone" antenna has to be some distance away from the
external "tower" antenna. That distance varies depending on the
hardware and software used in the amp - it may be as far as 45' of
separation, or as little as 12'. That may be hard to do in an RV and
still be able to conveniently use your cellular devices.
It is tempting to use a wireless amp and eliminate the requirement
for a phone antenna adaptor, and to enable use of multiple devices
at the same time (2 phones, a phone and aircard, etc). In the
past my
problem with this is that I could not found a wireless amp
configuration that works well in an RV environment. The other issue is
that the "phone" antenna (interior antenna) typically has to be pretty close to the
phone or aircard. In many instances I have tested there is no signal
boost on the phone unless the phone is within 2-3' of the interior
antenna.
With the widespread availability of 4G networks I do not recommend buying a 3G amplifier unless you absolutely need to. Affordable wireless 4G amplifiers are just starting to hit the market. Wilson has a new wireless amp that is currently the best performing of the 4G group. It has interior device distance limitations, though. The best alternative at this point in time is the Wilson Sleek, discussed below. I would wait for the dust to settle on the wireless 4G amps before buying.
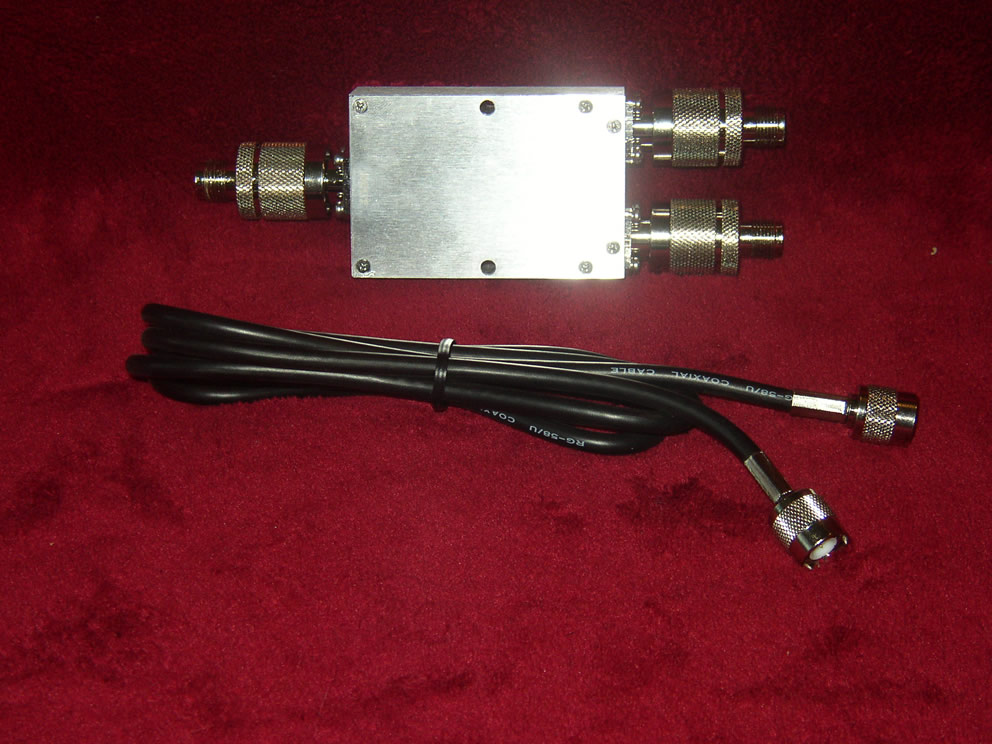
Splitter/Combiner
The disadvantage of using a signal splitter is that it diminishes (attenuates) the signal. But if you place it before the amp then the amplifier should overcome most/all of this. The splitter shown attenuates the signal 3 db. This is an acceptable tradeoff for the function provided but only if you use it with an amplifier. Do not use a splitter without an amplifier - it attenuates the signal too much.
Internet on the Road
Introduction
The purpose of this section is to provide the information
necessary to make rational decisions on products, with the goal being to
connect to the Internet from your RV. The idea is to make sure that all of
your local devices - computers, tablets, wireless printers, TV, DVR, etc.
only "know" about one network - the local one (LAN). The difference between
your RV and a "home" setup is that in the RV there is the potential for
multiple ways to connect the RV LAN to the Internet, based on where you are.
In a home environment (meaning a "fixed" environment) only one method is
typically used to connect to the Internet - often that is DSL or Cable.
Just as in a home system, the RV LAN is managed by a
router. This is typically a "cellular router", meaning that the router can
have a cellular aircard plugged into it and use that as a method to connect to the
Internet. Most modern cellular routers can also pick up WiFi signals
(hotspots) and use
them to connect to the Internet as well. A perfect example of this is an RV
Park that has a WiFi network - the router in your RV would pick up this WiFi
signal, and use it to connect to the Internet. Or, if the WiFi signal in the
park fails, the router could switch automatically to the cellular
aircard inserted into it. In this section I'll discuss how these work, and some available solutions. That is where it gets more complicated - as they say, "the devil is in the details". Millenicom (www.millenicom.com) is a reseller of mobile (cellular) broadband. They sell plans on the Verizon 3G and 4G networks. The Hotspot Plan is Verizon. This gives you 20 gigabytes a month with no contract. You have to buy their Jetpack device - you can not use your own equipment. They used to resell on the Sprint network, as well as Verizon, but they no longer have a relationship with Sprint. You can also get an iPad mini, or an iPad Air on the T-Mobile network. T-Mobile does not have the coverage of Verizon or AT&T, but the "deal" on the iPad's is quite good, and they have been "unlocked" so you could use them on another network if you have a SIM for that network. They seem to work on AT&T if you have an AT&T SIM. The hotspot feature on them is also enabled. On all the plans you can keep the equipment they supply when you terminate service. There are setup charges, but no termination charges. There are also no taxes added on each month so the quoted price is what you actually pay. The current plan is offering a 3G/4G Verizon hotspot capability with a "mifi"-like device - now typically called a "Jetpack" - that is a combination wireless router/aircard. You get 20 gigabytes of 4G data for $90/month, with no contracts and no tax. They have been supplying the Verizon 4G Jetpack from Pantech (MHS291L). The device used can vary over time. Unlike the previous versions of the Jetpack, it seems like the Pantech does not have the same technical issues with drop-outs. We use it, and it operates well. If you have the older Novatel Jetpack it is worth the cost of upgrading it, in my opinion. Millenicom will not tell you who provides the network for the various plans - it is part of their resellers agreement. But the information above is accurate. On both the Verizon and T-Mobile service you get full access to the network, just like a "native" customer. There are no restrictions or throttling of data. The best tutorial and information source for Millenicom is on the Technomadia website - The Millenicom Verizon Hotspot Plan Survival Guide. This is a very good deal, and should be the first consideration when looking at a cellular data source. 4G is the term coined by the cellular carriers to refer to the new/next generation of transmission standards for cellular voice and data. While what is currently available is not truly 4G by definition of the standards bodies, it is still marketed as 4G to represent the fact that it requires new equipment, and is significantly faster than the current 3G technology. Effective actual speeds of Verizon LTE have been seen in use up to 42 mbps. This is actual use - not theoretical. As the systems become loaded Verizon says the expected speeds will be in the 5-12 mbps area (downloads), or perhaps a little faster. Still quite fast compared to today's 3G speeds, which average in use up to 1.2 mbps or so. I have personally seen Verizon 4G running at 32 mbps, and commonly see 12 - 15 mbps. Verizon and Sprint (along with its partner Clearwire) have the largest 4G networks at the moment. Verizon's service is called LTE and they started the rollout in December, 2010. It operates initially on the new 700 MHz bandwidth in many locations - but it can be on any of the Verizon bands (700, 800 and 1900 mhz). Because it may operate on a different frequency than the existing network it requires new modems (aircards), perhaps new external antennas, and new amplifiers. Verizon continues to buy frequencies (bands) so this is going to remain a (somewhat) moving target. Sprint's service is called Mobile WiMAX and operates on the 2.5 GHz band. It also requires new equipment. While the newer services do require equipment upgrades, it is worth the trouble and expense for the greater speed and better integration of voice and data on a pure IP network. From an end-user perspective through 2012 the issue is the degree of availability of the networks. AT&T has an HSPA+ network that has higher speeds than their previous networks. They are moving to LTE starting in mid 2011, but this will take some time. While the HSPA+ network is not bad, it is not as widely deployed as the Verizon network. If you are choosing only one provider for data, my advice is to choose Verizon. If you can afford multiple plans, then my advice is to get a 4G aircard on Verizon, and a shared data plan with smartphone on ATT. This will permit you to use the smartphone with a free hotspot - giving you the best selection of data networks no matter where you are. All of the vendors currently provide aircards that can handle 3G and 4G. The older 3G aircards are no longer sold by the network providers, but they still work on the networks - you can buy them on Ebay and from private parties. So what do you do? (as of February, 2014) If you are a current Verizon user of the 3G system Verizon has made moving to 4G attractive by pricing a 5GB/month 4G data service at $50 ($10 cheaper than your current 3G service). This can save you money if you are on a 5GB contract and not grandfathered into the unlimited plan. If you move to the 4G plan, even with an overage of 1GB for a month (total use 6GB) you would only pay your regular $60, since data overages on the 4G plan are $10/1 GB. Not a bad deal. And you can get 10 GB for $80. The 4G aircards work on the 3G system with your current antennas and amps, but if you want those same capabilities on the 4G system you need additional equipment - the Wilson Sleek is the only 4G amplifier I would recommend at the current time (review link at the top of page). Keep that in mind. If you use much data moving to the 4G network is probably what you want to do. The speed is impressive and the network is virtually everywhere now. Look at the pricing tradeoffs from your older plan, though. Sprint users can get unlimited 4G for $60 a month and fall back to 5GB of 3G on that plan. So if you frequent a 4G Sprint area that is a great bargain. Most people will consume more data on 4G because of the available speeds. But if you are most often in a 3G Sprint area you get no real benefit from the 4G pricing plan, and Verizon would be a better deal. And history has shown that Verizon will roll out the network faster and more broadly than Sprint - another factor to keep in mind. If you are new Verizon aircard/modem user, you have no choice but to go to the 4G plan, since they no longer market the 3G data plan for aircards. Anyone starting service at this time will be on a 4G plan, and 4G on the Verizon network is virtually everywhere as of early 2014. The cellular companies constantly change pricing plans. Verizon's "tiered"-structure data plan is shown below. 3G modems are not shown in the chart, but are still priced at $50/5GB for current users. New users have to go to 4G and the shared data plan. I included this only to give you an idea of the data plan structure - you need to go look at the Verizon plans directly on their website when researching your best option. If you are on this plan you can remain on it. But new customers must go to the newer "Shared Data" plan, described below. This stuff keeps changing - this is just an example of the shared plan structure.
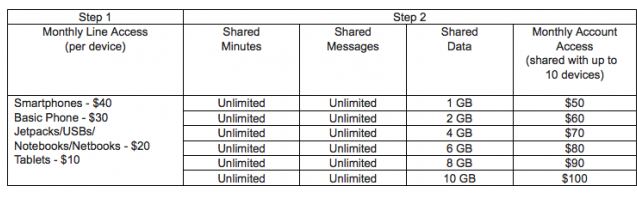
Shared Data Plans
Moving to the shared data plan is currently optional for existing customers. You can stay with the tiered "device/data" plan, where you pay for the device and it includes a certain amount of data, or you can move to the shared data plan, where the device charge is cheaper, and you buy a pool of data that all share. New customers MUST go on the shared data plan. If you are an existing customer and choose to move to the shared data plan, your USB aircard charge will drop to $20/month. So if you are entitled to a free upgrade get the 4G aircard (or a Jetpack). You have nothing to lose and you will have 4G speeds where available. Also, don't forget that you still have to fulfill your contract terms. For example, if you purchase a tablet with cellular capability from Verizon, you are on a two year contract for $10/month. That is $240 added to the price of the tablet. That may work well for some, depending on how you use the tablet. For others, purchasing a WiFi-only tablet on the open market, and turning on the hotspot on your phone is likely a better deal. Phone hotspots, minutes and texting are all FREE on the shared data plan. Cellular Data Modems and RoutersIf you want to send data over their systems the wireless providers require you to purchase some sort of data plan for use with a smartphone or to purchase an aircard that acts as a dedicated cellular modem. For most fulltime RV users, the air card is the preferred option since it is more flexible than a smartphone.
So what exactly IS an aircard? In simple terms, the aircard is a dedicated device (actually a modem) that allows you to send data over the cellular network instead of voice (as with a cell phone). The cellular provider then takes this data from the cell tower and connects it to the internet, just like a home-based ISP does. At home, many people use DSL provided by their local phone companies. There is a device that the computer plugs into called a DSL modem (often combined with a wireless router). The aircard takes the place of this DSL modem. In some regards, the aircard seems very much like a wifi adaptor - it is a wireless device that allows connection to the internet. But the technology used is totally different, although the result is the same.
The aircard is inserted into a PC or a "cellular router" and translates the data into the form that the cell system that you are subscribed to can understand. All of this occurs on the same cell towers that voice calls go through, although it is handled separately. Your air card has it's own "phone number" to identify it - although normally you do not have to know anything about this (except for on your bill).
There is currently only one form factor (physical configuration) of aircards used - a USB plug. The older Express Card format is no longer used, since all new computers only have USB slots in them.
As a "companion" to the aircard you can purchase a cellular router from a third-party supplier to use with your aircard - Verizon, ATT and Sprint do not sell or support conventional cellular routers, with the exception of the MiFi/Jetpack devices that I cover later. The router performs the same function as a "normal" home router does, but it is a special device that "knows about" cellular modems, instead of DSL modems or cable modems. You can not use your current house router with an aircard - it would not know how to "talk" to it, any more than a DSL router would know how to talk to a cable TV network. Using a cellular router allows you to set up a wireless network just like with a "normal" wireless router. Instead of using DSL or a cable provider for the backhaul (the attachment to the Internet), these special cellular routers allow you to plug your aircard into them for the backhaul. To talk to your computer, the router uses a wifi connection. You then use your computers wifi connection to access the Internet, just like with a conventional wifi network. (So, from your computer to the cellular router you use wifi; from the cellular router to the internet you use the cellular data system via the aircard.)
If you are thinking of an aircard instead of a satellite system, or as an alternative to just using WiFi, there are a number of things to consider:
Important: This is my opinion only, take it for what it is worth. Do not shop price on a router and aircard. Shop service. Especially if you are not a networking expert. If and when something goes wrong you need someone to call.
Because we fulltime in our RV, and space is at a premium I initially chose a very compact router. I bought the CradlePoint CRT350 and a USB aircard to go with it. For the aircard I chose the Verizon USB727 (made by Novatel) because of the compact form factor, the ability to use a microSD card with it, and the fact that it has a very good loop antenna should I choose to use it without the external antenna. Those initial choices were many years ago, now. Choosing an aircard today, you want to make sure that you get something that supports all of your cellular providers 4G bands.
Things have changed radically since 2008. Today we use a Jetpack that gets all of the 4G LTE bands. Speeds that we never even contemplated back in 2008 are now considered SLOW. I've seen speeds of 72 mbps on my phone - never even thought possible back in 2008. Now, if my Jetpack can only get 2 mbps service I consider it almost "unusable".
Data plans have changed a lot over those years as well. It used to be that if you exceeded the 5GB of data that Verizon includes with its non-shared data plan you could be cut off. Now, you simply get charged $10 for each additional GB of data. Or, if you are on a shared data plan, you get charged $15/gigabyte of data for overages. But what does 5GB mean to the "normal" user? Five gigabytes a month is 166 MB a day - every day. You would be unlikely to exceed this limit unless you were downloading/uploading very large files routinely, downloading movies, or streaming a lot of video or audio. Software updates can be large so you might consider turning off the automatic download feature and manage software downloads when you are on a wifi system, or when you know the size. If you are just surfing the web, doing email, updating websites and blogs, and occasionally viewing YouTube videos, then 5 GB may be enough for you. If, however, you run a business online that requires large file uploads, lots of photos, or constant video streaming, then you need to investigate a little closer. I suggest that if you have not had an aircard in the past, and decide to get one, that you monitor your usage on the Verizon website on a daily basis. This will give you a very good idea of what you are using, and you can adjust your data plan as needed. You can adjust your plan online as often as you like - with no service charges - to ensure you do not exceed your plan limits.
I'm often asked how much data we use. We have a 30 GB data plan with Verizon. I've never exceeded it. I can usually live within 20 GB.
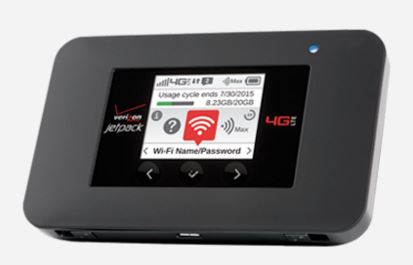
Verizon, Sprint, AT&T and other providers all offer the Jetpack for Internet access. The Jetpack is a small device that combines a wireless router and cellular modem (aircard) into one device. It is battery-driven, or can be plugged into AC or DC for static location use. The battery lasts about 3-4 hours, or more, depending on use. The device is small enough to slip into a shirt pocket for “walk-around” hotspot capability – or just throw it on the dash of your car. It allows any WiFi-capable device (like an iPad, Android tablet, or Android phone for example) to connect to the Internet without any cables or other modifications. All in your pocket. All the providers now have a 4G device available. The Netgear 791S is shown below.
Note: the MiFi was the original name of this device. It has been "rebranded" to be called the Jetpack. Conceptually, they perform the same functions. The early MiFi devices were pretty unreliable. The early Jetpacks less so, but still pretty bad for many people. The later Jetpacks - the Pantech 291 series or newer - are very reliable. Current the "best" mobile hotspot sold by Verizon is the Jetpack AC791L. This device is worth upgrading to if you have an older Jetpack. For the travelling RVer this device at first blush seems like a great alternative to an aircard/cellular router combination. But there are tradeoff in using this combination router/aircard. Only YOU can balance the pros/cons and determine what works the best in your circumstances.
Most people purchasing a Jetpack on today's market are going to be using 4G most of the time. Boosting a 4G signal is problematic at the moment. The only practical way to do it with the Jetpack is to use a Wilson Sleek 4G, which will provide some measure of boost to 3G and 4G bands. Wireless boosters are starting to be marketed - they should help boost the power of the Jetpacks. I wrote a review on the Wilson Sleek that you can find at the top of this page in the Resource section. One note on the Wilson Sleek Cell Phone Booster. If you use this cradle with a phone you either have to use the speakerphone or a headset/bluetooth adaptor for the car radio. All of the 4G equipment (phones, modems and Jetpack hotspots) use SIM cards for network credentials. You can move the SIM between devices at will and they will operate fine. For example, you can move the SIM from a phone into a Jetpack. There are different size SIM's and you may have to use adaptors. You can find SIM adaptor kits on Amazon. Since the links change a lot I won't provide a direct link, but if you search on "sim adaptor" you should find what you need.
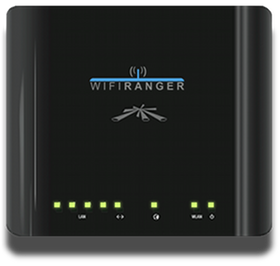
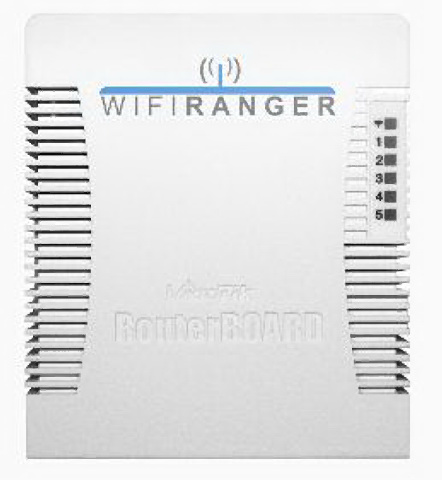
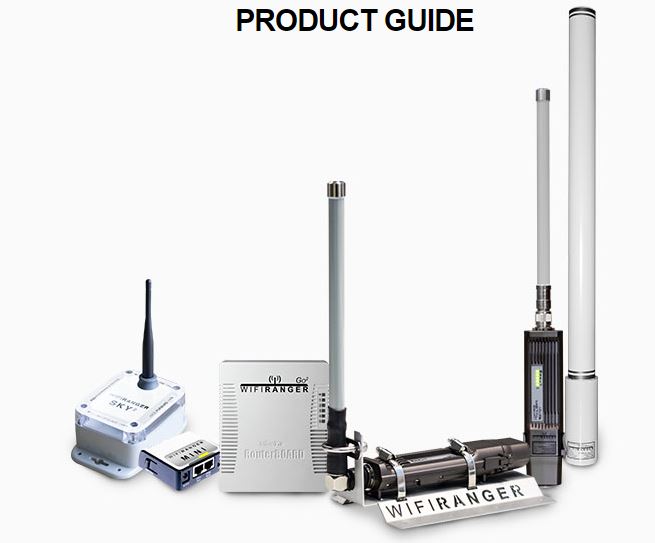
Shown above, left to right: Original WiFiRanger Home, WiFiRanger Mobile with "clamp mount", original WiFiRanger Go The 2015 WiFiRanger product line is shown below. The product has evolved greatly since its launch. The current generation of firmware and hardware is "best in class" in the 2015 marketplace, in my opinion.
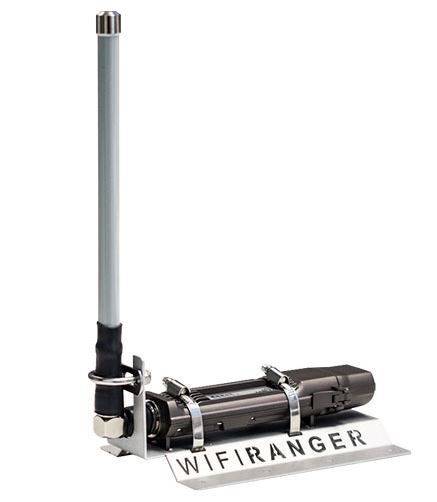
The discount coupon for any WiFiRanger product is back. Get 5% off your order when using the code WFRMAYER at checkout. Let me be perfectly clear: for most people one of the WiFiRanger (WFR) routers is the one you should have....read more on why I think so, below. I may seem to be pushing the WiFiRanger - but that is based on its merits, not because I have anything to do with the company (other than acting as a beta tester). There is no other product available that performs all the functions of the WFR with a simple user interface. WifiRanger (WFR) is a family of products that enhance connection to wireless (WiFi) networks. It consists of routers and associated rooftop radio products that pick up wifi signals, enhance them, and then repeat them for your use on a LAN. Like home routers they provide for a local network for your use, with both wired and wireless capabilities. What distinguishes the WFR products from conventional home routers is their ability to keep you connected to the Internet in a mobile environment, as well as a fixed environment like a house. They do this by picking up wifi hotspot signals that are too weak for other equipment to capture, and they also permit you to attach a cellular modem for connection to the Internet when wifi hotspots are not available. What differentiates the WiFiRanger family of products from other devices that perform similar functions is 1) the very simple user interface, 2) the ability to capture wifi signals from hotspots that other devices can not even see, and 3) various advanced capabilities like backhaul bonding and secure tunnels. The WiFiRanger products can be divided into rooftop units, and inside units. The function of the rooftop unit is to better capture wifi signals and repeat them for your use. They either repeat them wirelessly if you don't have an inside unit, or they send the signal to your inside router over Ethernet for your use. The currently available rooftop units are the Sky2 and the Elite. These can be used alone, or in combination witht the interior unit. I almost always recommend use with an interior router. The interior unit is the Go2 router or the new "Mini"router that is only available packaged with the Sky2. This is the heart of your system, and acts as a wireless router. It accepts Internet connections from cellular modems, cellular wireless routers, the wired rooftop WiFiRanger products, or from conventional cable/DSL modems. It can handle all these connection types and present one wireless local network for your devices to connect to. Your devices only need to know about the Go2 connection, even when your Internet source changes depending on what is available to you. This is a major benefit in managing your local network, and one of the primary reasons to use this tecchnology. The current technology cycle of these products is based on MikroTik products; it was previously based on Ubiquity hardware. This changes over time as "best in class" hardware evolves. The key to the entire thing - and what you are paying for - is the very advcanced WiFIRanger firmware that controls the hardware. The rooftop and interior units can be combined in various packages or purchased individually. The Elite rooftop units can be configured as a flat mount or a vertical mount. The flat mount provides for a lower profile unit that is attached directly to the roof. The vertical Elite is best pole mounted or attached to a batwing antenna. Since many RVs no longer have a batwing antenna, the flat mount Elite services those coaches. The first picture above is the original WiFiRanger Home. It was replaced with the original Go, shown below it. The second picture shows a WiFiRanger Mobile mounted to my batwing antenna. The Mobile and Marine are auxiliary radio/antenna devices whose purpose is to pick up more distant access points or hotspots, and repeat them to the WiFiRanger Home or Go routers for redistribution across your network. These are not just antennas, but powerful radios in and of themselves. They communicate to your Home/Go via Ethernet cable, or wirelessly. The current generation of rooftop products is the Elite, and that is shown below. The WiFiRanger is pretty simple to set up. Basically plug it all in, connect your aircard/Jetpack and turn it on. It could not be simpler. If you have an open wifi hotspot visible it will even automatically connect, straight out of the box. Once you are running you will likely want to make some configuration changes. The user interface is very simple - the entire thing is designed for networking novices. So the acronyms and "network talk" are kept to a minimum. If you are uncomfortable reading all the technical stuff here, then the one of the WiFiRanger products is your best bet. It is as simple as it can get.
The WiFiRanger routers can connect to the Internet via:
Tethering - what is it? Tethering is a physical connection between a device and a router, typically via a USB cord. It allows the device to pass data via that wire to the router, instead of wirelessly. This speeds up the connection, since a wireless signal does not have to be processed. So what else can they do?
When would I use a WiFiRanger (WFR) product?
What competes with the WiFiRanger?
When would I NOT buy the WiFiRanger?
below, WiFiRanger Go (in white) on top of WiFiRanger Home
Shown to the left is one generation of my "communications closet". You can see the two WiFiRanger routers in the center - the Home is on the bottom, and the Go is the white box on top of it. Unless I'm testing, I only use the Go - it is a superior router in my opinion. You can not see it, but my USB 4G LTE Pantech UML290 (Verizon) modem is plugged into the Go with a 4' USB cord and is velcro'ed on the upper part of the cabinet door. All my equipment is connected straight to 12 volt power - you can see the fuse center upper/right. The other router you see is an older Cradlepoint 1000. That is my basis of comparison - the 1000 is a very reliable and capable router, so I test against it. Not shown are some other routers I test against - Cradlepoint 1200, 95, 900, 35, 350. I also have most of the Pepwave products (AP, Mini, OTG, SOHO). If you look carefully, you will see two cat5 cables coming out a hole in the lower left of the picture. These go into a 1.5" conduit to a junction box on the roof and connect to various devices. At the moment, only the Mobile is being used (in the picture nothing is plugged into the router). The blue cat5 connects to a 4 terabyte NAS drive (2x2 mirrored) on the shelf above. The Go router has more than enough range for me to connect to it while driving - and that is through a metal back wall on the truck. Thus, I never have to change the network devices to have Internet while in motion.
Issues You may hear of "issues" using the WiFiRanger routers. They have an innovative and easy to use interface to a complex set of "back-end" capabilities. This interface shields the user from having to understand complex networking issues. But it can also introduce issues. I have to say, that the latest firmware excellent and it keeps improving. Of all the products I own I run the WiFiRanger Go.
WiFiRanger Elite FM - Flat Mount The purpose of the WFR Elite is simple - it captures a wifi signal from a hotspot, sends it to the WiFiRanger router via cat5 cable, and then it is repeated for your personal network. The Elite is packaged in both a flat mount, and a vertical mount version. The purpose of the flat mount is to provide a lower profile device suitable for direct roof mount. Many RVs no longer have a crankup (or motorized) batwing antenna that the vertical Elite is intended to be mounted on. The Elite is based on MikroTik Metal 2SHPn hardware with proprietary WiFiRanger firmware running the show. WiFiRanger routers have the ability to interact seamlessly with the rooftop unit. The rooftop units are a separate carrier-grade radio with its own antenna that is able to act as a wifi repeater. It picks up the wifi signal with its powerful antenna and then sends it via an Ethernet cable up to 250' to the WiFiRanger indoor router. Or if configured properly it can send the signal wirelessly. There the original wifi signal is repeated on the local WLAN for your use. This provides the ability to capture wifi from much greater distances than just using the WiFiRanger router by itself. If you read the section on CPEs (Customer Premises Equipment), below, you will understand that the WFRBoost is a carrier-grade device configured as a CPE (in the case shown here a MikroTik Metal). Until now it has been very difficult for people not experienced with networking to configure and manage CPEs . The WiFiRanger software integrates the configuration and management of the rooftop unit into a single Control Panel with a simple web interface. It greatly simplifies dealing with a set of complex network devices and allows the average user to gain the benefit that formerly was only available to those willing to learn enough about networking to deal with configuring these devices. If you plan on capturing WiFi signals with the WiFiRanger then I strongly suggest that you consider the merits of the rooftop unit (Elite or Sky2) to do so. While the Go2 router has a very good radio/antenna set in it, it is still not as capable as a when it is combined with an Elite rooftop unit. However, if you are just looking to "improve" capture in an RV park or other environment where your laptop alone can connect to the AP (access point, or hotspot) then the Go2 alone may be sufficient. You could start with it an then add an Elite if required.
No other mobile cellular router on the market has a rooftop device like this integrated with it. This is a unique capability and it alone is reason enough to buy a WiFiRanger product, in my opinion. click to expand
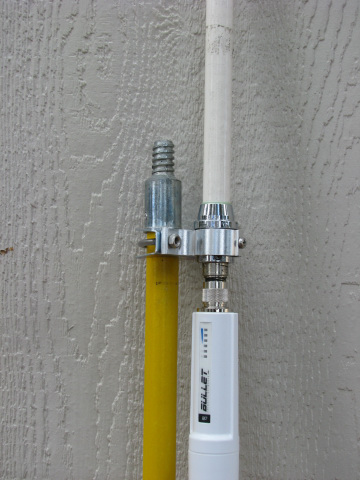
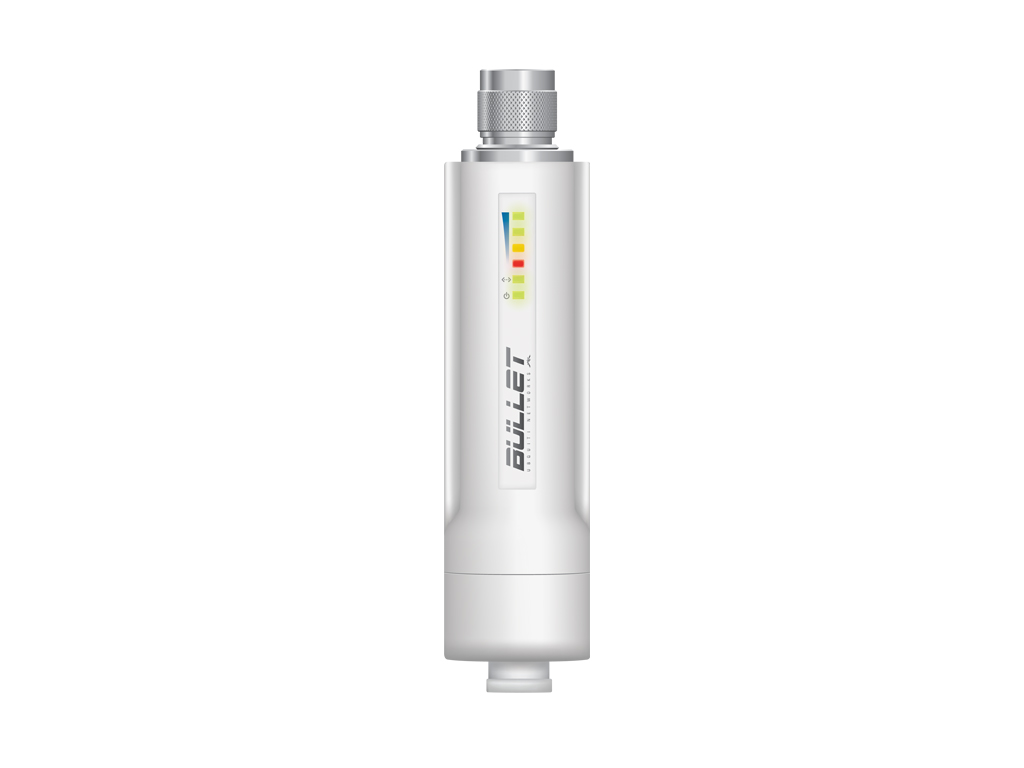
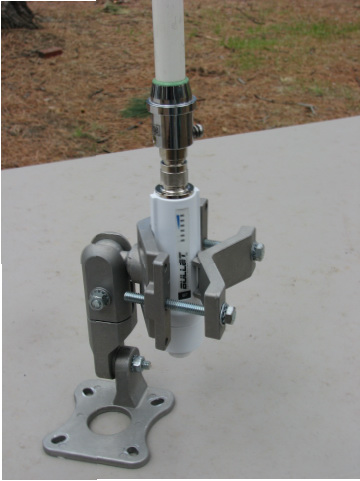
For the more technically inclined, the current Elite is a MikroTik Metal. The previous versions of the rooftop units used Ubiquiti hardware - primarily the Bullet. That older hardware is shown in these pictures. Shown in the picture series above on the far left is a Bullet, and a Bullet with an 8dbi omni antenna mounted to it. The second picture is my "homebuilt" Mobile that was used for testing the WiFiRanger firmware before the WiFiRanger hardware was available, temporarily mounted to the ladder of my RV. The third picture shows a Bullet mounted to a painters pole. This is a temporary mount - strap it to the ladder once it is raised. The fourth picture shows a Bullet held in a commercial bracket intended for mounting Access Points. This mount can hold things in any position.
Dream Cellular Internet System
updated 11/2015 This is what I would use, if I configured a system today. Make sure you check these items out for yourself - things change rapidly in electronics and this may not be current info, or it may not be applicable to your needs. Be especially careful to understand the router and its features/limitations as they apply to you.
A Viable Alternative - Smartphone Hotspots
Since many (if not most) people have smartphones today - either Android or iPhones - there is a viable alternative for Internet access using your phones hotspot. All cellular phones/providers make available what is known as a "hotspot" capability for the phone. This uses the cellular data system to connect to the Internet, and it uses the phones wifi capability to broadcast a local network that 5-10 devices can connect to. With this capability you do not need a cellular router or aircard. That saves you considerable money, and with the hotspots now "free" with the shared data plans it is a solution that may work for some users. What is the downside? First, where the phone goes, so does the hotspot. If each person has a phone that can run a hotspot, that can be overcome. But the network name will change, very likely. Also, there is no provision to hardwire devices like with a router.
Combining this hotspot capability on the phone with the WiFiRanger Go2 router offers a very nice solution. The Go2 can "failover" automatically between Internet connections. So if you are normally on Park WiFi and that becomes unavailable, your phone could be the secondary connection. And if that phone is unavailable, the second phone can be used. Automatically. This way the network name stays the same, and if one phone leaves the area the other is automatically used. The only downside to this is that both phones must have the hotspot running - this uses quite a bit of battery, so you would want the phones to be plugged into a charger.
Using this solution can save you the cost of an aircard, but it does add some complexity. And an aircard/Jetpack is only $20/month on the shared data plan....so it may not be worth it. WiFiFirst, it is helpful to understand a little about how wifi works, some of the jargon, and the technical limitations of the technology. Wifi is a two-way radio system that operates on the 2.4 GHz and 5 GHz bands. For our purposes, we will assume that we are dealing with 2.4 GHz radios, since that is what is commonly used by a consumer device - although that is "starting" to change. As the ac standard starts deploying you will see many more devices that handle 5GHz. Like any radio system, it takes “two to tango” – the wifi radio in your laptop, smartphone, tablet or other device has to “talk to” the Access Point (AP) set up by the provider of the wifi system. (Note: Access Points are also referred to as "hotspots". The terms are often used interchangeably.) This AP (Access Point) is the radio that eventually connects you back to the Internet. If this provider is an outside company selling/providing the service they are generically referred to as the WISP (Wireless Internet Service Provider). Examples of a WISP might be Tengo (a popular RV park wireless provider), a city-wide wifi system, or a provider of wifi to a hotel complex. When WISP’s set up wireless networks in geographically distributed areas there are often “dead spots” in radio coverage. These areas may have signal available, but to most wifi devices the signal is not strong enough to effectively use. In many cases a CPE device (Customer Premises Equipment) is used by the WISP to pull the signal in rather than put in more APs. This is cheaper for the operator and more effective for the end user in most cases. More about these CPEs later. Before you can connect to any wifi network you have to discover the network. One of the best tools for seeing what wifi networks are available around you is inSSIDer, which is free wifi scanning software. It will tell you lots of things about the network that many of the tools that are included with your computer will not. OK, enough of the acronyms. Now that we have a little background info, let’s look at what affects your wifi experience. Since we are dealing with radios, the obvious things are power, and blocking the line-of-sight to the AP. Radio waves at the 2.4 GHz frequency are pretty easily blocked by dense objects like cement walls, anything with water in them, and metal (the 5 GHz frequency is even worse). The typical RV park is a pretty hostile environment: you have an RV with (perhaps) metal sides next to you that blocks your line-of-sight (LOS) to the AP, and you are in trees. The trees have water in the leaves/needles/branches, which is very bad for signal propagation. In addition, you are using a laptop or other device with a weak radio in it, and you are often pretty far (in relative terms) from the AP. Providing wifi in a typical RV park is a very challenging technical problem from both from the providers view, and the consumers view – which is why so many people experience issues with it. In summary, the issues with wifi are typically (in order):
A Better WiFi Adaptor
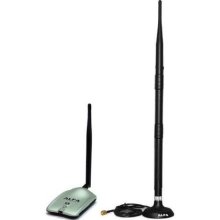
The picture shows an Alpha adaptor (Alfa AWUS036NH), but there are other good adaptors on the market. Often these come with a more powerful antenna - as pictured there is a 9dbi magnetic mount antenna included with the adaptor, as well as the inbuilt one (which is removable). This particular Alpha has a 2000mW radio. Although testing shows it does not perform at that level, it is still a very powerful radio. The online price is usually around $40. There is a similar 1000mW version of the Alpha that is usually cheaper, and adequate for this application. Popular manufacturers of these high-power external adaptors are Alpha, Orinoco, RealTek, and Hawking. Meritline.com usually has high-powered adaptors for reasonable prices. I have several Alpha USB adaptors and they do make a big difference in areas where you can see the signal on your laptop, but can not connect reliably. Typically, these better adaptors are used with a longer USB cable to position them on the side of the RV where the AP is. Often they are mounted to a window - either with included suction cup mounts, or with Velcro. You can get a "passive" USB cable up to 16'. If you need a USB cable over 16’ look at some of the “active” cables like this one that allows for 10 meters between your laptop and the adaptor. Just make sure anything you buy in an extension cable has the correct ends on it. Why would you need such a long cable? Remember that line-of-sight to the Access Point is critical for best reception, and having the long cable allows you the option of better positioning the adapter. These adapters are not waterproof, but they can be put into glad storage containers (or Rubbermaid containers) and positioned on the roof of the RV if required. They can even be elevated on painters poles like shown for the Wilson cellular antenna in the Antenna section earlier on this page. You just need to make sure you weatherproof them. A simple USB adaptor is typically an under $50 solution, but it is for a single device. What if you want to be able to support multiple devices at the same time? Well, you could deploy multiple USB adaptors if you are just dealing with laptops – but these don’t work for many other wifi-enabled devices. Usually, with multiple devices you want a local area network (LAN) that all your devices connect to, and then that connects to the Internet through an aircard or wifi. This allows all your devices to just know about your private network and you don’t have to keep changing things around on individual devices when you find another wifi network to access the Internet. But now you “get to” manage a network of your own. This can keep you up at night when things go wrong. Improved Radio with Local LAN While an external USB adaptor can greatly improve your wifi experience, it only works for the single computer that it is attached to. It will not help you with your other devices. For that you need to supply your own local network that all of your devices can connect to. The wifi network you connect through will supply the Internet service for your local LAN, and you will then redistribute this on your local wireless/wired network for your other devices. This is the same as using a cable modem or DSL modem to supply your Internet "backhaul" and then redistributing it. The difference is that you are using the RV Park or other providers wifi signal for the connection to the Internet, instead of a "hard wired" backhaul like DSL or cable. Some manufacturers of devices are calling this ability to use wifi as the backhaul WiFi as WAN. This expression comes from using the wifi connection as the Wide Area Network (WAN) - in this context WAN simply means the source of the Internet connection. For a cellular router you could as easily say "cellular as WAN".
The PepWave can also be connected to the WAN port of a router - either a cellular router or a conventional router like a Linksys. Properly configured, this allows the PepWave to essentially operate as the WiFi as WAN for any router. Another reason to buy from the 3GStore is that they provide configuration details on how this is done, and if you mess it up you can call them. The newer Pepwave Surf OTG (On The Go) integrates a cellular modem capability into the existing Pepwave Surf functions. You can read a test report on the Surf OTG here. There is also a version called the Pepwave Surf SOHO that incorporates full router functions into the device. A test report is here. The PepWave family is nice, but it has limitations. First, it is an indoor device – it is not weatherproof so you cannot put it on the roof of the RV (although some have done so in a weatherproof enclosure). Second, although it has an external antenna with an RP-SMA male connector it can be complicated to extend this antenna to the roof, where it would get best reception. Third, if you need more than one Ethernet port you will have to add a switch to it, or buy the SOHO. Normally, I recommend that the PepWave be high up on a window on the side of the RV that faces the AP. It comes with suction cups to mount it this way. If you can get any sign of the wifi signal on your laptop without the PepWave, then the PepWave will be a good solution for you – use inSSIDer for discovering the signal strength of the networks in the area.
The WFR provides the most flexibility and greatest feature set of the products available on the market today. It can support 3G and 4G cellular modems, satellite, DSL, Cable and WiFi as WAN sources. It can then repeat those signals wirelessly on its N wireless network (it also supports G devices). It has LAN ports for your wired network devices like printers, TV, or Network Attached Storage (NAS). It will automatically "failover" between WAN sources - in other words if you are connected via wifi and that network goes down, it will automatically connect you to the cellular network (or any other network you have available). For improved wifi capture it can use Ubiquity products in its "boost" mode. This is fully integrated with the Control Panel, so you do not have to manually mange multiple devices. All of these capabilities have been present in the past - just not in a single device with a simple user interface. The WiFiRanger is discussed in detail in its own section. Another product that does a similar thing is the Cradlepoint CTR35 wireless N router. The CTR35 supports “wifi as WAN” just like the WFR, as well as data sources from cellular, cable, and DSL modems – just like the WFR. It retails for slightly under the price of the WFR. Also available from Cradlepoint are the MBR95, MBR1400 and the CBR400 - these also handle WiFi as WAN. None of the Cradlepoint routers support an integrated connection with a remote CPE (WiFiBoost), like the WFR will. There are other solutions that combine portions of what we have discussed to solve wifi connection issues. To round out a sampling of them take a look at the following: Jefa Tech, RadioLabs. If you look carefully at the solutions you see advertised you will notice that the products solve one or more of the following issues, in order of sophistication and cost:
So what device or combination of devices “does it all”? That would be a router that handled multiple Internet sources and had good local connectivity (your LAN) in combination with a remote (rooftop) CPE for the best wifi capture. Today, the only device that does that is the WiFiRanger family of products. Rogue Wave The Rogue Wave is a wifi capture device – in other words a CPE – from Wave WiFi. My test unit was provided by Land and Sea WiFi. The product package provides for a complete solution. It includes the CPE, an 8.5 dbi omnidirectional antenna, and a Netgear N150 router. It also includes Ethernet wire for connecting the router to the external CPE, the power injector for the CPE, both a 12 volt and a 120 volt power supply, and rail mounting brackets for mounting the CPE to a batwing antenna or another “rail-like” device. You really don’t need anything else to get this device into service. This package retails at $375. The only critique I have of the product contents is that the Ethernet line may be a little short for some RV installations. But to be fair - there is no way to get this “right” for every situation. The documentation and Quick Start Guide are excellent. Even novices should have no issue setting this up and getting it going. It really was quite simple - which is probably it’s best feature when compared to it’s competition. The Rogue Wave uses a Ubiquity Bullet M2 as the CPE. This specific model is the 800 mW version of the M2, and covers the “N” WiFi protocol. It will take advantage of all the speed that an Access Point can provide to it. Other versions of the Bullet (there are many) may not handle the N networks and will have reduced throughput. The Bullet is coupled with an 8.5 dbi omni antenna. This antenna is my personal choice for all Bullets used as CPE’s. I’ve been using this combination since Ubiquity brought the Bullet to market, and in my opinion it is the best combination if you have the means to properly mount it. You cannot leave it erected on the roof of an RV - it is too tall. But mounted to a batwing antenna it is easily cranked up for use and lowered for travel. On the negative side, while it is far more effective at signal capture than a shorter antenna, it also can put stress on the Bullet if not properly supported. The supplied router is a consumer grade Netgear. It is not a cellular router - thus you cannot attach a cellular modem to it and use that modem as a source of Internet. If you have a cellular hotspot, though, the Bullet will pick this up as an available Internet source and you can thus connect the Netgear through that. This permits your local network - and any printer and device mappings that you establish - to remain the same whether you are on a cellular connection to the Internet, or you are connected through an RV park Access Point via wifi. Enabling the hotspot on your phone would work the same way. The router comes preconfigured to work correctly with it’s paired Bullet. As a user you are not required to do anything to get the device in service. However, you will likely want to configure the LAN to broadcast your personal SSID and change the default login information. How the end user is required to deal with the CPE is where the complications of most of these devices lies. Getting the user interface as simple as possible, for the novice user, is the key to success. This means automating a lot of background work. I have to say, the Rogue Wave firmware accomplished this superbly. It is by far the simplest device in this class that I have used. There is no “network jargon” and the screens are simple and obvious. Well - at least they were to me. Read the complete review of the product HERE. Customer Premises Equipment (CPE) CPE is a general term used to refer to devices that contain a radio set and antenna and are used to pick up the wifi signal (or other type of signal) and then provide it to your LAN or computer. They may be specialty devices, intended to only be used to bridge between the broadcast network and your private LAN, or they may be a generalized carrier-grade radio that can function in multiple fashions – as a bridge, a router, an AP, etc. A CPE has a higher powered radio than that available in your laptop, a better antenna, and it is typically mounted outside with clear line of sight (LOS) to the AP (Access Point). Thus it solves the biggest issues with wifi reception (LOS, power, antenna quality). The CPE is directly wired to your router or your computer with Ethernet cable – which is a digital signal that can be sent around 300’ without degradation. This overcomes the typical issue with extending an antenna from your wifi adaptor; an antenna connection is analog and the signal degrades rapidly when sent over a long antenna cable.
There are many commercial radios on the market that are used to deploy wifi networks. Almost all of them can be used as CPEs with proper configuration. My preferred CPEs are from Ubiquity. Ubiquity makes highly configurable devices that are priced right and are very reliable. Over the years I’ve used many of their products to deploy both wifi networks, and as CPEs.
You can set up a CPE to capture and feed wifi signal to any router. You do not need special routers like the WiFiRanger. However, if you go that route, you will be responsible for configuring and managing the CPE as well as the router for your LAN. It requires an understanding of IP addressing and some of the details of network setup. In the WiFiRanger these details are handled by the firmware in the Ranger - you never have to directly configure the CPE device itself. If you would like to "play around with" a CPE and interface it to your existing Cradlepoint (or other) router, and feel you have the time and skills to do so, then I would recommend you use a Ubiquity Bullet as your CPE. This is relatively low cost (around $50 with the Ethernet injector), has a nice small form factor to work with, and allows for a choice of antennas. I would recommend a short 8dbi omni antenna which you can find for around $30 if you look carefully online. You can mount it to your ladder, like I show in the picture, or you can look at the Antenna section here, and utilize a mount attached to the batwing TV lift. The Bullet is 100mW and generally priced at $39, Bullet2 is 400mW, the Bullet M (newest model, part of the AirMax family) is 600 mW and the Bullet2HP is 1000mW (around $80). These require the POE15 HD27012 Power Over Ethernet injector (15 volt) and can take up to a 24-volt POE for longer distances. For use with an RV I'd recommend the Bullet (100 mW) or the Bullet2HP; the M models are not needed in this application. The Bullets can run off of 9-24 volt power, depending on the distance of the cat5 cable. For RV use with runs around 60' you can usually eliminate the 120-volt transformer and directly connect the injector to 12-volt battery power. However, you have to maintain polarity. If you don't know what you are doing, don't do this. Here is how to configure it, for those interested - this should work for any AirOS device: To set up an AirOS device as a CPE (client bridge) you can use this document from the Ubiquity website. If that link no longer works, you can download it from here. To set up a bridge between two locations (like to share an Internet connection between two houses) read this wiki on the Ubiquity website. WARNING: When configuring or setting up these devices you will be using a "Power over Ethernet" power injector. This supplies power to the device over the Ethernet line. Four of the eight lines inside the Cat5 cable are used for power, and four are used for data between the CPE and your router or computer (when directly connecting to it for configuration). MAKE SURE that you plug your computer or router into the LAN side of the injector - sometimes labeled "Data". If you mistakenly plug it into the "Power" or "POE" connector directly it very likely will burn up your Ethernet port on your computer. The POE line goes to the CPE, NOT to your computer or router.
Amplifiers and routers require an outside power source. Both can run on either 12-volt or 120-volt. When installing your system you really should set it up for 12-volt use, if possible. This will allow you to use everything when boondocking or when driving down the road. In particular, the router needs to be on when driving if you want Internet access. It is useful to get emails, and to search for points of interest or look at live weather radar while travelling. You will have the technology - why not use it. If you set up everything for 12 volts then there will be no shuffling of cables on travel day, or when boondocking.
You may have to order a 12-volt adaptor for the router. Most of the amplifiers come with the 12-volt hookup. You may also have to locate the devices near an existing 12-volt plug, or wire in a new 12-volt service to supply them in your chosen location. This is generally possible to do without too much trouble. Just make sure you use heavy enough wire if you have to add a new 12-volt outlet. There are voltage drop tables in the Solar sections of this website.
You don't have to worry about the antenna - they are passive devices. They need no power. My Setup
I currently use the following: updated 2/2014
In addition to the WiFiRanger Go2 and Home I also have a Pepwave SOHO router permanently mounted in my communications center next to the WFR. That is my "standby" router. If something happens to the WFR then it is a simple matter to move a few lines to the Pepwave: one USB line for the aircard, and three Ethernet lines (one for the CPE, one for the NAS, and one for a switch that feeds the TV and DTV receiver at the entertainment center). Samsung Galaxy N I have a WifiRanger Mobile on the roof which is what I typically am using. Prior to my using the WiFiRanger I used various CPE's I built directly connected to a Cradlepoint 1000. Since I have a multitude of radios available to me my CPE varies with what I have on hand, but has been a Bullet for many years. For a directional CPE I use a Nanostation (NS2) when I need it. I use a Millenicom-sourced Pantech 291 Jetpack on the Verizon network. This is tethered to the WiFiRanger's USB port via a 4' USB cable. The aircard is connected (nested) to a Wilson Sleek 4G amplifier and the antenna is a magnetic mount on the roof. Originally, I intended to discuss use of satellite systems for Internet access here. Now that the cellular based systems meet most peoples needs I've decided not to have a Satellite section. A good resource for satellite system discussions is Mark and Dale Bruss's website.
|
|
|
|
||


 Technically,
it is always best if you use an antenna and amplifier that plug directly
into your phones antenna port. However, most people now use "smartphones"
that do not have an external antenna port. With smartphones there
are several options available to boost signal strength. The Wilson
811210 dual band amplifier uses a little Velcro connector that you
Velcro to your phone near the antenna when using the amp. Or, you
can buy an add-on cable with the patch if you already have an amp -
the model 301140 is shown to the left. They do
work pretty well, but obviously not as well as the dedicated antenna
port. The amplifier is a little cheaper, though.
Maximum Signal also sells these inductive antenna pickups for their
Cyfre amplifiers. All inductive pickups need to be secured right
over the internal antenna in order to be effective, so you may have
to experiment based on the location of your phones antenna.
Technically,
it is always best if you use an antenna and amplifier that plug directly
into your phones antenna port. However, most people now use "smartphones"
that do not have an external antenna port. With smartphones there
are several options available to boost signal strength. The Wilson
811210 dual band amplifier uses a little Velcro connector that you
Velcro to your phone near the antenna when using the amp. Or, you
can buy an add-on cable with the patch if you already have an amp -
the model 301140 is shown to the left. They do
work pretty well, but obviously not as well as the dedicated antenna
port. The amplifier is a little cheaper, though.
Maximum Signal also sells these inductive antenna pickups for their
Cyfre amplifiers. All inductive pickups need to be secured right
over the internal antenna in order to be effective, so you may have
to experiment based on the location of your phones antenna.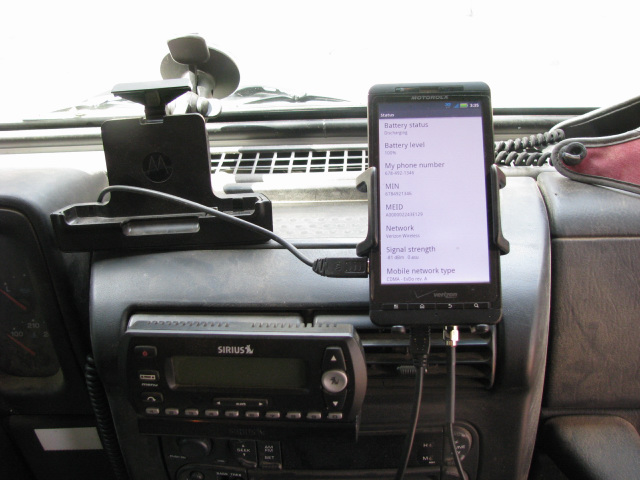
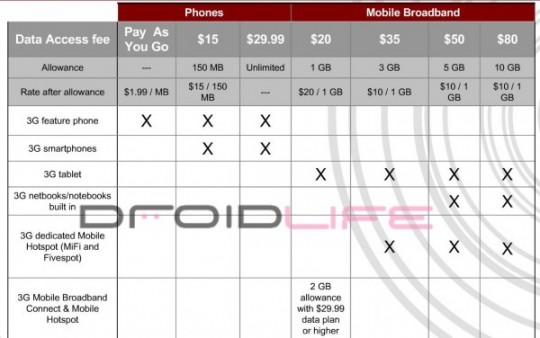
 Adding
confusion to the issue are the "shared" data plans by Verizon and AT&T
(Verizon plan shown on the left). These allow you to buy a "pool" of data
and share it among 10 "devices" - so your aircard no longer comes with 5GB of data a month.
Instead, you are charged a basic monthly fee for the aircard (in the case of
Verizon, $20/month). The data that the aircard uses comes from the "pool" of
data that you purchase separately. In the chart to the left, 6 GB of data cost
you $80/month. Your smartphone also has a monthly device
charge - $40/month on Verizon, and can also share from the same data pool. You
can do this with a tablet also (assuming it is a cellular-enabled tablet) - it
has a device charge of $10/month. If you have a lot of devices that want to use
cellular data the shared data plans can actually be cheaper. It also allows you
to add smartphones that may not be using that much data for a cheaper monthly
cost. How is that, since it is $40/month? Well all voice minutes and all texting is
now "free" on the shared data plan. So although that second phone is costing you
more per month ($40 vs $30 on the old plan) there is no additional charge for
minutes or texting. It may end up cheaper when you look at the total package
cost. You have to figure it based on your usage.
Adding
confusion to the issue are the "shared" data plans by Verizon and AT&T
(Verizon plan shown on the left). These allow you to buy a "pool" of data
and share it among 10 "devices" - so your aircard no longer comes with 5GB of data a month.
Instead, you are charged a basic monthly fee for the aircard (in the case of
Verizon, $20/month). The data that the aircard uses comes from the "pool" of
data that you purchase separately. In the chart to the left, 6 GB of data cost
you $80/month. Your smartphone also has a monthly device
charge - $40/month on Verizon, and can also share from the same data pool. You
can do this with a tablet also (assuming it is a cellular-enabled tablet) - it
has a device charge of $10/month. If you have a lot of devices that want to use
cellular data the shared data plans can actually be cheaper. It also allows you
to add smartphones that may not be using that much data for a cheaper monthly
cost. How is that, since it is $40/month? Well all voice minutes and all texting is
now "free" on the shared data plan. So although that second phone is costing you
more per month ($40 vs $30 on the old plan) there is no additional charge for
minutes or texting. It may end up cheaper when you look at the total package
cost. You have to figure it based on your usage. 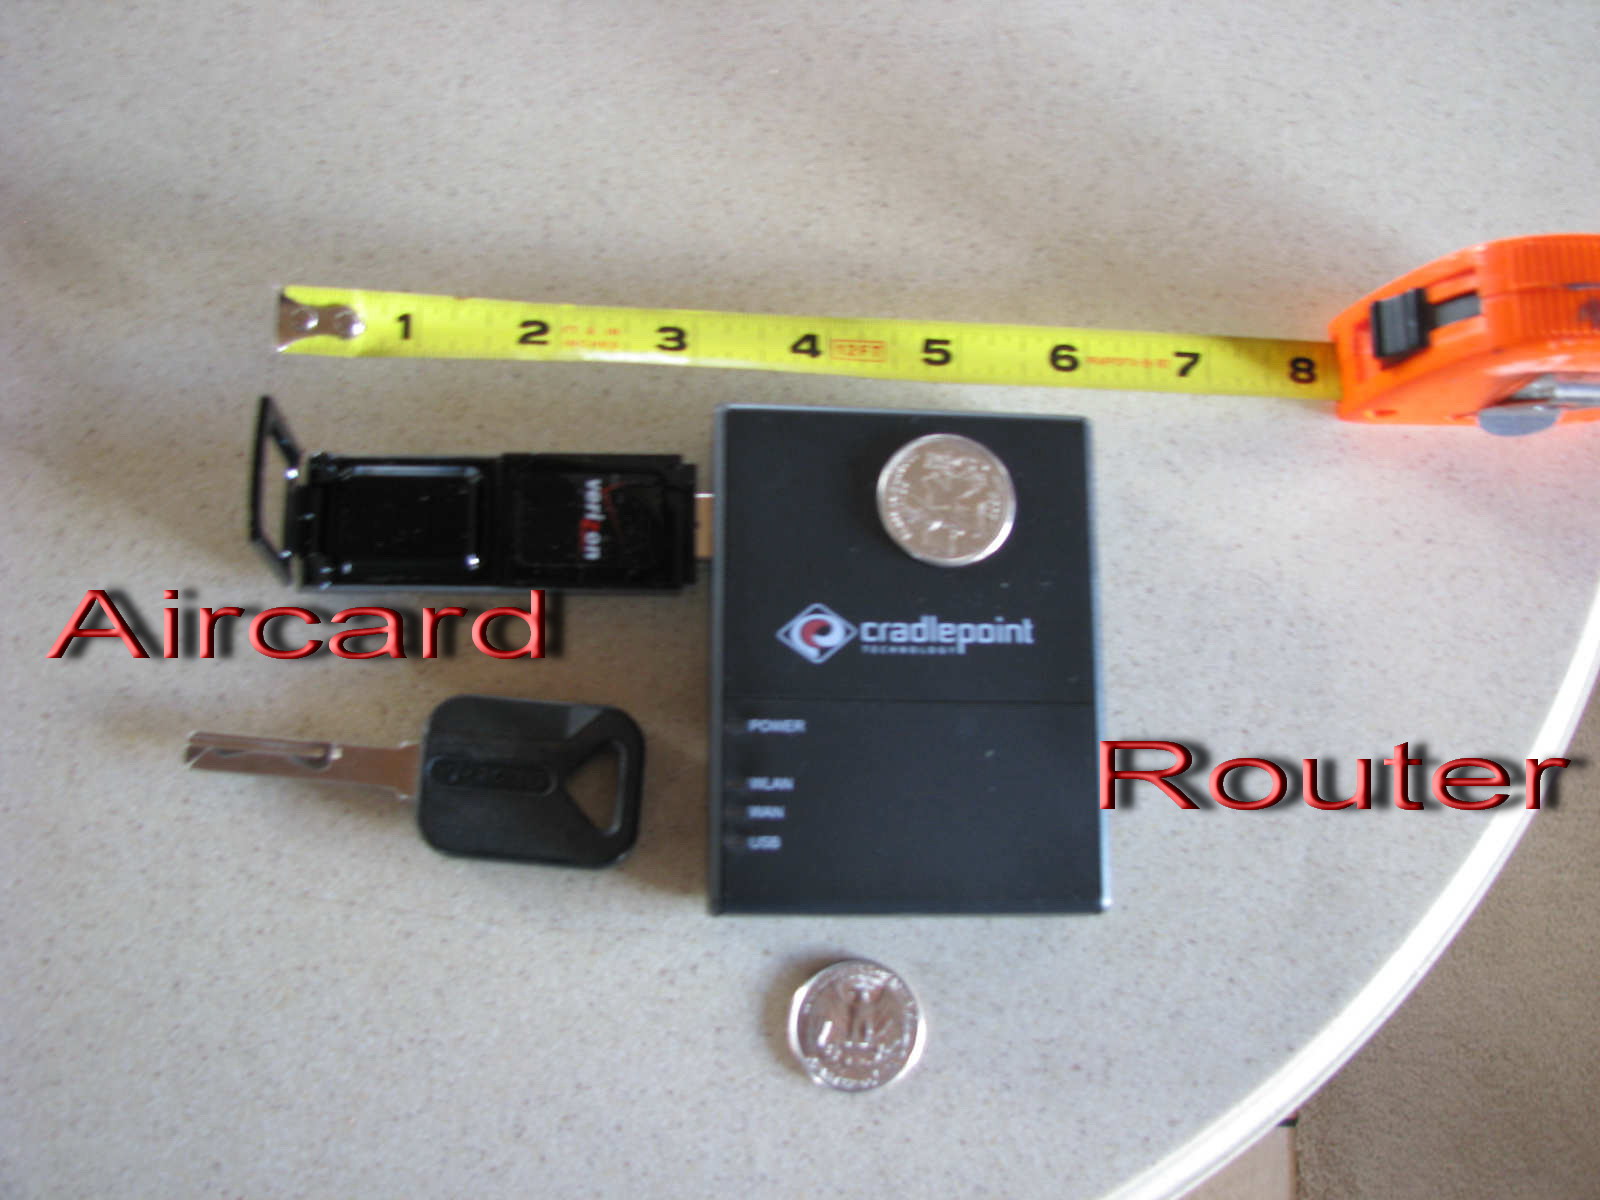

 The typical laptop or consumer wifi-enabled device has a
radio in it with 10-15mW (milliwatts) of power (or less). And the antenna is
built into the device, which is not the optimal situation. The simplest and
cheapest way to improve wifi performance is to replace this radio and antenna
set with an improved wifi adaptor with an external antenna - these connect to
the computer through a USB cable. This new adaptor
should have more power output, and a higher performing antenna on it – it might
even have a directional antenna (like a panel) that you have to point at the
signal source (the AP). Simply turn off the in-built wifi adaptor, and follow
the instructions for installing and using the new one. It is pretty simple –
everyone should be able to do this. Look for an adaptor with at least 200mW of
power, a removable antenna and the ability to plug in a longer USB cable.
Plugging in a longer cable (up to a 16’ passive cable) allows you to position
the new adaptor in the best location for reception – like maybe high in a window
of your RV. Note that you are now “tethered” to the device – you have a cord
coming from the laptop to the device, so it somewhat limits mobility. And you
have only improved that one laptops connection.
The typical laptop or consumer wifi-enabled device has a
radio in it with 10-15mW (milliwatts) of power (or less). And the antenna is
built into the device, which is not the optimal situation. The simplest and
cheapest way to improve wifi performance is to replace this radio and antenna
set with an improved wifi adaptor with an external antenna - these connect to
the computer through a USB cable. This new adaptor
should have more power output, and a higher performing antenna on it – it might
even have a directional antenna (like a panel) that you have to point at the
signal source (the AP). Simply turn off the in-built wifi adaptor, and follow
the instructions for installing and using the new one. It is pretty simple –
everyone should be able to do this. Look for an adaptor with at least 200mW of
power, a removable antenna and the ability to plug in a longer USB cable.
Plugging in a longer cable (up to a 16’ passive cable) allows you to position
the new adaptor in the best location for reception – like maybe high in a window
of your RV. Note that you are now “tethered” to the device – you have a cord
coming from the laptop to the device, so it somewhat limits mobility. And you
have only improved that one laptops connection.  The
easiest way for a novice to have a local wireless network and connect to wifi as
the backhaul to the Internet is probably with the PepWave Surf Mini, which has a
200mW transmitter in it (there is also a 400mW version). The PepWave combines the ability to hook into RV Park
wifi, and simultaneously support a personal wireless LAN just for your use.
It is relatively easy to configure and manage, but you do have to understand a
little about networking. It is available through many sources, but because a
networking novice may run into issues I recommend that you purchase it through
the
The
easiest way for a novice to have a local wireless network and connect to wifi as
the backhaul to the Internet is probably with the PepWave Surf Mini, which has a
200mW transmitter in it (there is also a 400mW version). The PepWave combines the ability to hook into RV Park
wifi, and simultaneously support a personal wireless LAN just for your use.
It is relatively easy to configure and manage, but you do have to understand a
little about networking. It is available through many sources, but because a
networking novice may run into issues I recommend that you purchase it through
the