|
|
||
|
|
|
|
|
|
||
RV Projects
|
|
|
|
|
|
Copyright © 2002-2017 John Mayer. All rights reserved. For reuse policy see Reuse Policy In this Section: (note: press the Home key to return to the Section Contents)
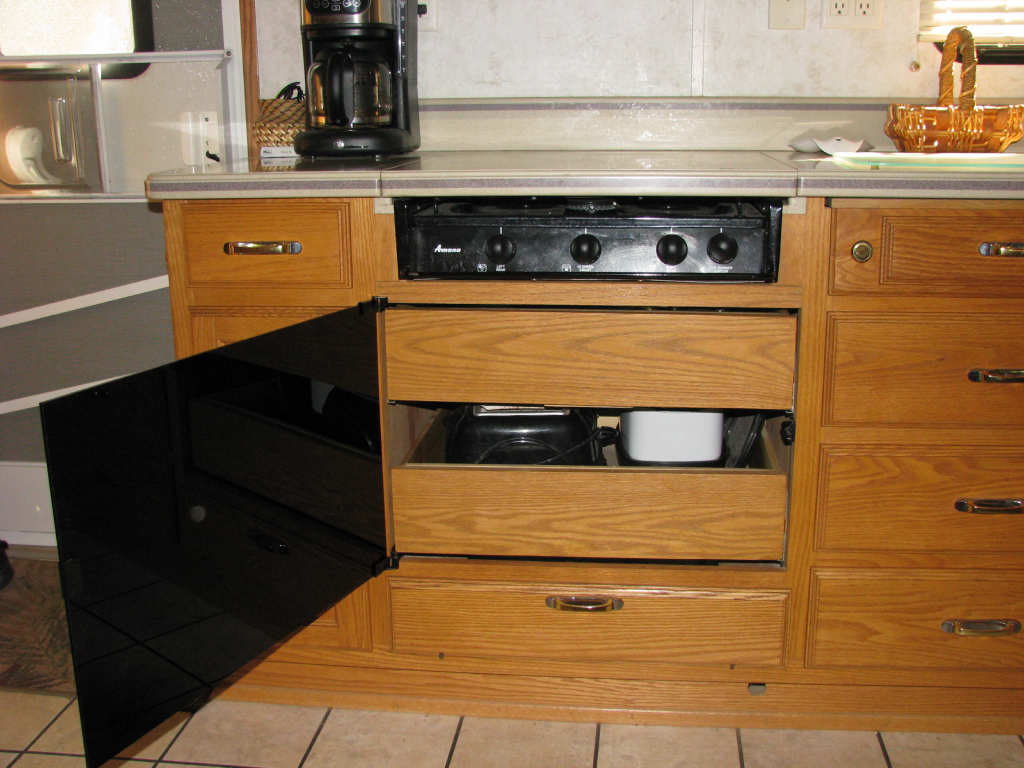
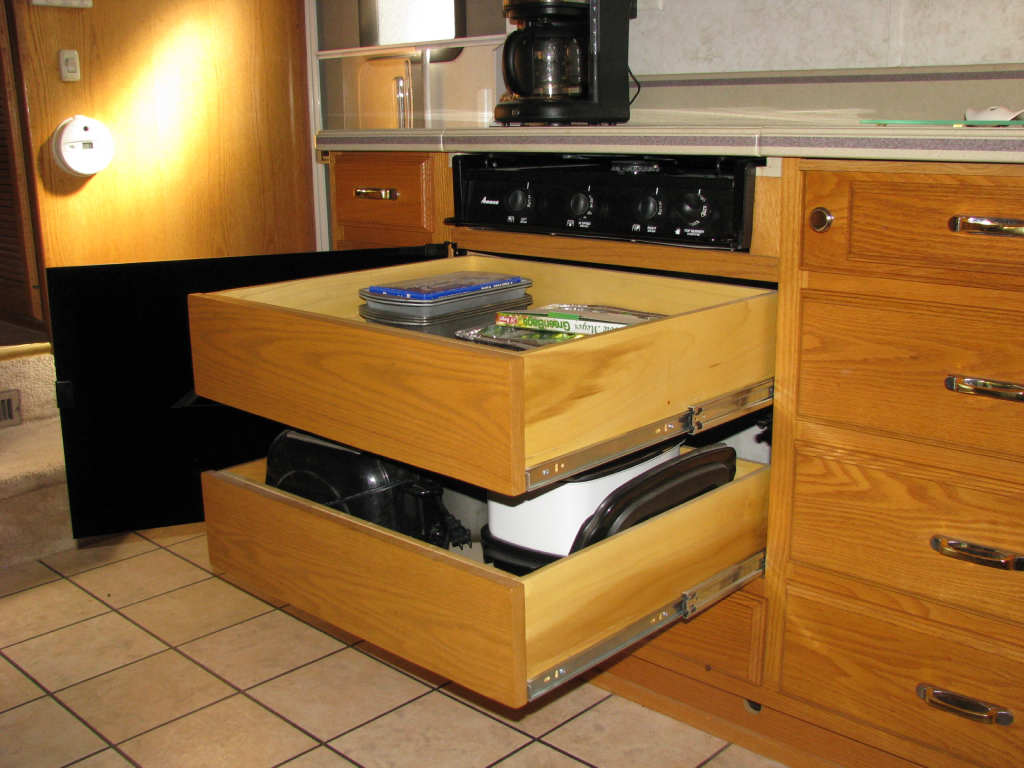
To overcome this "issue", we decided to make recessed drawers, and then cover them with a piece of black Lexan or plexiglass. The black would hide the drawers, and match the black cook top - it almost appears as if an oven is still there. We had a piece of custom-cut black plexiglass made for us. You could use clear plexi - available at Home Depot or Lowes - and spray it black. But it would not look as good as the black plexi. We decided not to use Lexan because of the cost (it was three times as much as plexiglass) and the fact that the door should not get that much abuse. Lexan will scratch less than plexiglass, though, and if it proves to be an issue we may have to replace the door in the future with Lexan. The original range was easily removed and disposed of. The replacement cook top was the same brand, obtained at the local Camping World. It dropped into the counter opening perfectly. A new stile was made to frame under it. The two drawers are made of conventional birch plywood construction, with full-extension 100-pound drawer slides. They are faced with oak and stained to match the rest of the cabinets. They are recessed about an inch from the front stiles of the cabinet when closed. The plexi was mounted to the face of the cabinet - it overlaps a little on all sides of the opening. The hinges are the type that go around the plexiglass and secure with a set-screw. This is convention "glass" hinging with no holes in the plexiglass. A "pop-magnet" is used to secure the door closed. To open it you simply press in on the glass and it pops open. Click on the pictures to expand them.
The presentation I did on Fire Safety at the 2011 HDT Rally is here.
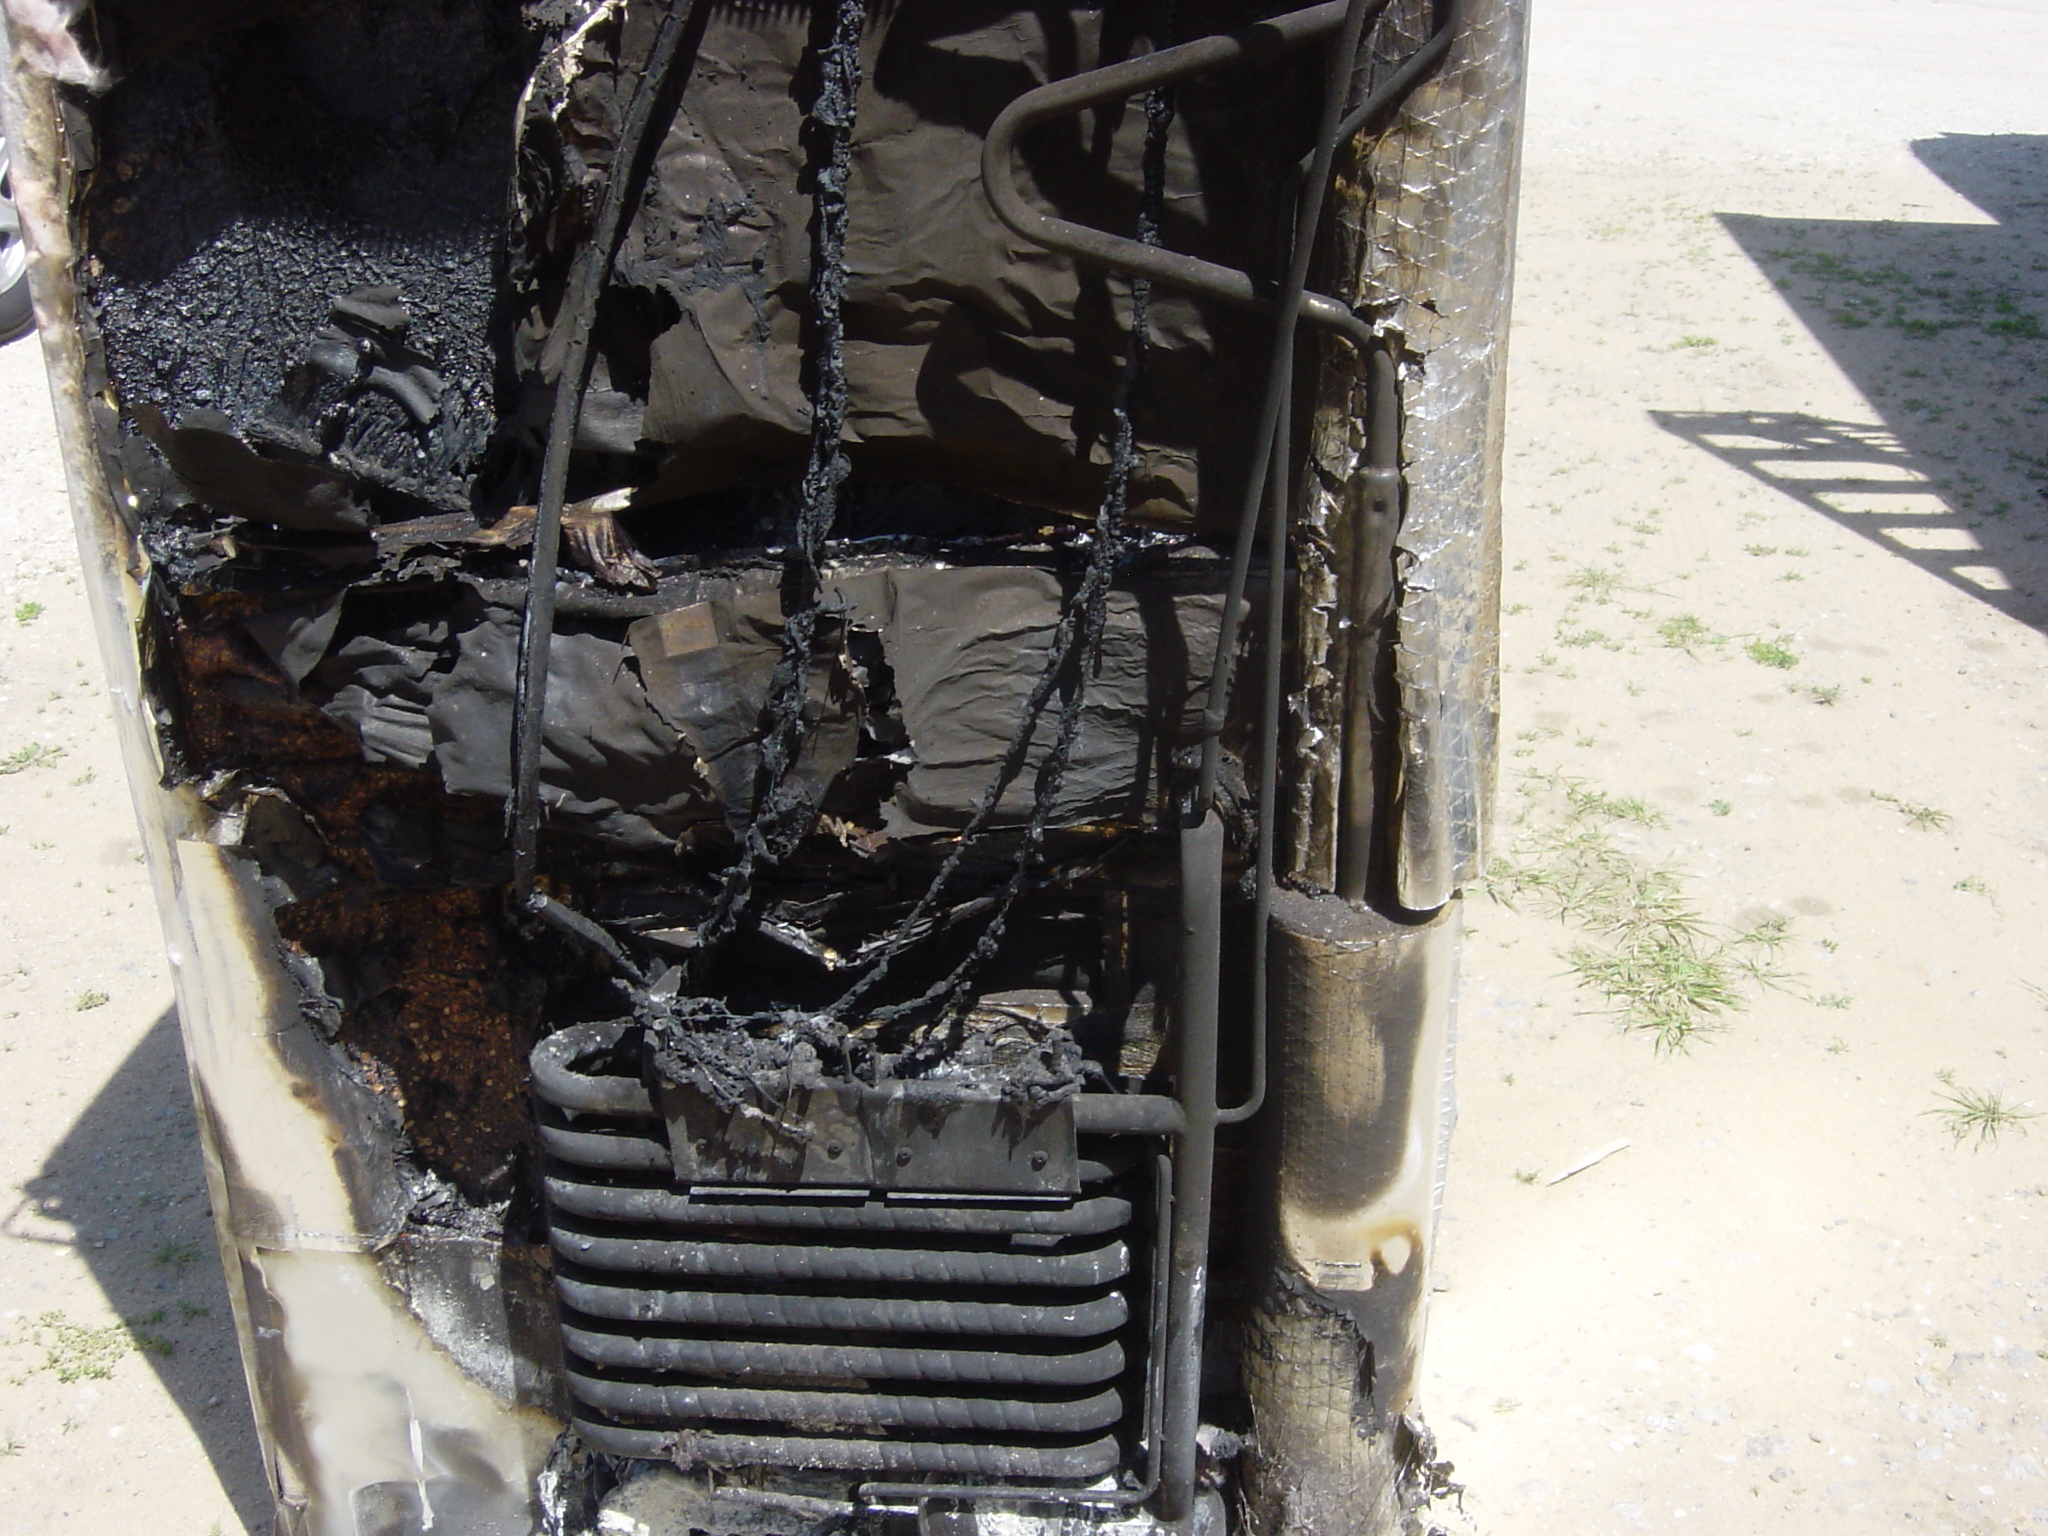
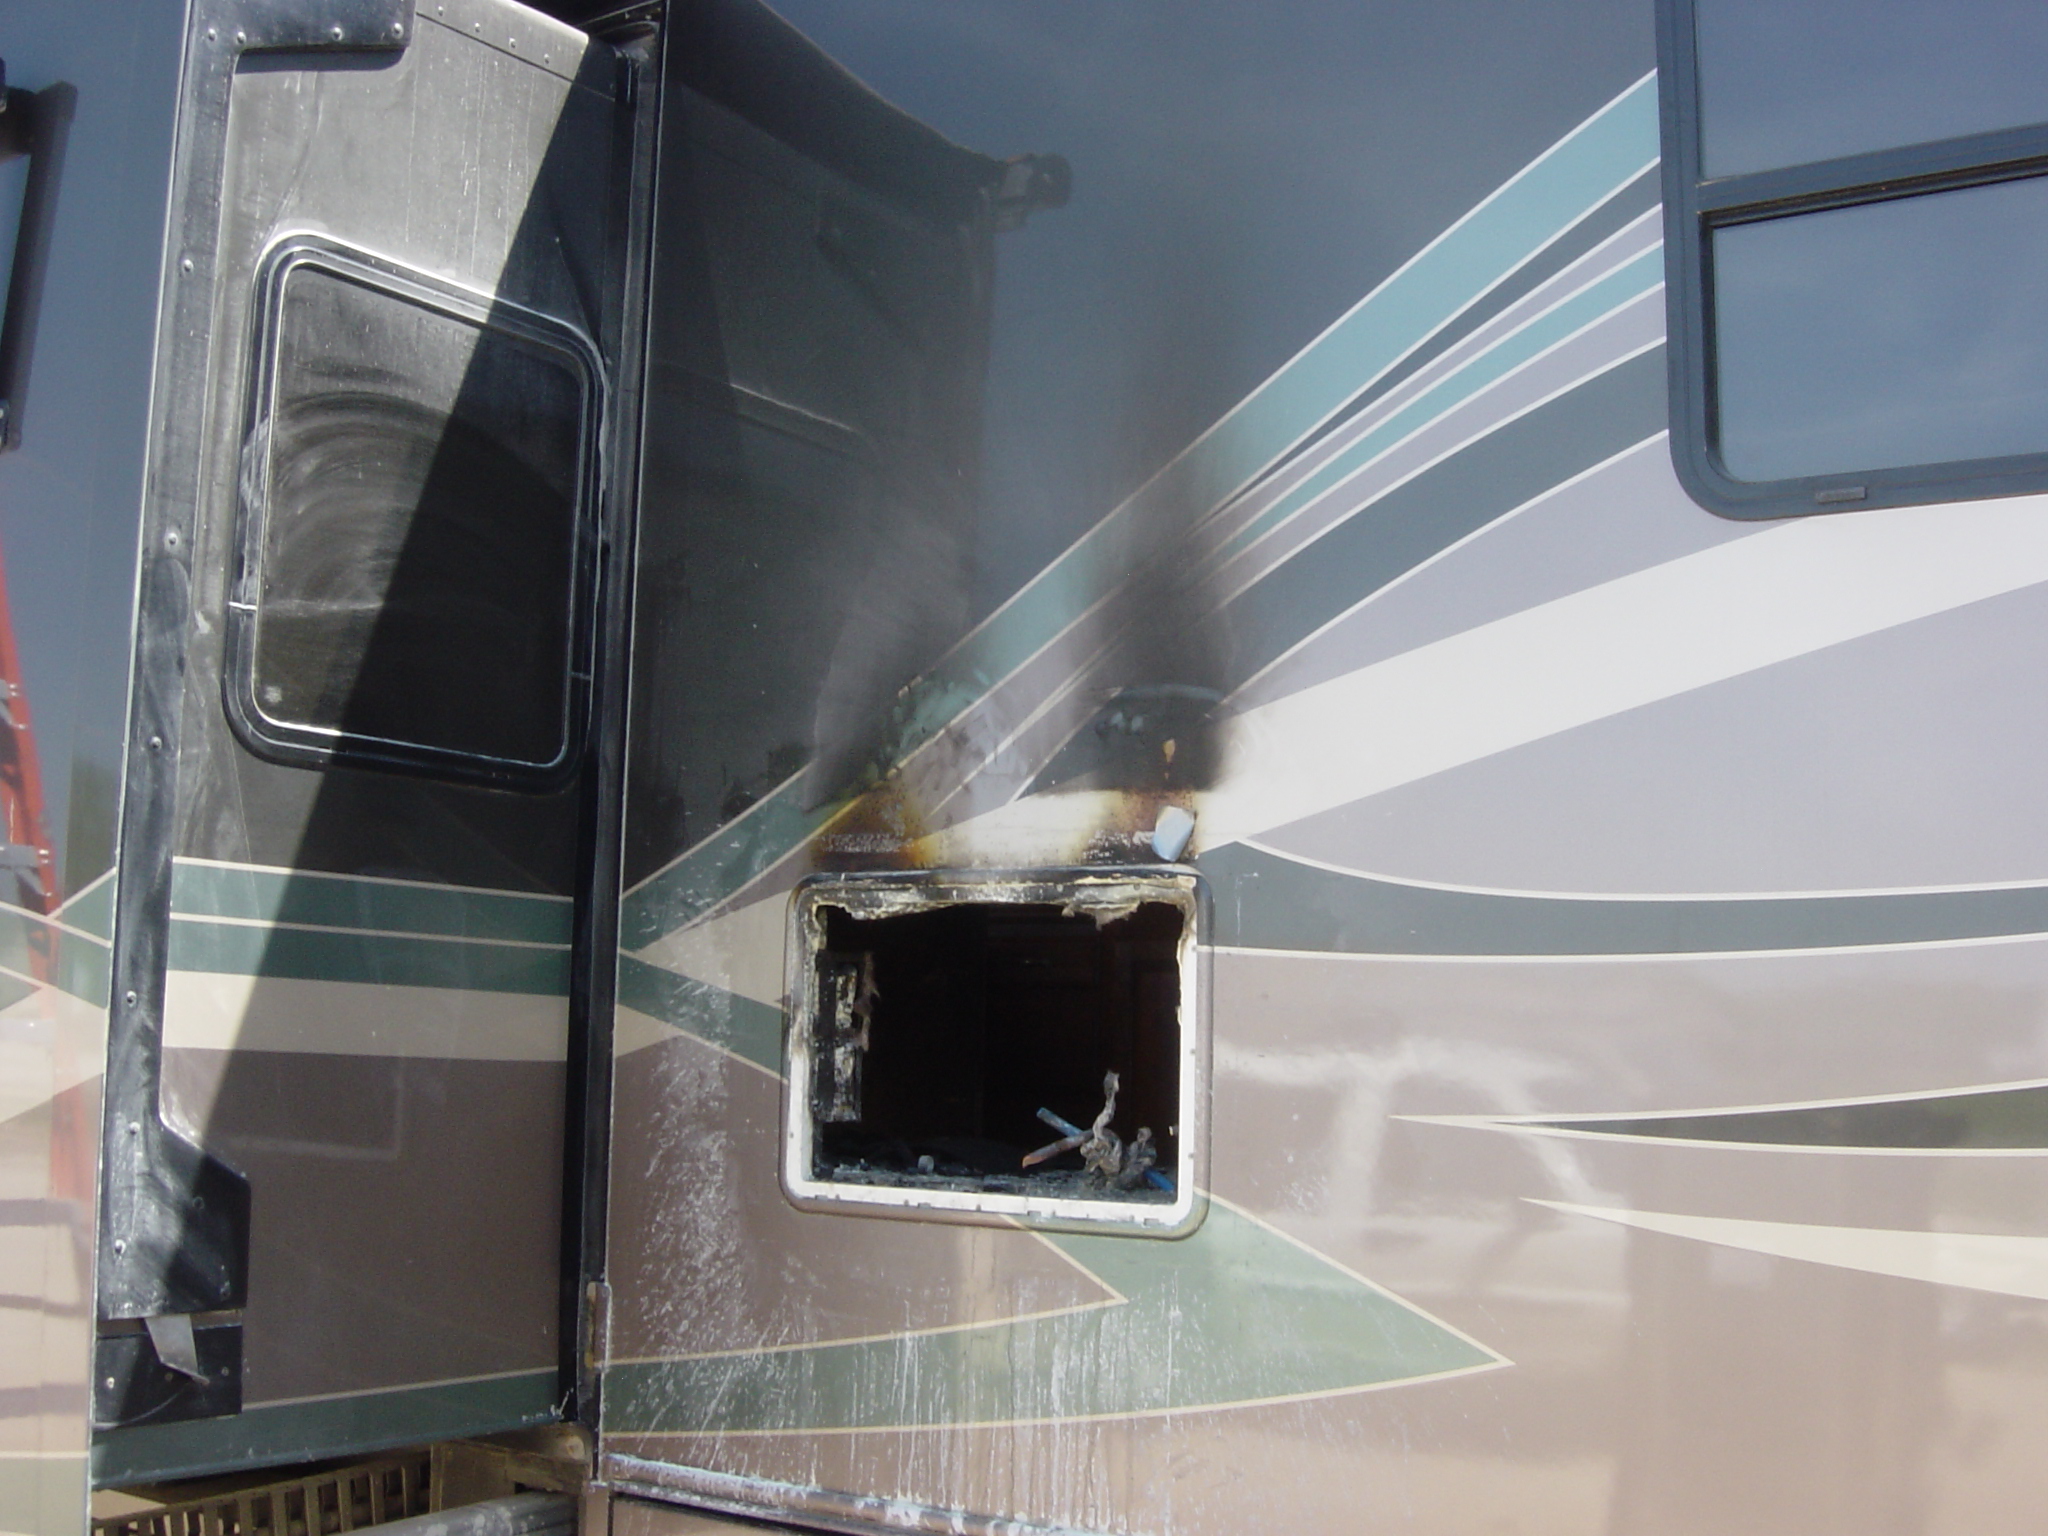
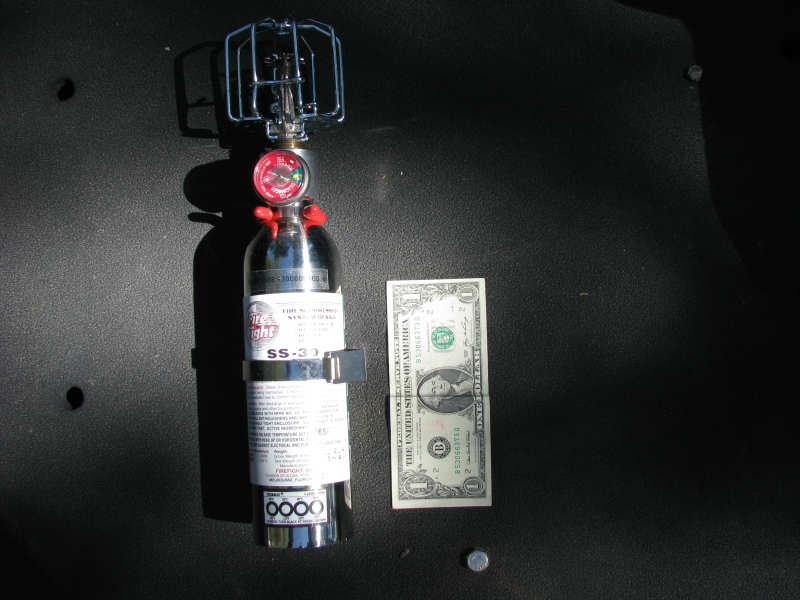
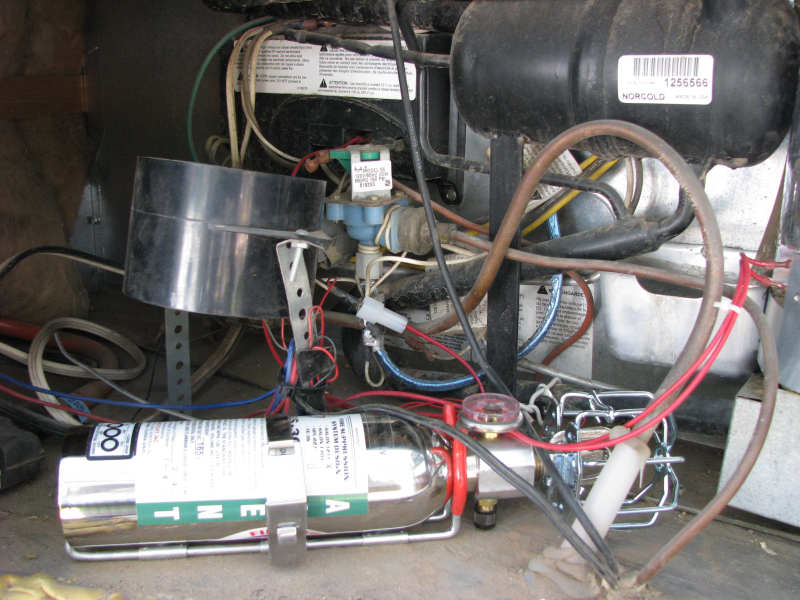
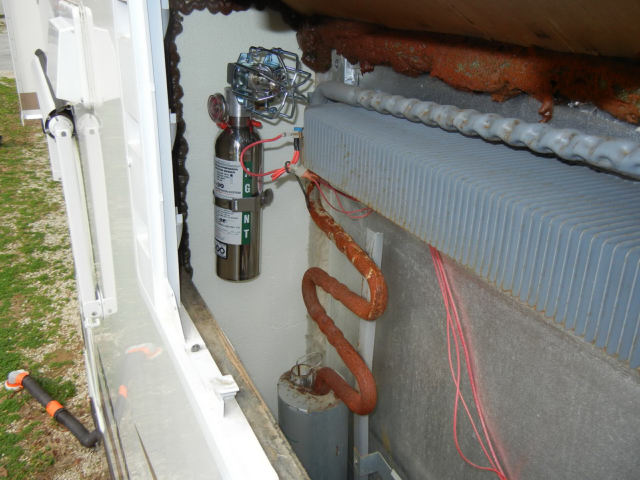
Most fires in RVs are either in the engine compartment, generator compartment, wheels/tires or refrigerator. Engine fires account for the majority of fires. What would you do if you had an engine fire in your RV? In most RVs the engine is pretty well enclosed, and it is difficult to get to for fire fighting. Your ability to get to the source of the fire has everything to do with the probability of extinguishing it (even assuming you are present). Automated, temperature activated fire suppression systems are now available at relatively moderate prices. These generally use Halon (or its replacement products), or water-based foam/surfactants. Manufacture of Halon has been outlawed because of environmental considerations, but it is still available. DuPont FE-36 is one of the popular Halon replacements, and is about as effective. All of these options have excellent fire suppression capabilities, pretty good re-ignition and flashover suppression, and no cleanup issues. They are far superior to dry chemical and CO2. Water is better than nothing, but is not considered a reasonable fire suppression product. Foam (referred to as AFFF – aqueous film forming foam) is really effective on class B fires, but can be highly toxic and pretty hard to clean up, depending on its formulation. Water-based surfactants are very effective on class A and B fires. They are now widely used in racing, are non-toxic, and biodegradable. There are several trade names that you will see advertised: FireX, FireAde and Cold Fire are a few. They work by absorbing huge quantities of heat, act as a dispersal agent, and suppress vapor release. They are by far the best extinguisher for fires like tires and engines. Extinguishers using surfactants can also be maintained easily by the owner, since they are water-based with a chemical powder added.
We recently met a couple who had lost a towed vehicle due to a tire fire. Fortunately, they were able to unhook it from their coach and pull the coach away - many are not so fortunate and lose the coach as well as the car. One thing they told us of note was that once the tire rubber started burning their dry chemical extinguishers had basically no effect on the fire. Only a surfactant-type of extinguisher like Cold Fire would have had a chance at suppressing a tire fire. This tire fire was caused by a blowout on the front/left tire. Would you know if you had a blow-out on your towed vehicle? Before it caught fire? Take a look at the tire monitor section of this website for some options on tire management. Cold Fire handheld extinguishers and automated systems based on Cold Fire are available from RV Safety Systems. The engine compartment “systems” they offer are truly that – a complete system that can monitor and protect BOTH the engine compartment and generator compartment. They are not particularly cheap, but considering the alternative I think they are worth considering if you have a motor home. Also, you may receive an insurance company discount if a suppression system is installed. Probably the best source for both Cold Fire and FireAde hand held products (including auto-suppression systems) is Mac McCoy (also known a “Mac the Fire Guy”). Blu Dot Air-Over-Hydraulic Brake System The presentation on BluDot from the 2011 HDT Rally is here. Brake controllers and braking systems for trailers are a subject of great debate among experienced and "techie" trailer owners. If you own a heavy 5th wheel you may of encountered a situation where you wish you would have had more effective brakes. There are several components of the braking system that can be improved, including:
Note: click on all thumbnails to expand to full size.
The Blu Dot actuation system circumvents all these issues by using the normal tractor gladhands and trailer connectors for braking. The tractor is designed with this in mind, and has many proven failsafe mechanisms to manage the quality of braking. The only translation of signal occurs at the endpoint - the brake actuator itself - where the airline pressure coming from the service line on the tractor is use to proportionately drive the master cylinder. No electric lines are used at all in the braking process, thus the biggest flaw of the other systems is totally avoided.
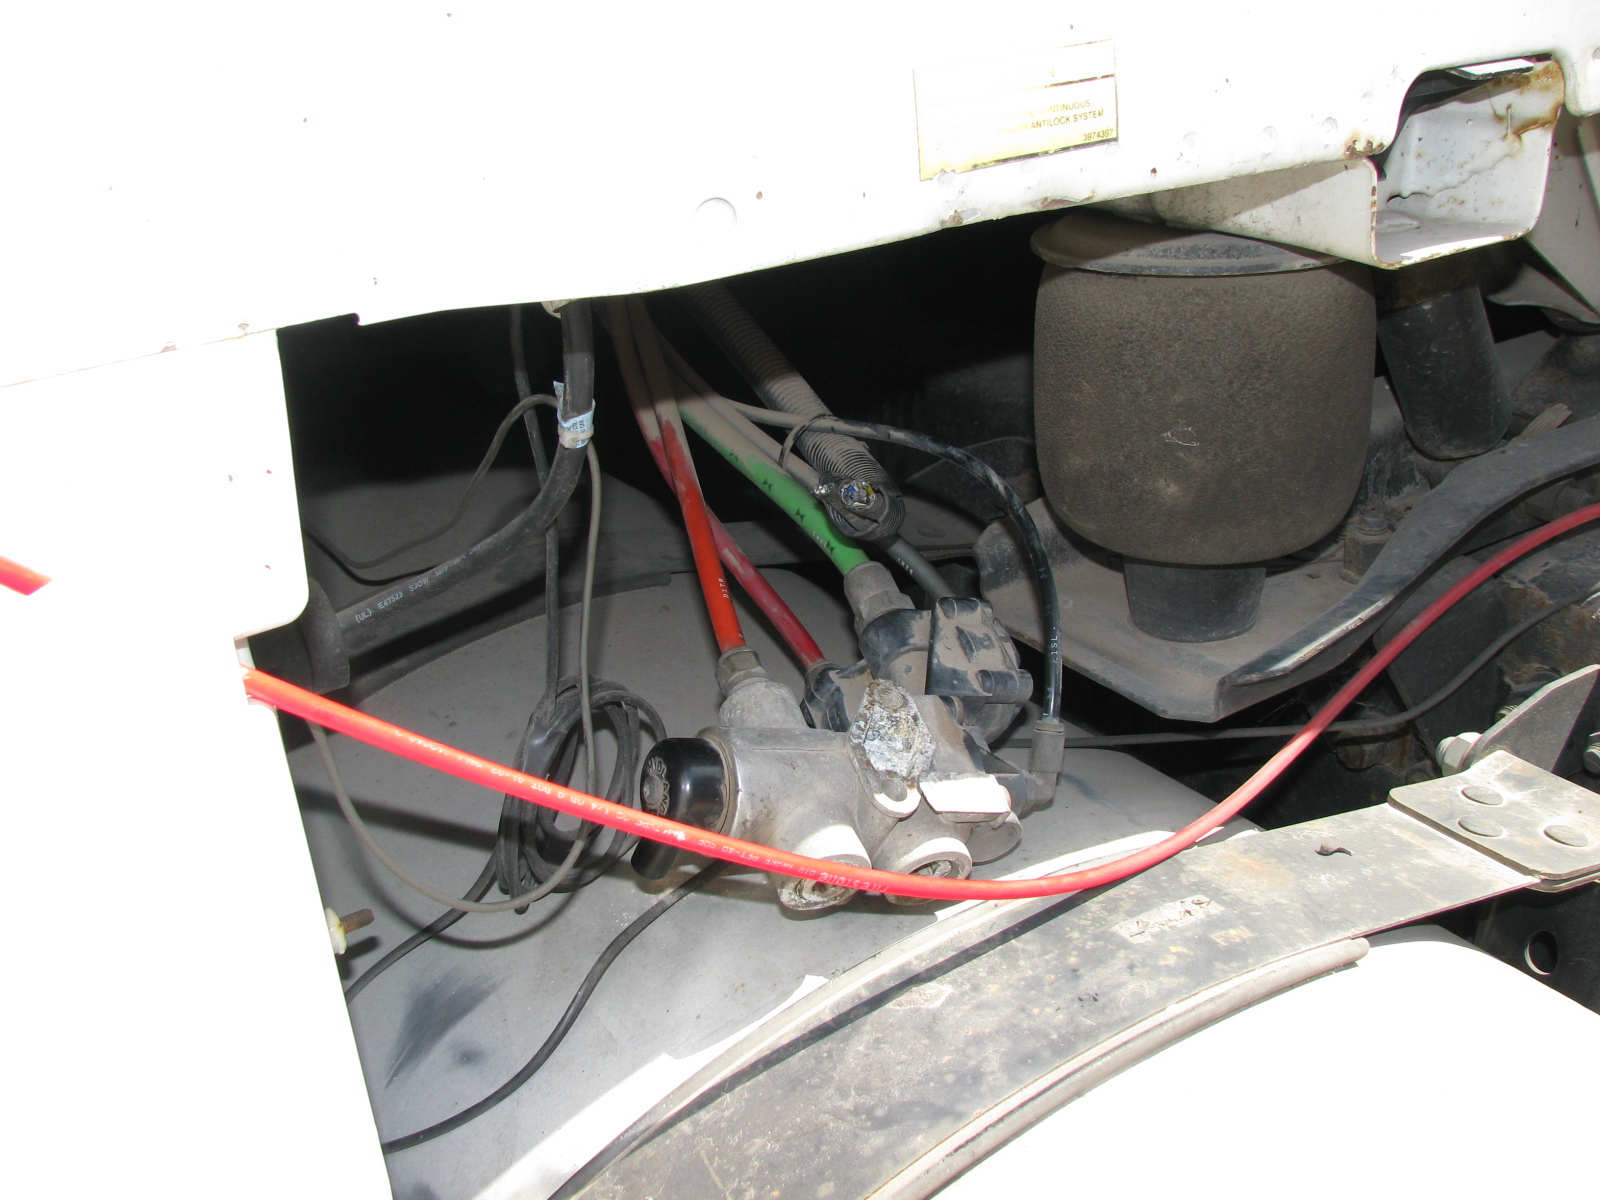
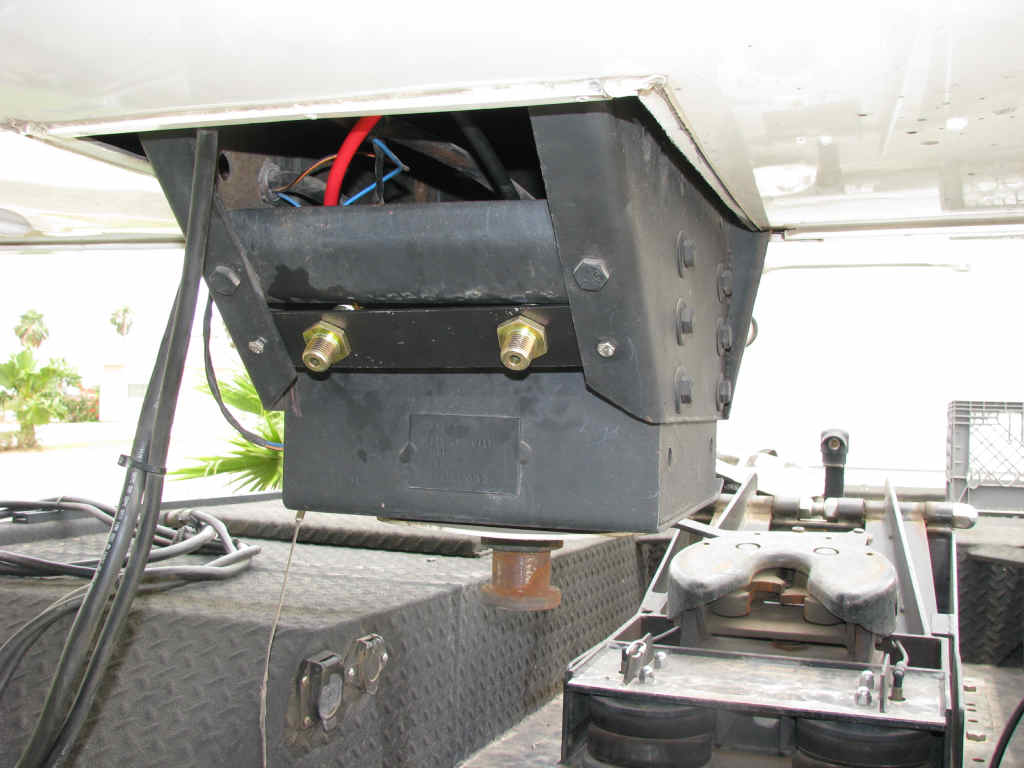
On an RV with hydraulic disc brakes there is still a tank, and that tank supplies the air that is used to drive the master cylinder. The service line (blue line) is a signal line. When you step on the service brakes in the truck, air is sent out the service line in proportion to how hard you press the brakes (a simplified explanation). Many times the emergency and service lines exiting the tractor protection valve are capped for RV use. You need to tap these exit points on the valve. Typically, you would run airline from each of these exits to the back of the tractor and install gladhands at some appropriate location. The first picture to the left shows a tractor protection valve with the output ports capped. In the installation on this truck this valve needed relocation, since there was not enough clearance between the hauler body and the valve for airlines to exit.
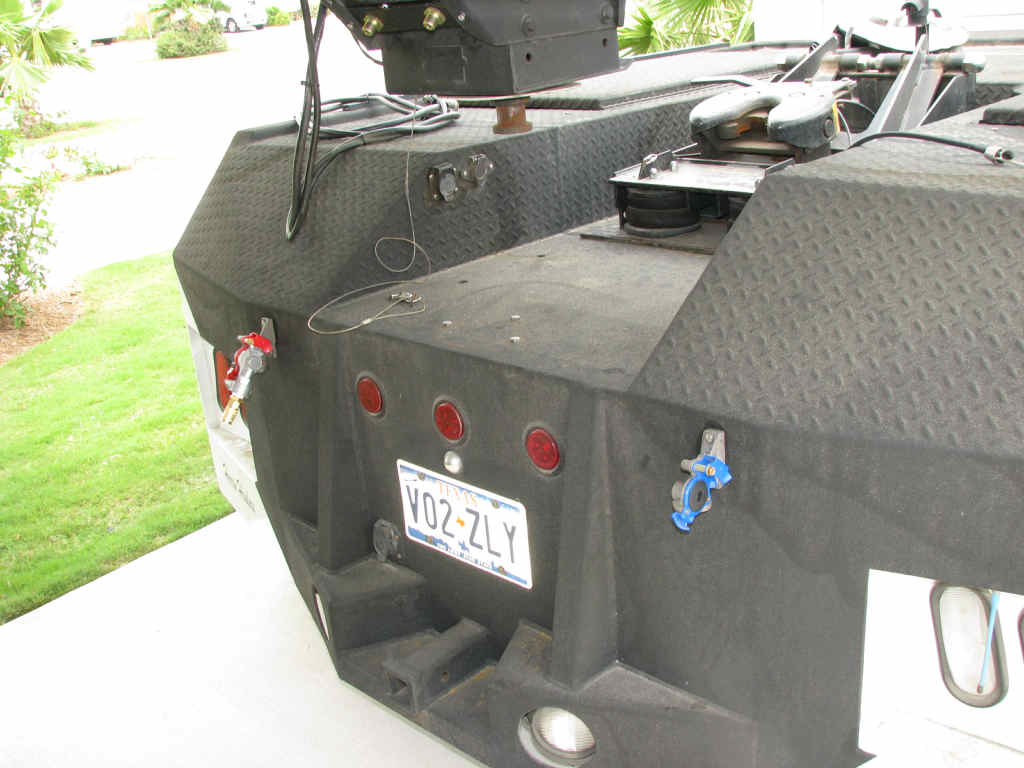
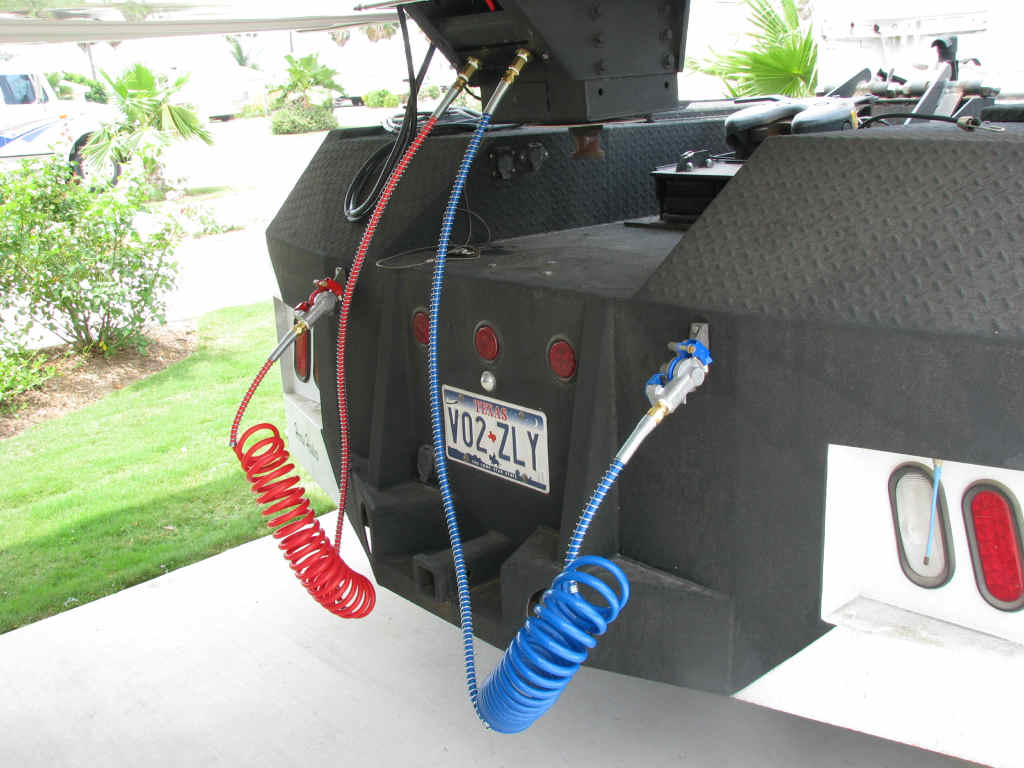
To the left you can see where the airlines are extended to on my truck. Gladhands were added to connect the coiled airlines to. Blue is the service line, red the emergency. If you are familiar with semitrailers then you might wonder why the gladhand ends are on the truck, and NOT on the trailer where they "belong". The reason is that in RV use the truck is dedicated to a single trailer and it is more convenient to just keep the airlines with the trailer. It could be either way; functionally, it makes no difference. If the trailer ever needed to be moved with a different truck with airlines on the truck side, you can simply interconnect the lines. On my truck I put the gladhand ends on each side of the tunnel. The purpose was to help keep the airlines from tangling. This works well, but you can put them right next to each other as well - that would be the more conventional placement. Note that on the emergency (red) gladhand there is a dummy connector with a quick-connect airline fitting on it. This allows me to use the tractor air system as a source for air tools or for filling tires. Simply plug in an airline like you would on a compressor. When attaching the air coils for operation of the braking system this dummy connector is removed and stored.
When installing and working with airlines on the truck you will likely need to purchase connectors. The Blu Dot kits come with most everything you need for the trailer-side. But you will need some parts for the truck side and to customize the trailer end of things. A wide variety of connectors is available online at http://fittingsandadapters.com/. They have good prices and prompt delivery. You can also purchase airline connectors at truck service departments and many auto-parts stores. But you will pay more, in most cases.
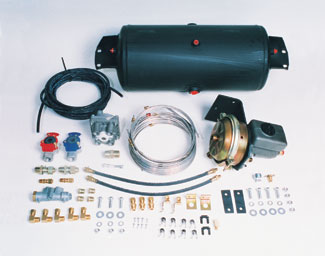
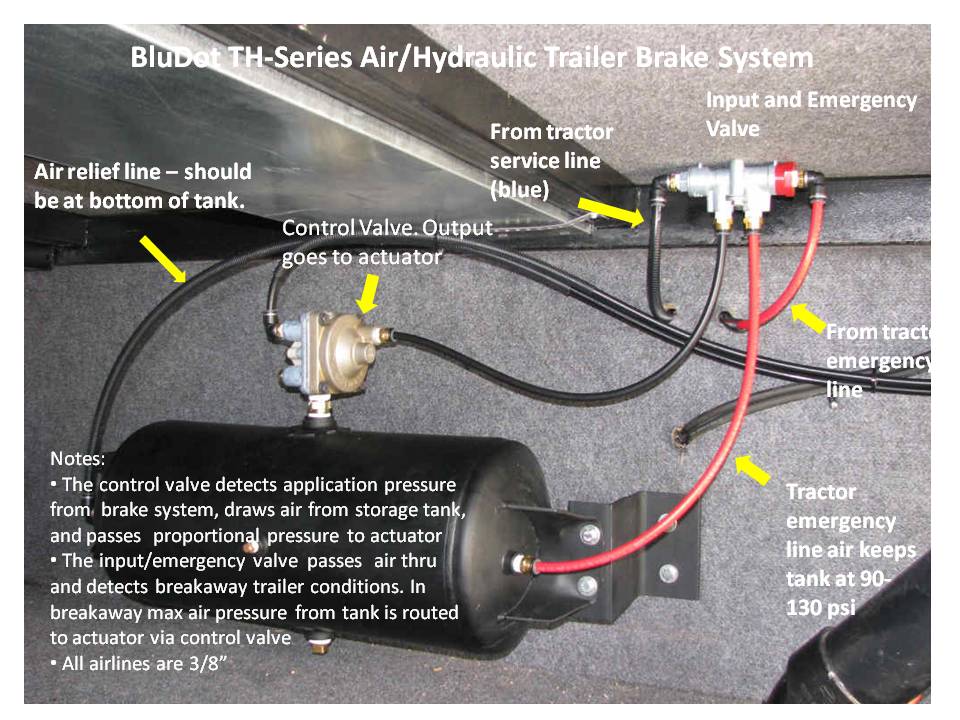
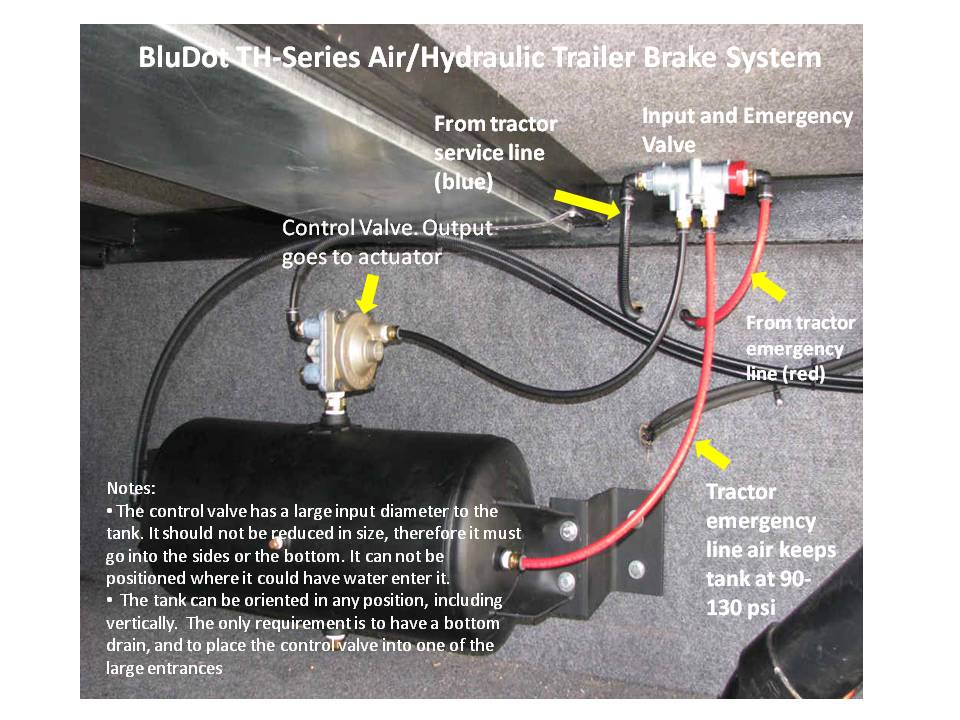
To the left you can see the major components that you have to locate in the trailer. In particular, the tank and control valves. These can be located anywhere, even underneath the trailer. The control valve attached to the tank must be placed in one of the large ports on the tank, but other than that, the tank can be oriented in any direction, even vertically. Just make sure the control valve is not on the bottom of the tank. The reason for this restriction is that if it was, it could pick up any water that condenses in the tank. You also need to have a drain line/pressure relief line on the bottom someplace. This will drain any accumulated water from the tank, and to also relieve the tank pressure when you disconnect the truck. Why do this? The way the BluDot is designed, if the emergency line loses pressure - like would happen in a trailer breakaway situation - then the valve that you see in the picture on the ceiling of the storage compartment will divert air from the tank to the actuator. This causes the trailer brakes to lock-up, stopping the trailer immediately. When you disconnect the red aircoil from the truck at your campsite this has the same effect as a disconnect - the trailer brakes lock. While this is convenient to keep the trailer from moving while setting up, it is not good to leave pressure on the disc brakes for long periods of time. It is not good for the seals, and the brakes can lock in that position. So there must be a way to dump the air from the tank once you are setup in camp.
The general purpose of the relay valve (the control valve) is to function as a remote-controlled brake valve to speed up both the application and release of the service brakes on tractors and trailers. In this case the valve is in the trailer. The valve relays a small volume of modulated signal pressure from the control valve into a large volume of modulated delivery air from the service reservoir (air tank) of similar pressure to the service brake chamber (brake can) attached to the master cylinder (this is the BluDot proprietary "joined" master cylinder/brake can). So, the valve takes an input from the truck, and pulls air from the tank at around the same pressure and sends it to the actuator (the brake can/master cylinder).
With a control port, supply port, delivery port and an exhaust port, when the control valve is operated, the relay delivers air from the service reservoir to the brake can at the same pressure as the control signal, causing the brakes to apply. As long as the control pressure is maintained, the relay will hold a like pressure in the air chamber and automatically replace any air lost because of minor leaks between it and the air chamber (brake can).
Releasing the control valve pressure signals the relay to exhaust the air from the chambers through the relay exhaust port. If control pressure is partially released, then the service brake pressure will be released proportionately. This is important - it is the only way pressure is relieved from the master cylinder/brake can assembly.
This relay valve assembly is the part that sits on top of the air tank (service reservoir) and it has four output delivery ports.
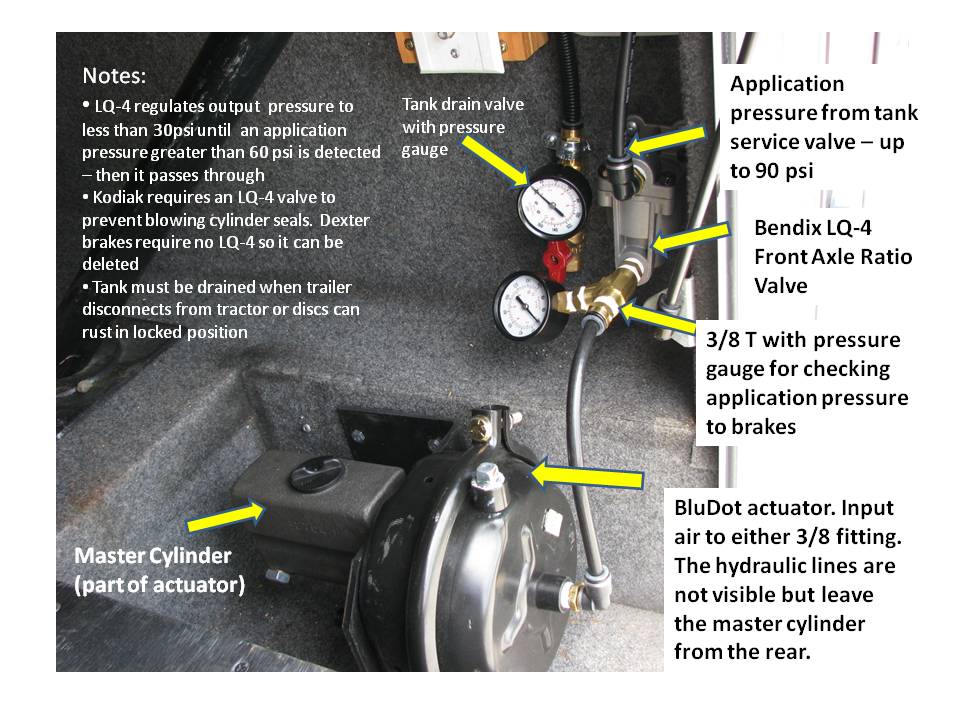
Shown here is the actuator, which consists of a truck brake can integrated with a master cylinder. In the case of Kodiak brakes a Bendix LQ-4 front axle brake valve is recommended by Kodiak and BluDot to ensure line pressures do not normally exceed 90psi. Kodiak has had some issues with high hydraulic line pressure damaging their brakes. Using this valve is intended to ensure that in normal operation more than 1000psi is never seen in the brake lines. The LQ-4 valve is not ideally suited for this application because it eliminates braking on the trailer until 20 psi is reached, and then it limits braking. Once the equalization pressure point (70psi) is reached, which then allows all air to pass. This has the unwanted effect of reducing trailer braking in mild-to-low braking situations. A panic stop with hard application would cause more than 70 psi pressure and trigger the "pass thru" so you would get full braking. Remember that normal to hard braking on a tractor is using 15-30 psi at the application side. A Bendix RV-1 reducing valve (102196, 90 psi reducing valve) installed between the emergency valve and the tank is a superior solution to the LQ-4 valve. The reducing valve plumbed into this location will only allow the tank to be pressured to 90 psi. Thus, no more than 90 psi will ever reach the brake can on application. This will meet the pressure requirements of the Kodiak brakes without reducing braking function in the mild-to-low braking situation. Putting the valve in this location will not restrict flow to the master cylinder/brake can. My advice is to NOT put in the LQ-4 and to instead put in the RV-1. This has been successfully tested in the field and operates as noted here. But it is up to you - and I can't take responsibility for your decisions, one way or another. If it was my rig I'd put on the RV-1, though. With Dexter disc brakes this component would not be used, and the airline would directly connect to the brake can. Note the air pressure gauges. One is in the drain/relief line. This shows the tank pressure under normal operating conditions. The gauge in the service line going into the brake can shows the application pressure. Both are optional, but make testing and debugging the system much simpler. The gauge with the T are under $15 - in my opinion it is money worth spending. Especially on the drain line - since forgetting to drain the tank for long periods when the trailer is unhooked can have a serious impact on the brakes. Some more pictures are on my Picasa album here.
The story is best told in pictures. Check out my Picasa album TV Mount. |
|
|
|
||
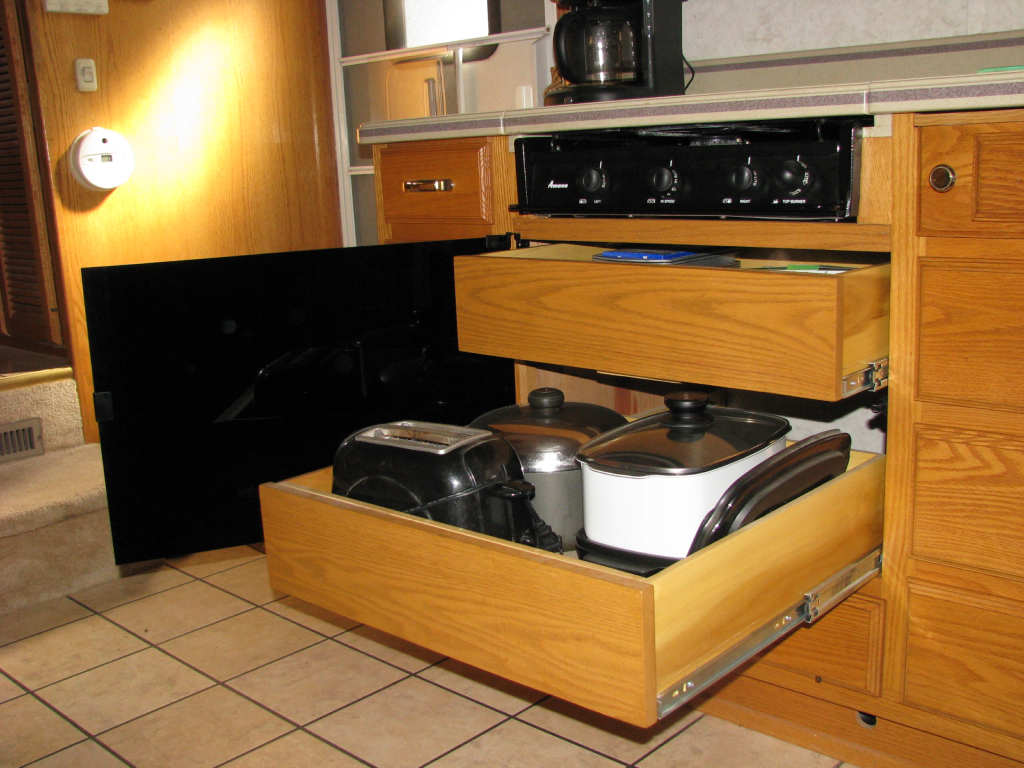 After
many years as fulltime RVers we found that we never used the gas oven.
We have always had a convection microwave, and we use that for all our
cooking and baking needs. The gas oven was used for storage of pots,
pans, and bread. So we decided to replace the range with a cook top, and
turn the gas oven space into drawers. It was a relatively simple job if
you are handy with woodworking. The biggest issue for us was matching
the drawer edges to the rest of the RV. That proved to be impossible
without having custom router bits made (at a cost of over $200). Even
Carriage, the maker of our 5th wheel, would not make drawer fronts for
us. Unfortunately, they use a custom edge and we can not find any router
bits (or combinations) close enough to match theirs. This would not be
an issue with almost any other manufacturer.
After
many years as fulltime RVers we found that we never used the gas oven.
We have always had a convection microwave, and we use that for all our
cooking and baking needs. The gas oven was used for storage of pots,
pans, and bread. So we decided to replace the range with a cook top, and
turn the gas oven space into drawers. It was a relatively simple job if
you are handy with woodworking. The biggest issue for us was matching
the drawer edges to the rest of the RV. That proved to be impossible
without having custom router bits made (at a cost of over $200). Even
Carriage, the maker of our 5th wheel, would not make drawer fronts for
us. Unfortunately, they use a custom edge and we can not find any router
bits (or combinations) close enough to match theirs. This would not be
an issue with almost any other manufacturer.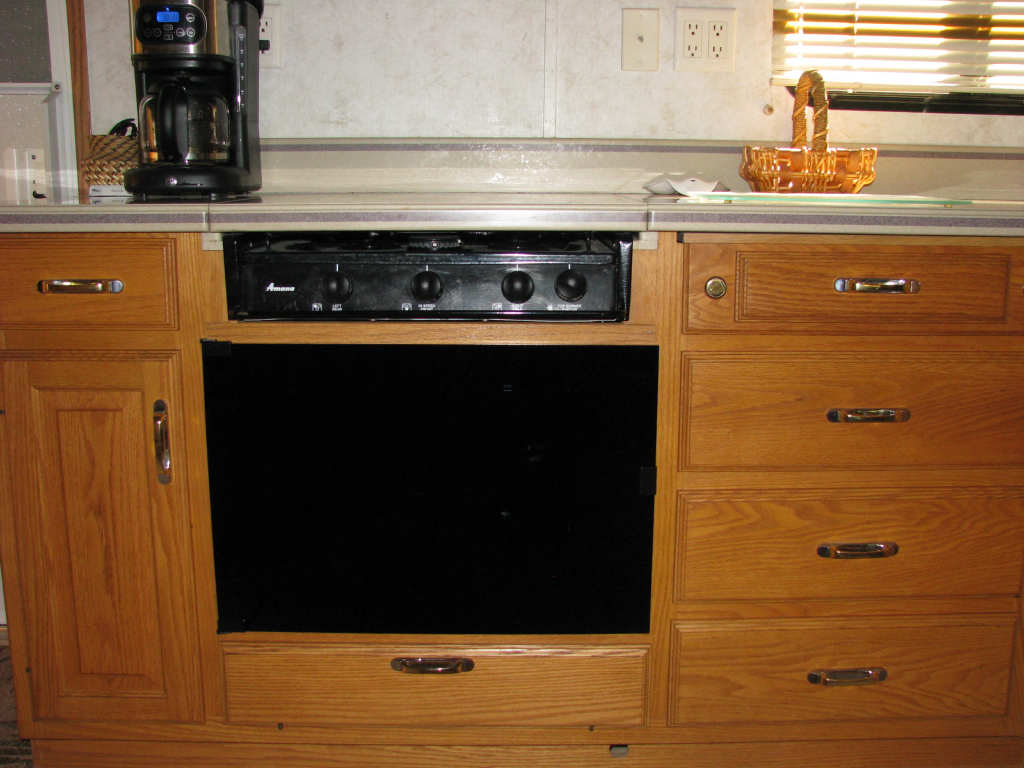
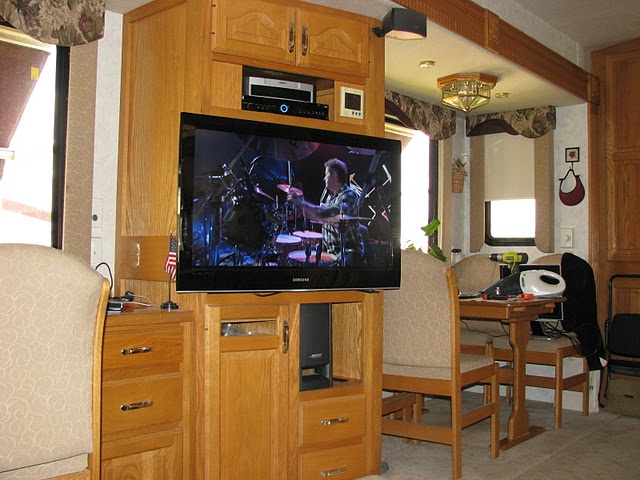 In
our Royals International we converted the entertainment center from
housing a 24" Sony tube TV to a 32" Samsung LCD TV. I mounted this on a
custom made swing-away mounting system in order to utilize the space
behind the TV. The TV sat on the "face" of the cabinet, since the newer
16:9 ratio LCD was wider than the previous 4:3 ratio TV. This is a
typical issue you will face when upgrading a tube TV to an LCD. Some
variant of the techniques I used should work for most installations.
In
our Royals International we converted the entertainment center from
housing a 24" Sony tube TV to a 32" Samsung LCD TV. I mounted this on a
custom made swing-away mounting system in order to utilize the space
behind the TV. The TV sat on the "face" of the cabinet, since the newer
16:9 ratio LCD was wider than the previous 4:3 ratio TV. This is a
typical issue you will face when upgrading a tube TV to an LCD. Some
variant of the techniques I used should work for most installations.