|
|
||
|
|
|
|
|
|
||
Selecting Your Heavy Duty Truck
|
|
|
||||||||||||||||||||||||||||||||||||||||||||||||||||||||||||||||||||||||||||||||||||||||
|
|
Copyright © 2002-2013 John Mayer. All rights reserved. For reuse policy see Reuse Policy In this Section:
This section discusses our trucks, and the factors we considered when selecting from the many available trucks. Although we ended up buying our first truck - a Volvo 610 - through Larry Zeigler, we considered all our options before accepting one of the trucks Larry acquired. It took us over a year to find our truck, and we spent a year before that researching our options. We were pretty particular, and as it turned out, some of the things we thought we wanted on the truck we dropped when we bought from Larry. During this process Larry offered free and willing advice to us. Ten years later I still find his advice was “right on” in every respect. Some of the tradeoff’s you have to make are personal choices/preferences; such as wheelbase. Only YOU can decide on these, but you need to understand your present and future requirements well in order to make an informed decision. Your truck will last a long time, so choose accordingly. Near the end of this section is a link to salesmen you might consider, and some other helpful info. Also, check the Resource Listing section for various sources of parts, places to have your truck painted, etc. Obviously, much of the info that follows is our opinion. I try to present the logic we used to reach our conclusions. Your preferences may differ. There are a large number of pictures of our Volvo 610 being converted to a single axle here: 610 Volvo conversion. A photo album of our 780 bed build and other 780 projects is here. One note on bed building: since smart cars have become popular additions to HDTs for local transportation I would think hard before building a body that was not large enough to add a smart. Even if you are not interested in a smart, it will enhance the resale value of your truck greatly, and you may change your mind in the future. There is a great deal of reference information on the Heavy Haulers Resource Guide (web site). Including lots of pictures of different trucks. It is well worth a look. To answer some of the common questions that people have about using an HDT as an RV Hauler check out A Note About Owning and Driving an RV Hauler Semi- Truck.
Some people have the skills, desire, location and knowledge to find and convert a truck to an RV hauler on their own. Most people do not. If you have the skills and location to do this work yourself you can probably skip this section. If you don't have the confidence to find and check out a truck on your own you may want to buy a "turnkey" conversion. You have two choices: buy an existing truck that is converted for RV use and that is for sale, or have a truck converted specifically for RV use by a truck conversion company. Both are good options. The Escapees HDT forum always has a number of trucks listed for sale. Most of these have been used in RV service for a number of years. They have conveniences added to them for RV use. And they can be a good buy, if someone is "moving on" and getting out of the RV lifestyle or converting to a motorhome. There are not many truck conversion companies that convert HDTs. There are more companies that convert MDTs, but most of them will not touch a used HDT. For a "turnkey" product - where you simply specify the type of truck you want and the characteristics of the conversion (wheelbase, singled, etc.) there is only one company I would recommend. That is RV Haulers in Calgary Canada. Gregg and Kerry Shields convert (mainly) Volvo tractors for use as RV haulers. They find the truck, check it out before purchase, perform any mechanical upgrades/fixes required to make it a reliable RV hauler, single it to your specifications (short, long or mid), detail the truck, put on an ET hitch and Jackalopee wiring converter, cut the frame rails to proper length, clean up the frame, and do any other customizations you want. While Gregg does not currently build hauler bodies, the truck is completely prepped for a hauler body to be added. For a hauler body I highly recommend Larry Herrin, in Kilgore, Texas. While I have the skills and knowledge to find an appropriate truck and "job shop" out the work of converting an HDT to an RV hauler, I chose to use Gregg for the acquisition and conversion of our 2009 Volvo 780. It greatly shortened the time required to get a functioning truck, and Gregg is incredibly conscientious on the mechanical aspects of the selection and conversion process. He shares my philosophy of preemptive maintenance, and replaces all marginal or suspect parts that he finds during conversion. This results in a far more reliable truck. In my opinion, one of the things that differentiates RV Haulers from other conversion companies is the amount of time and effort Gregg puts into the mechanical aspects of the conversion. He makes sure that the truck is mechanically sound, and has mechanics on staff to perform any work required to make the truck as reliable as possible. He also has an excellent relationship with the local Volvo dealer for things that he can not do "in house" - like reprogramming the ECU or the lighting and traction control systems. The fact that Gregg is in Canada and I had to import the truck did not prove to be an issue. Gregg prepared all the paper work and the border crossing was a "non-event". It took all of twenty minutes. Working with Gregg was indeed a pleasure. During the process of finding and converting the truck we spoke almost daily, using email or Skype. The communication process was superb - I never "wondered" about what was going on, and I was involved in all the decisions along the way. Gregg uses video and pictures extensively, so you always have a good "feel" for where the conversion process is. If you would like to see a series of about 30 short videos documenting the conversion of our Volvo 780 take a look at the RV-hauler website. There is a link to the video series on the home page. I can not stress enough how important good communication is during the conversion process. You are paying a premium for someone else to do the work - so it is incredibly important that you be aware of, and involved in, the decisions that have to be made during the conversion process. There will ALWAYS be surprises when doing a conversion on a truck, and as the owner you want to be both aware of the issues, and involved in the decision process. Gregg excels at keeping you involved and aware of what stage the project is in. He also is keenly aware of how long it takes to do the conversion properly, and he gets the job done. Believe me, grass does not grow under Gregg's feet. The trucks Gregg finds for conversion are typically in Canada. That is not a problem, and in some ways is an advantage. For example, trucks in Canada often have auxiliary heaters in them. My truck has a Webasto heater (that heats the truck without the engine running). They also tend to more commonly have APU's in them as compared to US trucks. Gregg finds his trucks from both dealers and owner operators. Many of his trucks are owner-operator trucks. These trucks tend to be very well taken care of, and also outfitted to a higher level of amenities and options than other trucks. Before purchasing a truck, Gregg inspects them very carefully - he is very particular about the condition of the truck, and he only buys non-smoking trucks. So you are starting with a great truck, and the conversion and build-out process only improves things. Gregg will deliver the truck to you in the US (or Canada) if that is convenient for you. He also now pre-clears customs for trucks coming to the USA. In my case he prepared all the paperwork and it was a simple matter to clear customs - now he actually takes the truck through customs for you prior to your picking the truck up. Thus, you do not have to do customs when bringing your new truck home. Simply drive across the border as you normally would. This is a great service, and eases peoples "nervousness" about truck importation. Gregg and Kerry own an RV and use an HDT to pull it. So he understands very well how important reliability is in the tow vehicle, and he also understands the RV lifestyle and what is important to an RVer. For example, he only uses the best hitch available - an ET hitch. When considering an HDT conversion, if you are not doing it yourself, you will be well served by giving Gregg a call. If you have any questions about the process, or using RV Haulers for your truck conversion, feel free to contact me.
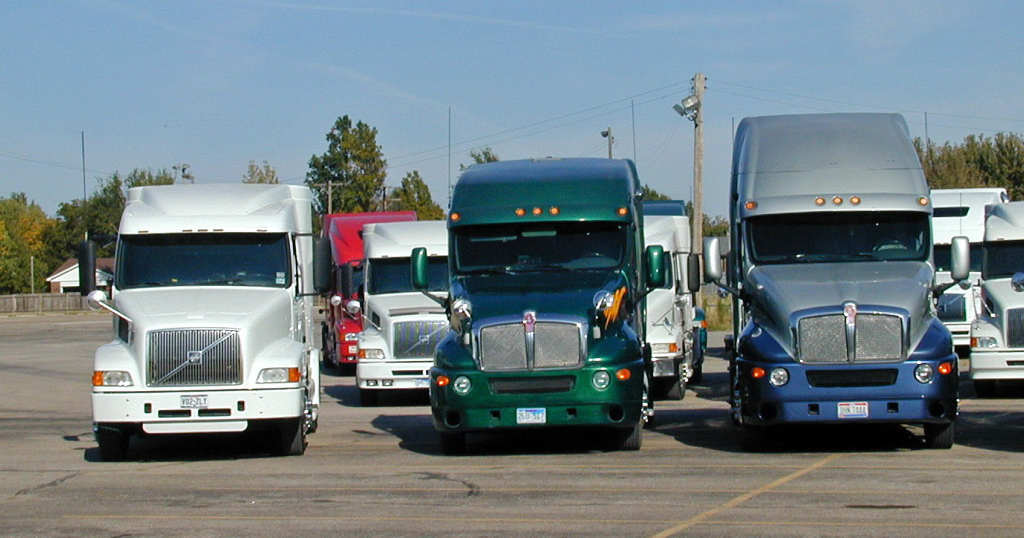
Which Class 8 to Convert We obviously selected a Volvo, but that does not mean other class 8’s are not as good. As with RV’s there are tradeoffs in every model. Personally, we wanted an aero sleeper, but others find a sleeper to be too big and a waste of space. Some buyers convert the sleeper to passenger seating. This is certainly doable. You can add windows to the back and sides if your truck does not have them (try Peninsula Glass for a great selection of high-quality RV-style windows). You can also add a jackknife couch in place of the bed (and still retain the storage compartments). If you want to be able to drop the couch into a bed then you will have to remove the storage cabinets in some trucks (definitely in a Volvo 630/670). We chose to leave our interior intact since we sometimes use the Volvo for short overnight trips instead of hauling the 5er. We also like having a fridge/microwave in the truck, which would be difficult in a Volvo 610 if you added a jackknife couch. You can see some pictures of Volvo's with windows and couches added at Powerhouse Coach. Look in the "Toters" section. There are two primary tradeoffs that will drive all other choices when considering which tractor to convert. These are length of cab, and height of cab. Full height tractors are easy to find (full-height tractors are about 13’ tall) and much easier to find with an automated transmissions than mid-height tractors like a Volvo 630. Mid height tractors have the advantage of being easier to drive off the interstate/National Network. There is less tendency to hit tree limbs, or to have to deviate because of low overpasses. There is only one popular mid-height aero tractor and that is the Volvo 630. Other manufacturers make mid height units but they are harder to find. (You can find more mid-height conventional tractors - those with the long nose - but we prefer an aero sleeper.) Full height tractors do have additional storage in the extra vertical space. Most of the full-height tractors are also longer than the mid height tractors. The length of the tractor (wheelbase and cab length) is probably the most critical measure. Your wheelbase will be driven by the BBC (Bumper to Back of Cab) measurement. Basically, longer sleepers have longer BBCs. So the Volvo 630, with its 61-inch sleeper, will be much shorter to the back of the cab than a Volvo 780, with its 77-inch sleeper. The longer the BBC is, the longer the minimum wheelbase. So, you need to decide how long of a wheelbase you can tolerate. Anything over around 210” is going to be significantly harder to drive around town and park than shorter ones. I’ve kind of chosen 210” arbitrarily, but it is based on my experience driving our truck (182”) and longer wheelbase MDTs and HDTs. Of course, you really need to consider what kind of deck cargo you will be carrying. If you don’t intend to carry anything on the deck, then stay on the short side. Our 182” will carry a single motorcycle or ATV. On a Volvo 630 a 182” wheelbase is about as short as you can go. If you look in the section describing our body you will find the spreadsheet we used to play with different wheelbases and body layouts. It has a truck body calculator for Volvo 630, 780 and Kenworth T2000. This should help you decide what wheelbase truck to buy. What you give up with the shorter cab trucks is the nice large
sleeper. The Volvo 630 is certainly livable, but a Volvo 780 has a lot
of extra room and storage, as does the T2000, with its 75” condo. As an
example of the length tradeoffs, consider a T2000 compared to our 182”
wheelbase Volvo 610. Our truck body is 9’ long (behind the vertical cab
fairing). There is a box in between the cab fairings that is 14”. To put
the same body on a T2000 (9’ body behind the vertical cab fairings) you
end up with a 204” wheelbase, assuming you can find the 230” wheelbase
tractor to start with. (Subtract 26” from the tandem wheelbase to get
the single axle wheelbase.) Most T2000 wheelbases (unconverted) are in
the 232-240” range. So you will have at least 22” more wheelbase. But
you will have 14” more condo space, if that is important to you. Note
that our deck is the shortest that is usable for carrying much of
anything, so your deck might have to be longer than our 9’. Some history of Volvo models, and evolution can be found
here. Here is how Volvo model names work: VNM = 112" 'bumper to cab'
"medium hood" 42T = 4x2 Tractor 1997-2001 models Gen 1 models Oct-2002+ Gen 2 models 200, 300, 800 = day cabs engines, Volvo D12 and Cummins ISX only 2005 2006 2007 For our first truck our candidates for conversion were the Volvo 610, Volvo 770, Pete 387, and Kenworth T2000. All are full height tractors with large condos, except the 610. We did not consider a Volvo 660 because it has the condo of a 610, with the height of a 770. For us, the worst characteristics of each. We also did not consider any Freightliner product. We have many friends with MDT FL's and they have nothing but problems. Danielle's friends in the heavy trucking industry recommended staying away from Freightliner unless cost was a significant factor. Your opinion may vary on this point. (Update: the newer M2 FL's are pretty nice trucks, and if I was building new I would consider them. Also, the Cascadia has proven to be a very good truck.) At the time we were looking for a truck it was to be our daily driver, so we discarded the Volvo 770 and Pete 387 because of their height. They are just taller than we wanted for every day driving. They are fine on major highways, but on secondary roads, and especially in some campgrounds, they are taller than is convenient. Even with our 10’10” Volvo 610 we have to be observant. Most of our time is spent in every day driving, not while towing, so it was more important to have a tractor that was good around town.
The T2000 has a 75” condo, and a 50” setback front axle. Its BBC is 184”. With a suitable body, the minimum wheelbase of a T2000 is in the 204-208” range (assuming you want to carry a motorcycle). Along with the longer wheelbase, the T2000 only has a 45-degree wheel cut; the Volvo’s have a 50-degree wheel cut. The combination of these two factors means that a T2000 will be a much harder vehicle to live with on a daily basis. Our limited experience with T2's also led us to the conclusion they are noisier than Volvo's, and the driving position (especially for short people like Danielle) is not as comfortable as the Volvo. The driving position does vary somewhat based on the installed seats, and the availability of telescopic steering (this is an option in T2's and standard in Volvo's). In favor of the T2000 is its very nice 75” condo, and its looks. We consider it one of the best looking tractors on the market. It is also fairly easy to find one with an autoshift transmission. If you are looking at a Pete 387, be aware that from 2005 on they have a wheel cut of 55 degrees (with the 12002 front axles) - better than a Volvo. Prior to that you were stuck with the 45 degree wheel cut in a Pete. Back in 2003, all these considerations led us to a Volvo 610 as the right tractor for us. The final deciding factor was the Volvo had a driver’s side air bag, the engine was designed to dive below the cab in an accident, and the dash was designed to be crashworthy. While we would have loved to have a larger condo, the 61” condo is fine, even for overnight trips. Despite the negatives of the T2, it is a fine truck, and we would consider owning one in the future. It would have to have telescopic steering, though. An in-depth analysis that came to a different conclusion, ending with the purchase of a Volvo 770, can be found at the website of Mark and Dale Bruss. 2011 Update: If choosing today we would choose a 780 first, and then a Pete 387. Since our truck is no longer our only transport, the taller cab height is not a factor. The extra space inside is an important consideration, since we do use our truck as a mini-motorhome on occasion. We prefer the 780 over the 387 because of the dinette, and the extra cabinet storage in the 780. But the Pete looks better in our opinion. 2012 Update: In fact, we did choose a 2009 Volvo 780 as our second truck. For the reasons noted above.
Our First Truck - 1999 Volvo 610 In 2003 we purchased a 1999 610. It had a Cummins ISM (upgraded M-11) with 400 hp and 1450 lb./ft. of torque. One of our “must-haves” was an autoshift transmission – more about that later. We have a 182” wb, after conversion. The frame was cut at 39” behind the rubber of the rear tire (see the body-building section for our recommendations on this). We added Accuride aluminum wheels on the fronts and outer rears. We had the truck dyno’ed, DOT inspected, an overhead (tune-up) done, all fluids changed, and synthetic added to the transmission and rear. We also had Cummins do an engine inspection and bought the extended warranty that they offered (200,000 miles/2 years). We had the tank fairings added to the truck. This is an expensive and time-consuming operation. Figure on a minimum of $2000 to add these (yes, you read that right). If you want tank fairings, make sure they are already on the truck - adding them is not really practical. I did not have the converter do any additional electrical work, or add any appliances. I'm very particular about electrical modifications and the “draw” of appliances, so chose to do those myself. You can see what I did in the Truck Improvements portion of this website. I did have the shore power connector added because I was picking the truck up in Kansas City and driving directly to Livingston, TX to register as a motor home. I did this without having all the appliances in. If required to go through an inspection in order to obtain the motorhome designation, I wanted to be able to go to Wal-Mart, buy the appliances, and then complete the registration process for a motor home. Having shore power already in would make this much easier if I needed to do it “on the road”. As it turns out, it was not necessary; I registered as a motorhome without any inspection. I added the appliances later. Back in 2003 our requirement for an engine was Cummins, Detroit, Cat in that order and at least 400 hp/1450 torque. Variable hp engines were fine, as long as they met these minimum requirements. As it turns out, 400 hp is sufficient to pull a heavy RV. I would buy another 400 hp engine, but I would prefer a 430-ish/1550-1650 torque. The extra torque would be handy sometimes in the big hills of the west. When looking, I was more familiar with Cummins engines, so that was our preference, but at this point I would take any of the big three. At the current time, most Volvo trucks have Volvo engines in them. Originally, in 2003, I said I would not buy a Volvo engine. Not that I thought that there was anything wrong with them, in fact they have a good reputation; it is just that I thought they would be harder to get worked on by “experienced” mechanics than the others. I've since changed my view on this and would buy a Volvo engine (and in fact, did buy one on our 2009 780), assuming the truck met my other requirements. The experience of others with the Volvo engines has been good, in the service area. We have routine service (oil change, fuel filter, lube, etc.) done at Speedco, primarily. It is easy in and out, we can run through with the 5er attached, if required, and they are consistent in price and service level. They also don’t object to you standing and watching them; in fact they insist on you watching them torque the oil drain plug. I always get an oil test done. It is relatively cheap, and lets you know if anything is starting to go in the engine or cooling system. Once a year or so, when I am in a Volvo dealer for Volvo-specific work I have them do just a lube. That way I have a better chance of getting all the lube points done. You would think a Volvo service person would know where they are (perhaps wishful thinking). So far (after over 10 years), we have had no engine-specific problems
with the Volvo 610. A note about the "big block" engines (like the ISX/ N14 Cummins or the Volvo D16). These engines are heavy. When used in a bobtail tractor, with a good fuel load onboard, you could overload the front axle (typically 12k lbs.). To counter this problem, Volvo, at least, moved the fuel tanks rearward on some versions of their trucks. This interferes with having a body with forward storage compartments (just forward of the axle), since there is at least one fuel tank positioned back in this area. You see this most often on 780's but it can be on 630's with the ISX/N-14 (or any "big block"). You need to be aware of this when converting to RV use - you want as much weight on the rear body as is practical to "unload" the front axle and better distribute weight. Many people add weight (up to 1500 lbs., in some cases) behind the rear axle in the form of plates. I think this is a good idea if you have a front axle close to overload. Remember, you use the tractor "bobtail" more than hauling. If you are having a hauler bed built, then you can move the tanks forward to regain some of the space lost to the tanks. The body will more than balance out the front axle loading. The B50 rating of an engine is an indication of when half the engines will need overhaul. So a B50 of 500,000 miles means half the engines that reach 500K miles will have needed an overhaul. The following table gives statistics for the most popular engines. If you buy a used truck that has an engine near the B50 then you should factor in the cost for an overhaul into the price, in my opinion. Any engine close to the B50 you might consider replacing the rod and main bearings and having a look at the engine while doing that. Cost to replace rod and main bearings on most engines is in the $1400-$1600 range. It is cheap insurance for a higher mile engine.
Engine idle time is another piece of data to look at. The ECM report
or drivers display will show total idle time. Industry experts report
that Class 7 or Class 8 OTR trucks (Over The Road) will average 1,800 to
2,600 hours per truck annually. If used in expedited freight then it
will typically be higher, because of extended layover times in
expediting. The air systems, and associated parts, are quite different from a regular truck. The braking system depends on a reliable, and clean, air supply. When selecting a truck you need to make sure the air system is in good working order, with no major leaks. All trucks will leak down over time, when left sitting. “Normal” behavior falls in the range of dropping air to 75psi (the alarm point) in a 24 hr period. When checking a truck for acquisition, I personally would not accept a drop of more than 5 psi (more or less) in a 2 hr period. If it is leaking down that fast you need to discover why. The leak could be anywhere, and it might be hard to find. Some of the component parts of the air system are very expensive to replace, so you need to find out why it is leaking. On all modern trucks there are three air tanks; a “wet tank” that the air compressor supplies with filtered and dry air (you hope), and a tank and associated lines for the primary brakes (rear) and secondary brakes (front). The wet tank needs to be checked and drained on a periodic basis. It might contain water (through condensation) or a small amount of oil. You don’t want this oil and water to get into the braking system. If the air dryer desiccant filter is working properly, the amount of oil/water in the wet tank will be minimal. Our truck NEVER has any moisture or oil in the wet tank. When used in commerce, the driver is required to check once a day. I generally check once a week, and have never found anything. Some trucks have automatic drains on them, but they should still be checked manually on a periodic basis. When looking at a truck I would be suspicious of lots of water/oil, but it is in the normal range to have some. Depending on how much it has been driven once the dealer acquired it there might be significant condensation. You know the salespeople are not draining the tank. Using air brakes is a little different than hydraulic brakes. With air brakes, there is a lag between pushing the pedal and brake take-up. This is because the air in the lines takes time to activate the brakes (about .5 second, according to CDL manuals). There is also no direct feedback through the foot pedal; what you feel is the resistance of a spring, not hydraulic modulation. Some trucks have an application air gauge, where you can see how hard you are applying the brakes. This is really only useful for long grade descents, so you can tell if your brakes are fading. It is not real usable for normal stops.
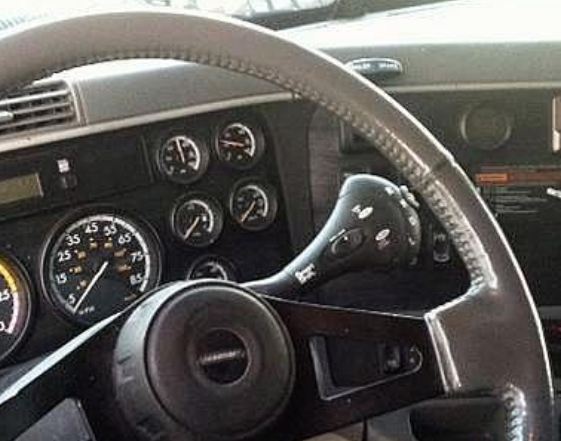
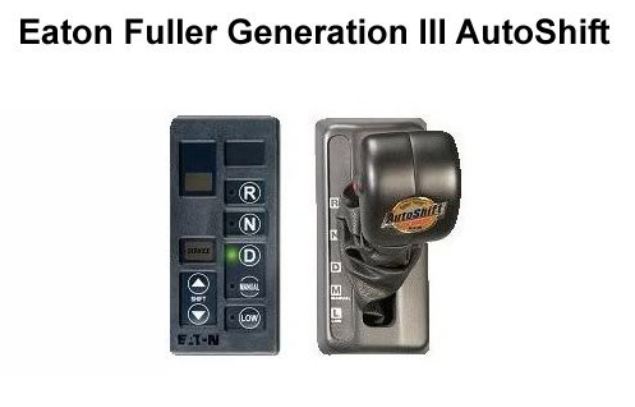
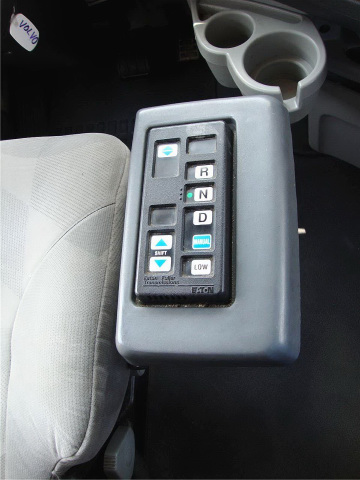
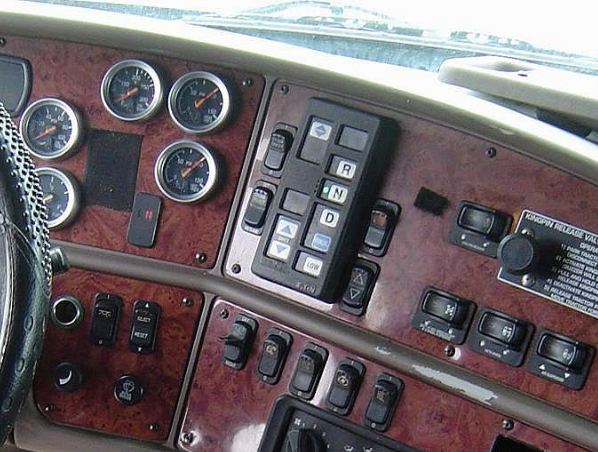
Autoshift/Automated Transmissions We restricted our choices to trucks with an autoshift transmission. At the time, that was the only automated transmission widely available in a class 8 tractor. Starting in 2002 you could also find fully automated transmissions - also called 2-pedal transmissions. These operate much like an autoshift, but eliminate the clutch pedal entirely and give that function over to the computer. They are still not an automatic transmission like in a car - they have no torque converter. They automate the shifting and clutch work that a driver would normally perform with computer controls. Depending on the year and make of truck you may see: Autoshift, Freedomline, Ultrashift or I- Shift transmissions. All but the Autoshift are 2-pedal transmissions with no clutch pedal, and no clutching required. An autoshift is a 3-pedal transmission that requires clutching at start (and stopping if you don't use neutral) - after that it performs all up/down shifts on its own, under computer control. Autoshifts can be 10-speed (the most common) or 18-speed (pretty rare and probably not best for RV use). On all of the automated transmissions you can use some form of "manual mode" to perform the shifting yourself. You use buttons on the transmission stalk or panel, or sometimes (with Freightliners) a form of paddle on the steering wheel or steering column stalk to control the shifting in manual mode - it varies by transmission type, truck make, and year. In all cases with the automated transmissions the computer will not allow you to perform a shift that is "harmful" - even under manual control. This is an advantage in a used truck - you know it has not been abused by the driver. There are two forms of the autoshift commonly available: Generation 1 and Generation 2 (usually abbreviated Gen1 and Gen2 in ads). They both operate in a similar fashion, and both require use of the clutch for starting and stopping. The computer software is different between them, as is the control mechanism. In a generation 1, the transmission electronics are housed in a console that is mounted to the floor next to the drivers seat. The mechanical control lever at the top of the console permits shifting into the automated modes mechanically with the lever, or if in "Hold" you can shift between the gears with an electronic shift, controlled by buttons on the stalk.
There is no inherent advantage to one generation of autoshift over the another. They all operate in a similar fashion. Some may feel that the generation 1 ability to start in 5th gear is an advantage. Others may feel that the touch pad of the Generation 2 mounted on the seat or dash is an advantage. It boils down to personal preference, in my opinion. All autoshift generations are sensitive to dirt and corrosion in the plugs and sensors mounted to the transmissions. If you start having issues with an autoshift then the first thing to do is to pull all the connectors and clean them with electronic cleaner. Ultrashift
Ultrashift came out as a Gen2 in 2004 and moved to generation 3 in 2005. The Ultrashift trans does not "skip shift" by itself in older models. It always goes through all its gears, even under a light load. Newer models (PLUS) WILL skip shift and have additional features such as Hill Holding and Auto Neutral. The Ultrashift console can be mounted seat-side, as shown in the left picture (typical on a Volvo), or mounted onto the dash as shown on a Pete 387. Notice that the console looks identical to the Gen2 Autoshift. Ultrashift video 1; Ultrashift video 2. Freedomline The Freedomline transmission, from ZF-Meritor, first appeared in Peterbuilt 387's in 2001, and in T2000's and Volvo's in 2002. It a 2-pedal transmission with an air actuated clutch with a separate air tank. It is available in a 12-speed and handles up to 1650 lb-ft of torque. It has an aluminum transmission case, so it is lighter than the other automated transmissions. The shift console is typically mounted to the driver's seat and can swing up. The Freedomline will "skip shift" on its own - that is, if it detects a light load it will skip gears when upshifting. ZF-Meritor got into a series of lawsuits with Eaton and no longer sells transmissions in the United States market. If you are looking at a truck with a Freedomline consider that in the future it MAY be the case that knowledgeable service technicians and parts will be less available for a transmission that is no longer imported. Given an equal truck I'd probably not choose the Freedomline. I-Shift
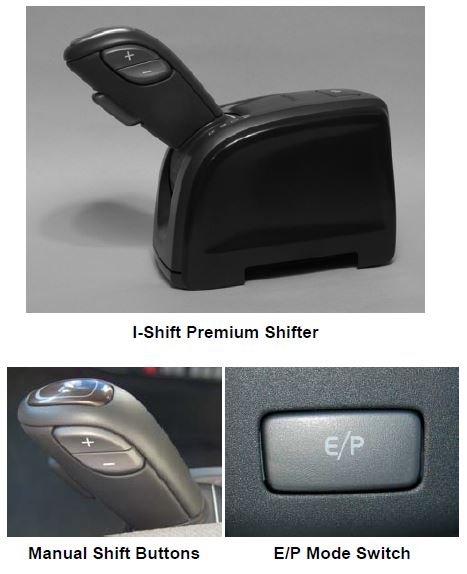
The I-Shift is seat mounted with some additional controls on the steering wheel itself. There are two models of gear selectors - both are foldable for sleeper access. The Basic gear selector allows selection of manual hold for the current gear, but no other gear selection in manual. The Premium gear selector (shown to the left) allows manual mode to fully change gears up and down. It also has the performance and economy modes which the basic selector does not. Volvo has some unique features in this transmission, like eco-roll and a kick-down feature on the pedal. The I-Shift will "skip shift" and has a hill hold feature (optional). Starting in 2014 all Volvo tractors will come standard with an I-Shift. They are that good. A competitive analysis (from Volvo) that compares an I-Shift to the Ultrashift Plus (the newer Ultrashift) can be downloaded here. I Shift video 1; I Shift video 2; (Note: these You Tube links may be broken....I can not control YouTube.)
Detroit DT-12 Automated Transmission This transmission from Daimler AG, the parent company of Daimler Trucks North America and Detroit Inc, is a 12-speed fully automated transmission. It is similar to what has been used in Europe for years and is available in two torque specifications: 2050 and 1650. You can find an article I wrote on it here.
My personal preference in transmissions (2013) is: I-Shift, Ultrashift, Autoshift. At the present time I would not buy a Freedomline, since they are no longer available in the US, and I have other good choices in transmissions. There is nothing really wrong with a Freedomline - but since I have other choices why buy something no longer imported. Most RV haulers have one of the rear tandem axles removed. This process is called “singling”, or “singling-out” the truck. There is no real requirement for a second rear axle in an RV application. The amount of weight carried when hauling an RV is not enough to justify tandem axles. If carrying a car other than a smart, in addition to pulling the 5th wheel, it is probably best to leave the tandems in place. It will give you better weight distribution front-to-rear. In order to determine if singling the truck is appropriate you have to fully understand your cargo carrying requirements. If you intend to carry a lot of weight, or a lot of weight in the forward (drom box) position then singling is probably not a good idea. The reason is that you will likely overload your front axle. Especially if you have a large displacement engine. Before singling you need to weigh the front axle and determine how close you are to the limits. This will help in determining the rear axle position to use. Using the rear (rear) position will result in more weight shift to the front. Using the front (rear) will reduce this, but you will still get weight shift to the front. If you intend to carry any car other than a Smart, then you probably need to remain tandem. Same with other heavy deck cargo in a forward drom box. This is likely to overload the front axle. Another consideration is the type of bed you are adding to the rear. If adding a hauler body (with side compartments) then you may decide to move the fuel tanks to the forward position. This will shift weight to the front axle - some of which will be compensated for by the weight of the hauler body, or by any weight you add to the rear of the body - behind the axle position - to act as a cantilever force. It is all a delicate balancing act (pun intended). If you are just hauling your RV, with maybe a motorcycle or ATV on deck, and the typical tool boxes and "stuff" that people carry, then you are unlikely to overload the front axle if singling to the front (rear) location. This is especially true when pulling the trailer, since the hitch location is likely behind the axle centerline and the trailer pin weight is unloading the front axle. The point is - you need to know and understand your long-term intentions on use of the truck. Otherwise you may find yourself unable to do some of the things you want. You can't just throw things together without risking disappointment later. The axle position chosen to position the
remaining rear axle (forward position, or rear position, or other) is
based on your cargo carrying needs. If you need a large deck – say to
carry two motorcycles – then you will probably consider the rearward
position - "singled long". Otherwise, to maximize maneuvering and
shorten the overall length of the truck, most people choose to move the
rear axle into the front axle position - "singled short". It is unusual
to create a new axle position that is different from the original
locations. It is a somewhat expensive
process to re-drill the frame for a new position, so it is not usually
done. However, with the recent popularity of carrying smart cars
piggyback, many people, including myself, single "mid". This better
balances the appearance of the truck.
Cons of Singling
The proper way to single the truck is to utilize the rear axle. It is
the main drive axle and is designed for constant service. It is either
left in place, or moved forward to replace the most forward of the
tandem axles. A new drive shaft needs to be fabricated, and possibly a
new carrier bearing. Sometimes a truck is singled using the front axle
by just leaving it in place. The rear axle is simply removed. This
requires engaging the power divider at all times, and leaving an exposed
yoke at the rear. This yoke was the termination point for the rear drive
axle. It is designed to be loaded, and running it unloaded can cause
issues - you will most likely have early seal failure as well as other
problems. The front (rear) axle is not designed to be used as the primary drive
axle, it is designed to be engaged in low speed, slippery conditions - not to be run at highway speeds. At the 2006 HDT Rally the service
manager, a group of mechanics and Kenny Doonan (the owner of Doonan
Truck, the Wichita Peterbuilt dealer) all advised against singling the
truck using the front axle. Other sources advise against it as well.
Personally, I would not buy a truck that is singled this way. Other
people have differing opinions, but bear in mind, this is not within the
design parameters of the truck. It does work, however. An excellent
write-up on correcting a "front axle singling job" is on the website of
Mark Shelley - "DIYGuy". His 770 was singled by just dropping the rear
axle. It caused him many problems and a lot of work and expense to
correct. Figure on a minimum of $4000 to fix this - after the fact. Look
here:
Mark
Shelley On a Volvo the process of singling the truck is fairly straightforward. The suspension and axles are totally independent in operation - there is no tie between the two axles. Typically, the rear axle is moved forward into the front axle position. No new holes have to be drilled - the suspension and axle move intact. One major issue with all axle relocations is the driveline angle. The original driveline angles must be maintained, or you will likely have vibration problems, and potentially driveline failure – usually a u-joint. On a Volvo, there are shims on the original front axle that establish the driveline angle. These must be removed from the original front axle, and moved to the rear axle when it is moved forward. They are inserted between two saddles that are attached to the axle with U bolts. In most cases this will establish the proper driveline angle, but it must be measured to ensure it is within specifications. In some situations additional shims must be added. Make sure this is done, or you could have vibration issues or even u-joint failure in severe cases. If your truck has not had this done, and is operating OK (with no vibrations), then I would not worry about it. The most likely outcome will be early u-joint failure, so just keep an eye on things during yearly preventive maintenance inspections. ABS Issues All trucks now come with ABS brakes. There are two brake systems commonly used: Wabco and Bendix. The Bendix three axle ABS can be reprogrammed to ignore the removed axle. This is a simple job – any shop can easily do it. The Wabco system can not be reprogrammed and must be switched out to a 2-axle system (cost is about $650-$700 with aftermarket parts, plus 1-2 hours labor). Make sure your ABS is properly set up for the single rear axle. To identify which system you have, you need to find the ABS controller. It is generally under the cab, near the transmission. Verify that any shop work is done correctly. It has happened that the bulb has been removed from the ABS fault light on the dash to "fix" the ABS. Turn your key on and verify the ABS bulb is still there, and that it does not come on once the truck is running. Here is the method Dan Freedman used on his Volvo 780 with the Wabco ABS. It may or may not work with your truck - these things do change over time.
Singling a Volvo with VEST and other Traction Control Features
Newer Volov's
have
VEST (Volvo Enhanced Stability Control) with a Bendix ABS-6 with added
ESP (Electronic Stability Control) with traction control between the 2
drive axles. All of this is talking to the engine ECM and the I-Shift
transmission ECM. When one removes an axle all heck breaks loose. Answer:
1. The MeritorWabci ECU's can't be reprogrammed. If you have a 6S6M
truck and drop an axle you need to find a used 4S4M ECU. Otherwise the
fault lamp WILL stay on all the time. This is not just an ABS problem but rather more a
stability controller issue. Volvo Lighting Controller The Volvo ECM monitors, among other things, the
current in the tail lights, brake lights and license plate lights. If
you replace all the regular bulbs with led's, the ECM sees this as an
open circuit and kills that circuit. Add three more regular tail light
on each side like we did and it sees to much current and shuts down the
circuit.
Kenworth trucks, with the AG suspension, may prove more difficult to single. Most of the AG suspensions have a running beam that ties the suspension elements together between the front and rear axle sets. In particular, the AG 200 can not be singled. The AG 380 suspension is an exception – they are totally independent. Some people single Kenworth's by completely removing the AG suspension and substituting a “conventional” suspension. The AG 380 suspension is identical to the Peterbuilt Flex-Air suspension. On Pete's the Flex Air suspension and the Low Air Leaf can both be singled, since they have totally independent components. The Low Air has a real long air leaf spring instead of elliptical springs so the forward position of the frame brackets may interfere with toolbox positioning if building a hauler body. Singling considerations:
If you just singled the truck and have vibration problems look first to the driveline angles. You must verify they are to spec. Also, verify that the axle is not shifting at its attachment point. This will happen if the U bolts are not torqued to specifications, and is fairly common. After that, look at the following:
Probably as important as the truck itself is the dealership and
salesman you use. Unless you have a lot of heavy truck experience you
are somewhat at the mercy of the salespeople. Hundreds of trucks have
been bought by posters on the HDT section of the Escapees forum. The
best sales people are in this PDF
file. Check the
Heavy Haulers RV
Resource Guide for additional info.
Central Carolina Trucks will also convert the tractor for you - if they
sell it to you. Many other truck dealers will not. "Trade terms", is industry jargon for what a dealer would expect a trucks condition to be if acquiring it from another dealer. You often see this in advertisements. You can see a definition of trade terms in Trade Terms For Heavy Duty Trucks and Trade Terms for Tractors. The best advice is that you have to make sure the deal is right, and the truck is right. You can not depend on sales people to represent your interests. They need to sell the truck Evaluating a Potential Purchase Prior to purchase you should either inspect the truck yourself, or
have it inspected by a mechanic or inspection company. Try
Truck Remark or
National Truck Protection for inspection companies. You can perform a decent inspection yourself on many of the trucks systems and components. At a minimum you must have a dyno done. This will tell you the blowby numbers, which gives you the most basic condition of the engine. The dyno will also give you the horsepower at the rear wheels. Compare this to the rated hp – it should be 80% of the rated power, more or less. Much less than 80% and I would not buy the truck unless it was priced such that in in-frame could be done and still have a decent price for the truck. Another test that can be done is a coolant compression test. This is done under load and checks for air in the coolant system. There should be none. If there are bubbles in the coolant, it is most likely a bad head gasket. Typical blowby limits are:
Sometimes the dyno will report blowby in psi. Look up the conversion formula from psi to water column on the Internet. Make sure the truck has a current DOT inspection. This will not catch
everything, but at least blatant safety items are covered. A dyno and
DOT are normal pre-purchase events. Walk from any deal that does not
allow them. If there is a VIS Check facility in the area, it is highly
recommended. It will check brake and suspension operation. It catches
things that a DOT can not catch. As an example, new kingpins can be over
$1200 – a VIS will catch this – nothing else will. You will almost
always have to cover the cost of the dyno and VIS. Sometimes you can
negotiate a pass/fail deal with the seller – but not usually. Have the ECM data dumped (printed out). Check the ECM miles against
the odometer miles. They should be close – or there should be a good
explanation. Check the engine serial number against the actual number.
Check the average speed driven. Check if the truck was governed to a
limited speed. Check for any fault codes. You are looking for anomalies,
and things that do not make sense. There should be no charge to dump the
ECM. Check the engine over for leaks and for general external condition – look at the belts and hoses. If you have coolant test strips, check the DCA level and pH of the coolant if it is not extended-use coolant. When having the engine checked it is best to be there when they hook up with the laptop so you can see the inactive fault codes before they clear them. Go through the engine, transmission, ABS, gauges, etc. If the engine is a C12 make sure it has had all the updates done. If it is a Cummins engine start it right after the key is turned on. Don't give the fuel transfer pump a chance to pump all the bubbles out and you'll know if you have air leaking troubles – this will cause rough running. If it is a T2000 or Pete 387 try to test drive it in at least a 15mph crosswind. Do the doors leak air? Does it have the secondary seal? Push on the corners of all the sleeper panels. Are they still bonded? Play with the wipers. Do they park in the right spot every time? Or are they erratic? ($300 part) If it is a T2, does it have the complex reflector headlights? Have them installed if not (huge improvement). Also tell them you want the drivers mirror glass with temperature display (it is a simple install) If it has the AG200 suspension have them check the pins & bushings for play. Check for composite front springs (they are rare but are a KW highway tractor option). Have they been beat up with highway debris? Do they have any deep gouges or feathered areas? How are the sleeper side fairings? Are they bent or beat up? ($600 range each piece). Check the clutch rod heim joints and bell crank for wear. Make sure the clutch pedal has about 1" of free play. Make sure the radiator ground wire is connected and not torn up.
Listen to the fan hub at high idle. Does it rattle and sound rough? How
much friction material is left? Check the sleeper leveling valve rod. Is
it worn out with loose joints? If it has a cab or sleeper mounted
tailpipe listen to it real close during the test drive. Is the drone
acceptable to you? Or are you going to want to rip it off and run it
over 10 times at the first truck stop you see?
Take a look at the batteries if the box is accessible. In almost all
trucks, there are four of them. They should be clean and the terminals
in good condition. Other than that, you won’t be able to tell much.
Make sure the rear tires have the same tread pattern and wear level.
Note if they are virgins, or retreads. Note the tread depth – you want
50%. Note the condition of aluminum wheels. It is not likely they will
be polished, but check them for deep scratches and curb damage. Wheels
can be sanded to get out deep scratches – note for negotiations. The
frame will be rusty in most cases, but note how bad it is. Sometimes it
has been sandblasted and painted. Note the quality of the job – there
should be no flakey rust left. If the hitch is an air slider, the rails
can be used in mounting an RV air hitch on a plate. A regular hitch may
require additional bracing to mount the RV air hitch. Crawl under the truck and look for loose wires, and oil. There will
almost always be some oil and grease. That is normal. Look for leaks
around gaskets. Check for air leaks where you can (make sure the air is
up on the truck). Check the condition of the headlights. If the covers
are “milky” they need replacing, or polishing. Generally, they need
replacing. Check that the headlight high beam switch is operable (the
truck needs to be running, with the park brake off). This often goes on
Volvos. Also verify that the daytime running lights work correctly, and
that the other running lights and turn signals are operable. You would
be surprised what does not work – even with a current DOT. On the inside, turn the key on and make sure all the diagnostic
lights are functional – especially the ABS light. Sometimes bulbs are
removed to mask problems. Once the truck is running all lights should
extinguish. There is no acceptable explanation for a fault light
remaining on – it needs to be fixed. Make sure that the instruments all
work. They should not constantly jump around. Depending on the
instruments you may not be able to verify correct operation – for
example, rear axle temps can only be verified if you drive the truck
some. Check that all switches are functional (to the extent you can
without driving). In particular, verify that heat and air works properly
– don’t forget the sleeper controls. Verify that the instrument lights
work and adjust up/down. Make sure any powered windows and mirrors work
smoothly. The drivers display should work once the truck is running. Go
through every screen and verify the LCD display is not damaged, and note
the status of the screen. If there is a Road Relay (or comparable
display) in the truck, do the same with it. These two displays are very
expensive to replace. Check the radio and CD player for correct
operation. Make sure all the speakers work (on Volvos, sometimes the
ceiling speakers are not connected – this is normal). Verify the wipers
work, that the intermittent feature works, and that the washer works.
Before starting the truck, check the level of the air system. If it has at least 60psi, bleed the three tanks first (you may need pliers). If it has no air in the system, you will have to air it up first. Check for water and oil. A little is within the normal range, but a lot indicates a bad air dryer, a saturated desiccant cartridge, or another air system problem. A truck with a good air dryer will normally have no fluids in the air system. Air system problems can be expensive and aggravating to resolve. Start the truck and air it up. It should build air at a good rate, and fairly evenly in the primary and secondary systems. Perform an air brake test (if you do not know how to do this, consult a CDL manual, or look elsewhere on this website). Shut the truck off with full air (120-130 psi). Verify that the truck holds air – crawl around and check for obvious leaks. Check the air system again after an hour or so. It should not have bled down more than about 5 psi (at the most). If it has, you need to figure out why. If you have a CDL they will let you drive the truck (and you probably
do not need to read this). If you do not have a CDL they may not –
sometimes they will. If you do not know how to drive a manual, or have
never driven an HDT before, now is probably NOT the time to learn. Have
the salesman drive it. If they do not let you drive it, go for a ride
with the salesman. If they will not let the truck be driven, walk away -
FAST. Check the alignment – on a decent road the truck should track true
with your hands off the wheel for 10 seconds or more. There should be no
vibration in the driveline, and the wheel balance should be true. Find a
place without traffic and check the braking. The truck should stop fast
and true from various speeds – sometimes it will pull a little, but it
should not pull a lot. On an autoshift truck, ensure the truck operates
properly in “Hold”. Verify what gear you can start out with in an
autoshift. If the truck is not programmed to start in a higher gear than
“2” you can have that changed (in a Gen 1, up to “5”; in a Gen 2, up to
3). Check the
clutch brake operation – the clutch brake should engage within a half second or
so of fully depressing the clutch (at a stop). Otherwise it may need
adjustment or replacement. Obviously, the truck should accelerate
smoothly without misses or surges. Verify the cruise control works.
Verify the Jake works in all positions. Everything is negotiable. You may not be able to get the price down,
but you may be able to get lots of work done for that price. If you are
buying from a dealer then you can get lots of work done as part of the
deal. If buying from a broker (without repair facilities), you may not
be able to get any work done, but you can negotiate price, based on
needed work. Do not sign the delivery papers or take delivery until ALL
the work is done. You will find it difficult or impossible to get work
done if you "bring it back later". A deposit is normal and expected. Make sure it is
refundable without penalty. Get this in writing. Things to negotiate:
First Things to Do On Your New Truck
So you got your new truck home. If you bought it from a dealer or broker then you likely have no idea what maintenance items have been done to it, and when. The best thing to do, in my opinion, is to perform all the routine maintenance at the beginning, so you know where you stand with the truck. Yes, it is dumping more money into it, but you probably intend to keep the truck for a long time. Skimping here may bite you down the road. Of course, if you can, get the dealer to do some or all of this stuff as part of the purchase price. Some dealers are open to this, and some are not. If the dealer you buy from is going to charge you for this, then I would consider having it done at my local dealer. This will help you establish a relationship with your dealer.
Here is what I would do to any new truck:
This will get you started. Hauling a smart Car On Your Truck Since smart cars have been available in the United States people have been piggybacking them on RV haulers. This section will document our conversion of a truck for smart hauling. Although we currently double tow a Jeep Wrangler for offroad use, the reality is that we only need or use that vehicle out West. The rest of the year a smart would be an ideal second vehicle, and would mean we could stop towing doubles - which I do not like. We have purchased our smart. You can see pictures of it here. You can see a photo album of out Volvo 780 smart deck build here. There are extensive comments on the pictures. Here is a list of parts we used on our smart deck build. |
||||||||||||||||||||||||||||||||||||||||||||||||||||||||||||||||||||||||||||||||||||||||
|
|
|||||||||||||||||||||||||||||||||||||||||||||||||||||||||||||||||||||||||||||||||||||||||